DIY Explanation

pour améliorer, meaning 'to improve', is a humble record of our renovation, home improvement and landscaping projects, with our travel adventures thrown in.

31 March, 2011

Light? What Light?

Generally creating light requires power, and that we certainly do not have that yet.

That hasn't stopped me dreaming about the light fittings for our house though! I already gave you a peek into what I'm thinking for the master bedroom, and I will soon give you a peek into what I'm planning for the bathroom, but in the meantime my mind (which can't seem to stop and think about one project at once but bounces between them all incessantly - wouldn't you love to be in my head?) has moved onto the kitchen light.

After we'd bought our second hand kitchen, the lady also offered me their existing light fitting for $50. At the time, I wasn't thinking of going too fancy for the lighting for the house, so decided to agree, since it's quite a large fitting, and they tend to be pretty expensive to buy brand new.

Here's the picture of that kitchen with the light in place.


Sorry it's blurry, that was the picture in the ad, the only one I've got of it. It's made of wrought iron, with little wrought iron vine leaves in the surrounds. To be honest, it's really not my style, but at the time I figured it worked, and that I'd live with it.

Then while we were finishing the final gates at our last house, Tom accidentally dropped something on it and smashed the glass bowl section that hides the bulbs. Hmm. So, if we're going to use it (and it would be a real shame to waste the $50 we spent on it) we'll need to do something about that, which started my mind ticking. I know! I can use that as the perfect excuse to re-make it into something that pleases me more!

And this is where my mind is heading at the moment...

sourced from Design Crisis


Birdcage Light sourced from Urban Outfitters


This is someone's homemade version:

sourced from A Penny Saved

I'm not a huge fan of how messy the strands of beads become in the home-made version, but then again, I'm totally in love with that first chandelier that's almost a complete mess. Go figure!

Who knows, I'm still not sure... and I might change my mind entirely... but it's definitely fun speculating!

30 March, 2011

Tap Dancing

Yesterday I caught you up on the first part of the process of preparing our third bedroom for its transformation into extra-special bathroom. But wait, there's so SO much more!

Covering the floor in villaboard!


And before we coated all of the walls (and new timber framing) in villaboard, we had to sort out the plumbing and electrical connections that we wanted concealed behind the walls.

It's amazing how long it takes just to decide at exactly what latitude and longitude a light fitting should go at, so multiply that by three for this room, and then add two power points and a light switch, and we've got a reasonably complicated electrical plan. We definitely had to call in the professionals for this part of the process (fortunately we used a different electrician than the one that has helped oh so much with getting our power reconnected, so we were very impressed with the work). Whew!

A light point coming off the previous door post


A power point a little further down.


And then it was time for the plumbing plans. Our biggest problem here was deciding exactly what plumbing fittings we needed where. See the type of fitting you choose to have has an enormous impact on what actual plumbing is required. Meanwhile we'd been thinking we didn't have to make too many hardware decisions yet.

So time to fast-track tap shopping! Originally we were thinking of having a wall-mounted spout and taps above the vanity sink (on top of our fancy schmancy vanity unit), and a fairly standard tap, spout, shower-head arrangement for the bath/shower. But then we hit a snag.

I couldn't find any tap/spouts that I really loved! They were either really modern, or really boring! And I had to make a decision, because the entire plumbing plan relied on me saying whether I wanted an all-in-one spout and mixer, or whether I wanted a separate spout and two taps, etc etc etc.


And then I found this.

And I was in love. But guess what? They usually retail at over $1,000. Ouch.

And then we realised that when we bought our second hand claw foot bath, the seller actually threw in the existing 'telephone' bath tap set. You should have seen our faces. We immediately dashed out of the house and straight to the little junk pile next to the shed where we'd stacked a whole bunch of miscellaneous items that we weren't planning on using again. And it was there!

The poor darling had been sitting out in the elements for months, but here she is:


The ceramic handle is cracked and an unfortunate shade of pink, the pewter faucet bit needs a proper shine, and the hose and shower head are a little dated and also in need of shine, but considering it was F.R.E.E. we're certainly willing to work with it! We even asked a plumbing store and they said we could get a brand new hose and shower head attachment for $170. Not a bad option, although we might see what we can do with this one first.

Allie's pretty pleased with the idea.


Tom is certainly enjoying the whole 'telephone' reference.


He's supposed to be simply gesturing with his hands while on the phone in the bath here, apologies that this isn't obvious. I wasn't the photographer.


He enjoyed that so much he decided to make a real phone call.


Once we'd decided what spout we were using for the bath and shower, Tom could work out the placement of the plumbing. Fortunately, the fact that the spout itself is separate from the taps means we could buy a pre-welded bath plumbing set, which makes things a LOT easier. Tom drilled a few holes in the frame he'd built to fit it through, and it's now nice and snug.


Here's Tom demonstrating how the shower head will actually work (i.e. not as a telephone handset).


The taps that came with the 'telephone' section were not particularly impressive.


And then Tom found these on a trip to Bunnings:


Done! They were $80, which is not exactly cheap cheap, but it appears to be hard to find lever-handled taps (as opposed to the full cross-handled ones like the old ones we already have) at a price under $100. These looked like an excellent option.

For the vanity, we decided that instead of having a spout and taps coming off the wall (which would have required plumbing inside the wall instead of simply from within the vanity), we would have a traditional-looking kind of mixer. Something ike this one, that will go with the traditional look of our bath tap.

sourced from Restoration Online


Here's the trial run of the old telephone bath spout with the new Bunnings taps beside it, above the bath. Looks good, huh?


So we're very very very happy that we've managed to get ourselves a bath and shower set plus taps for a big...fat...zero...dollars that will actually match the look of the claw foot bath and be pretty and not too modern. Hooray!

Much more to come of course! This bathroom is a big project!

29 March, 2011

Breakthrough!

It's all happening over here at the moment!

After our anything-but-fairytale-like electricity situation last week, we made a big decision.

To move into our house anyway, without power. We've run an extension lead across to our very kind neighbour's house (thanks Peter!!), and we spent Sunday moving all of our necessities back in again. And let me tell you, I would happily have cold showers every day of the week and never be able to have the microwave and kettle on at the same time ever again (combined, they trip the single power cable) just to be able to live in my own space again.

So we're feeling much happier now, and are therefore much more patiently awaiting the mystic event that will be our eventual power reconnection.

On that positive note, let me catch you up on our other progress!

Since our existing bathroom is no longer particularly safe (see here - every time we go to the toilet or have a shower we are very relieved that we come out alive), we're fast-tracking the creation of our new bathroom. See here for our house tour that includes the floorplan, and here for our bathroom fitout plan. Aside from actually getting the tiling done (see here for our tile shopping), the biggest step is actually getting the door to the room in the right place. The existing doorway comes off the sleepout.


Whereas our bathroom plan actually has it coming off the dining room.


So before our tiler can start his work, we need to deal with that situation. Sounds fairly straight forward, yes?

But wait. We also need to cover over the VJ boards that the walls are made of, because they're pure timber and timber moves too much with changes in temperature. If we were to stick tiles straight to the timber, we could end up with all sorts of problems. As well as that, the way most of the internal walls are constructed is that there are no wall cavities at all - you see one side of the VJ boards in one room, the other side in the next room. Nothing in between. So, we need to build out a little frame on the top and bottom walls in the above plan to allow room for the plumbing for the bath and vanity to be hidden behind the tiles.

So, with all of that in mind, Tom toddled off to Bunnings and bought some pine framing timber (so much easier to work with than hardwood), and knocked up some wall framing for those two walls.


Here it is up on the West wall (the one to the right of the new doorway).


And here it is on the East wall, where you can see the existing doorway still.


Since we were obviously then at risk of not actually being able to access the room at all if we kept blocking the existing doorway, it was time to cut through the dining room wall to create the new doorway. It's always a nail-biting exercise when circular saws come in contact with walls, but fortunately we got through it without incident, making sure that we measured it to the same dimensions as the existing bathroom door, so we can just relocate it.

Here's Tom marking out where to make his cuts, so the doorway lines up perfectly with the doorway to what will become the laundry (currently the corridor to the existing bathroom)


Now sawing along the top line.


You can just see the outline of the cut


And now hand-sawing the edges that the circular saw couldn't get to.


Moment of truth...


Voila! A new doorway! It was pretty terrifying actually committing to the positioning of the doorway and even just watching the person doing the sawing (let alone actually sawing into the wall) was nerve-wracking, but in retrospect, it was pretty easy! Talk about dramatic changes that don't take long!


And as if we'd planned it that way, the doorway opening almost perfectly lines up with the window in that room!


Then it was time to install all the villaboard to line the walls with, so the tiles could attach to it instead of the timber walls themselves.


Although it sounds easy, and isn't exactly what I'd call difficult, the whole process was incredibly time consuming.

We had to rig up very sophisticated support mechanisms to hold the boards against the walls while the glue dried...


(These are some little pieces of fibro that we used to secure timber beams as firmly as possible against the boards)


We had to measure, cut, re-measure, and re-cut the boards to fit into the smaller gaps perfectly (surprisingly hard)...


And fit them around the existing window...


We also highly recommend investing in a decent glue gun. For about half the sheets (until we saw the light and saved his sanity) Tom had to battle with a gun that would split the cans of glue part way through, pouring glue absolutely everywhere.


I'll leave it there for the moment. There's plenty more to come! This bathroom is a long way off finished, so stay tuned!

25 March, 2011

Once upon a time...

Once upon a time there was a princess and her prince who moved into a cottage (yes, we truly are that gorgeous - you've seen pictures of us, right?).


They decided that they wanted their cottage to be bigger, so began planning to build another storey underneath their cottage where their pet frog could live.

sourced from 123RF

They moved out just before Christmas one year, so that their cottage could be lifted high up into the air. It was not safe for the cottage's light fairy to stay, so she too had to move out until the cottage was safe again.

sourced from artsy time

A month passed, and the cottage was ready for the light fairy to return.


sourced from Flickr

But the queen of light (who ironically wore very dark clothing) kept foiling the light fairy's plans to return. The light fairy tried, and tried, but to no avail.


So the prince and princess waited. And waited. And waited. And kept on living out of suitcases.

And you want to know the real kicker?

There's no living happily ever after. There's no decent conclusion to this story. There's just more waiting and more bad news and more disappointment. Because guess what? The power company have said that this time around (it being the third time we've lodged the form to get the power reconnected), they need to involve the council to come and close off our street in order to reconnect our power (excuse me? why not the other times as well???). So instead of the usual ten-working-day wait, we have to wait extra time for yet another government-run bureaucracy to get their act into gear to come and reconnect the power.

The expecteded date for reconnection then? 8th April. ANOTHER two weeks, and almost FOUR months since the FURIOUS prince and princess had to move out of their house.

AAAAAAAAAAAARRRRRRRRRRGGGGGGHHHHHHHHHHHHHHHHHHHHHHHH!!!!!!!!!!!!

Nuff said.

sourced from Kotaku

24 March, 2011

Our House Tour

Update: see here for our more recent house tour

Welcome to the very very belated tour of our current house!

Here is the view of the house from the street not long after we moved in and started messing with things (although we had already removed some of the trees)


And here it is now after raising the house for the second time. Yes, that's right, it had to be raised twice!


This is the floor plan of the house when we first bought it, as drawn by our building drafter.


All of the little red squiggly lines are things to be removed.

And here is the intended floor plan for the house. We're extending the little kitchen add-on (at the top of the plan) removing most of the wall between the dining room and the kitchen, moving the bathroom into the third bedroom and demolishing the entire existing bathroom extension, moving the laundry upstairs into what is currently the hallway to the bathroom, closing in some of the sleepout to become an office (hopefully with enough room for a little sofa bed so it can moonlight as a third bedroom), stealing some of the space in the second bedroom for a built-in robe for the master bedroom, closing in the useless little entry space to become an ensuite to the master bedroom, removing the back door (and stairs) entirely, and adding french doors to become the main entry to the lounge room (with matching ones to access the new office), and opening up the rest of the sleepout to become a verandah again, the way it would have been when the house was first built.

And those are just the intended changes to the floorplan!


Here was the view of the back of the house at the beginning. That's the horrible existing bathroom extension on the right.


This is a closer view of the back of the kitchen (on the left above):


And later on once we'd progressed with the extension of the kitchen add-on.


When we entered up those back stairs originally, we saw this. It's totally our fault the floor's so muddy though, don't blame the house! That's the dining room in the foreground and the lounge further on.


With a lick of paint it turned into this.


And here's the lounge.


The room where you see that little window to the top left of the above picture is the existing front entry. Our piano started residing in there when we redid the floors. Our eventual plan for this little area is to close off both of the existing doorways and cut a new one in that left wall which adjoins the master bedroom. This will then become a teeny tiny ensuite bathroom.


The front door is to the right of that, opening onto the sleepout.

The sleepout has basically been our storage area since we moved in, so it always looks something like this from that little entryway. Actually usually it's way more crowded.


Eventually we will remove those horrible 70s aluminium windows with plastic-y frosted glass and open it up to become a verandah again, but for now we're very happy to let it serve us as a storeroom.

If we spun around from the little front entry way and faced the back of the house again, this was the view towards the back of the house. Lounge room in the foreground, with Daniel and Tom mucking around in the dining room further on.


This view now looks a little more like this:


I know, with all of that junk in there it really doesn't seem like much of an improvement. But we've got rid of the yukky yellow walls, and the floor looks pretty great. Here's a closer view of the dining room with marginally less junk in the way.


Don't worry, I will be removing those awful pink curtains and replacing them with something that will cover up the yellow glass in those windows as soon as possible. What is it with the people who built this house and the colour yellow?

If we back back into the lounge and turn immediately to our right there are the doorways to the two bedrooms.


The master bedroom on the right started off like this.


Yes, that pesky scaffolding keeps getting in the way, doesn't it? Although it blends in better in the older photos, with the backdrop of the yellow walls.

Not only did we also stain the floor and paint the walls in the bedroom, but we decided to go a bit crazy and paint the ceiling a colour.


Sorry, that photo was before we removed all of the masking around the ceiling and the window.

Now if we move next door to the second bedroom, it's more of the same. We've staind the floor, painted the walls, and sanded back and painted the shockingly awful ceiling in there as well (yes, those white flecks all over the floor are off the ceiling):


And now it looks like this:


If we now turn around again and walk across the lounge, we will enter a part of the sleepout (which currently runs in an L-shape around the front corner of the house) that will eventually become the home office. It's currently maintaining its storage room status, and usually looks like this:


The door you see on the left there is the door back to the lounge room that we just virtually walked through. If you then turned to the right, where I was standing to take the above photo, you would enter the door to the third bedroom. Which used to look like this:


This poor room has seen a fair bit of action so far. First we ripped up some of the floorboards in there to use in the kitchen, then it became my sorting room, and then the storeroom, and we're now just getting to the point where we start changing the floorplan by blocking up the current door to the room from the sleepout and cutting a new one in the dining room wall to access it directly from the main living area. This room will soon become our new fancy bathroom. Watch this space, a lot is happening right now!

Oh and for anyone with an eye for detail, the floorplan from the building designer above shows us moving the wall between the home office and the bathroom to make the home office bigger. That is not going to happen. Way too much work for way too little gain in our opinion, given that there's a perfectly good wall already there. A smaller office never hurt anyone... did it?

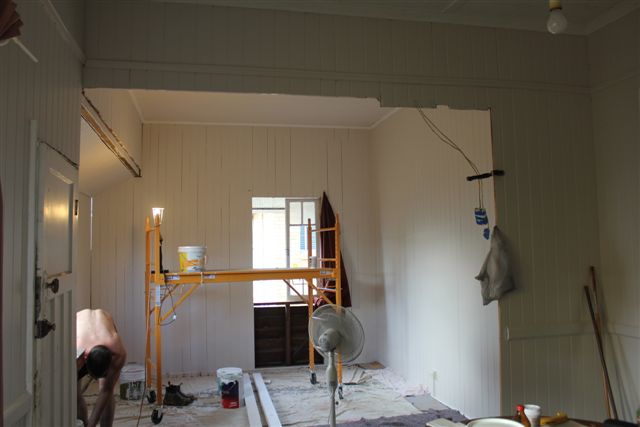
Anyway, back to the tour! If we then retrace our steps back into the lounge room and into the dining room, we have the kitchen on our right. This is how it started.


That doesn't even show the worst of it. The doorway to the kitchen was just like the others in the house, with a wall separating it from the dining room. Then there was a small barely-big-enough-for-a-human gap immediately inside that wall, and then this benchtop island started. It was fairly clear that these cabinets were not actually designed for this kitchen, so it made for a rather strange floorplan. A wall oven was positioned over to the right next to the sink. It was very attractive.


We started destroying this room with a vengeance quite early on, removed most of the wall between the kitchen and the dining room, extended the old stove nook to give the room a bit more floor space (discovering, and having to remove a furry friend in the process), and of course, staining the floor and painting. Now the kitchen looks like this.


A big difference? Definitely. In any way resembling a kitchen? Nope. We'll get there eventually.

So now if we turn around again and look across the dining room, we will see the little corridor that currently leads to our crummy bathroom and toilet.


That door on the right is the linen closet. And the door refuses to close at all unless encouraged properly with very sophisticated door-closing mechanisms.


Yes, that's a rubber band.

This little hallway (including the linen closet) is the last little bit of the house that we haven't seen yet that remains under the existing roofline. We plan to turn it into a little laundry.

Currently, if you turn right at the window and walk forwards, you not only risk life and limb, but you get a lovely view of the toilet.


And to the right of it is the horrible horrible horrible bathroom.


I attempted to brighten it up with an $8 shower curtain from Crazy Clarks when we first moved in. It helped, but not much. And yes, that's mould on the wall and around the top of the tub. Lovely.


So there you have it! Our current house, warts and all. It's definitely a work in progress (to say the least), and we've got a lot of effort ahead of us, but we're getting there step by step, and boy is it making a big difference! Just you wait till you see our new bathroom!
Related Posts Plugin for WordPress, Blogger...