Warning... this post contains more rug-related dithering on my part. But does it have a happy ending? Wait and see!
Guess what people? I recently claimed that "Australia Has No Rugs", when I undertook a
search for a rug for my office. Well, shame on me, because as it turns out, Australia does actually have a few rugs! It takes a bit of searching to find them though, and they're not necessarily affordable.
What prompted my search? This. The only other room in the house that has a rug in it, the lounge room.
We've had that red rug since we first moved in to our last house. We got it for a discounted price of $200 from the place that we bought our house's shutters from, because one was slightly damaged. It took up considerably less visual space in the last house.
I've been wanting to replace it for a while though, for three main reasons:
- I'm moving on from my red obsession a little, and it's kind of hard to move on from red when the floor is covered in it.
- Now that Allie is an inside dog, we have dog hair issues. And the red rug is not only hard to vacuum, but if I don't vacuum twice daily it always looks covered in dog hair.
- It's not big enough for the room. As you can see from this shot of the room in an earlier (slightly cluttered) incarnation, it extends past the couches, but leaves quite a large chunk of space on the other side, about 2.5 metres. I tried to make that look deliberate with those little black spindly chairs, but to pull the room together properly, it needed to extend further towards that far wall.
So, I began searching, and came up with the following options:
RUG OPTION #1
Tom and I were at a shopping centre together recently (which doesn't happen very often!) and decided to pop in to Carpet Call to see if they had any rugs that interested us. None of the patterned rugs thrilled me, so we were just about to leave when I spotted this rug at the bottom of a pile. Tom made a superhuman effort and lifted up the corner of all of the other rugs on top of it so that I could get a good look at it (and a photo). It's a pure wool knotted rug, and the ticket price of about $1,400 almost made us faint. The sales girl said they could give us 20% off, but that still meant a price tag of over $1,100, which was still nowhere near our comfort zone. So we left our phone number in case they could scrape some more dollars off it, and left without feeling too much regret.
Later that week, I received a phone call from their "Rug Manager" (got to love that title) offering us the rug for $910. Coming under the grand certainly made it a bit more attractive for us, but I was still pretty uneasy about it. Spending $1,000 on a rug wasn't really in the month's budget, particularly not with all of those
concrete slabs and
benchtops we've been buying!
So, in typical fashion when struck with indecision, I made a list of pros and cons:
- It’s pretty expensive still
- It looks expensive though, which is a good thing
- It would disguise Allie hair extremely well, I think.
Definitely better than our current rug does!
- I don’t know how easy it would be to vacuum Allie hair off
it, since it’s not a perfectly flat surface
- It doesn’t have a pretty pattern, which is what I was really
hoping for.
- But it does have a nice texture, which is almost as good as
a pattern in some ways.
- Because it’s a nice neutral colour it’s not likely to be
something we get sick of too quickly
But I was still undecided. So I hit the web to research what alternatives I could find. And I found quite
a few websites that I never knew about before. The longer I searched, the more confused I got, though. I began to wonder if I would ever feel capable of making a decision. Does this feel like
office rug deja vu?
This brings me to…
RUG OPTION #2
The West Elm Andalusia Rug. West Elm is the same company
that I bought my
office rug from, so I’m confident that they can post to
Australia, which is definitely a good thing. Including the shipping (which was half price at the time), this rug would cost us $620.60.
Definitely cheaper, but still definitely not a small expense! So I got my list on again:
- It’s still not cheap, but cheaper than the CarpetCall one.
- It’s the kind of pattern that I’ve been loving for a while.
- It’s neutral and not particularly stand-out-ish, which will
make it easier to decorate around in the future.
- It’s a flatweave rug, meaning it won’t have the cushy-ness
that our current rug has. It will be more like the office rug
- It’s probably a more forgiving colour for dirt and stains
than the CarpetCall one, given that it’s mostly grey, not white. But it might
show up Allie’s hair more.
I kept searching.
RUG OPTION #3
It isn’t actually possible to get this one in Australia.
It’s the ‘Cream Smoke Shag Rug’, available on
Overstock.com. That pattern (not so much the
colours) really appealed to me when I first saw them. Since I couldn't get it shipped internationally to me, I came up with two ideas for me to create a look similar to the pattern on this rug:
Or... cut up and reassemble other rugs to create a pattern –
like Mandi from
Vintage Revivals did.
The biggest motivator for either of these DIY options is cost. I could go for a fairly
daring pattern, theoretically without having to worry about it being horribly
expensive. If we didn’t want to keep using that rug in the future, we wouldn’t
feel so bad about having thrown money down the drain, because it would be
cheaper. Theoretically.
And then this happened.
RUG OPTION #4
I stumbled across an amazing (AUSTRALIAN!!!) website where
they custom-make rugs, and ship them for free, called
Rug Couture! In a whole range of different
and cool geometric patterns, and all colours of the rainbow! It’s exactly what
I was looking for.
Except for one tiny consideration.
They’re not that cheap. I found a couple of patterns
there that I like, including the one above.
For the 200cm x 300cm size (which is what I’ve been looking at for all of the
other rugs), it would cost $1,815.60. For the 170x240 size it’s $1,234.61. Not
cheap.
I think if we were planning on living in this house long term and I
was really confident in the design of the rug it wouldn’t be such a problem to
invest in something unique and expensive, but I don’t think we’re at that stage
in our lives right now.
So bring on the next!
RUG OPTION #5
I found another Australian website that I also didn’t know existed
called
Zanui.com.au. I didn't like most of their rugs, as usual. But
then I saw this one. Does it remind anyone else of the “Cream Smoke Shag Rug” that I liked the pattern
of above? With the pattern just oriented sideways instead?
The colours are good, and the price was the best yet (aside from the potential DIY options) at $588.70, with free shipping.
When I first saw it, I thought
“THIS IS THE ONE! I FINALLY FOUND IT!” But then I immediately started wondering if it’s
a bit too much? Will it be really intense and overpowering in our little lounge
room? Would we be more sensible to go for something with a smaller pattern
(like the West Elm option) that doesn’t make quite as much of a statement?
Particularly since I want to one day put a rug under the dining table as well, so we don't want too much pattern competing in the adjoining spaces.
And then, because I’m crazy and was beginning to overthink this way too
much, I decided to photoshop the rug into an old photo of our lounge room to
see what it would look like. By the way, I don't intend for our couches to be brown forever, so please ignore the clash-iness of the brown couche with the grey rug.
Tom loved it. I was worried about it.
And then, something else happend!
First, I stumbled across this photo on
Houzz, and fell in love with the colour scheme.
And then, almost at exactly the same time, I stumbled across this photo (on
Houzz as well), and the proverbial light bulb came on above my head.
I realised two things:
- I really liked the royal blue, black, grey, zebra colour
combination. I’ve never been an animal print fan, but this photo makes it look
classy.
- Layering rugs is totally an option! Of course I’ve seen it before, but that second photo
really made me stop and think. You don’t have to have just one rug, you can
have two, one on top of the other! And that seemed to me like the perfect
solution, because we need quite a large area covered to make the room look
good, but having a strongly patterned rug (like the Zanui one) over that big area would be quite overwhelming. So, an idea was born. We could do a very plain, hopefully cheap big rug for most of the area,
with only a very small little coloured/patterned rug directly in between the
two couches.
Of course, I then wasted no time going Internet trawling. And I found the
following two rugs (plus a whole bunch of others, but these ones were the
cheapest):
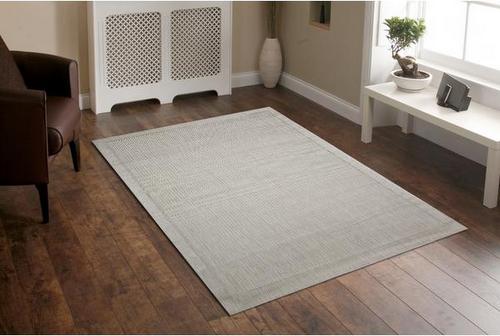
It's a Silver Sisal Rug from
Deals Direct, for just $169.95 with free
shipping (which I can't find a link to anymore in the correct size - maybe it's not available right now)!
And this one...
... is a blue shaggy rug from
Solace Zone, for a total of $92 (incl.
shipping).
That makes for a total of $262, which is a fraction of what
the other rug options were going to cost us. The more I thought about it, the
more sold I was. And the biggest advantage is that if we ever get sick of the
blue rug, we only have to spend about $100 to get a complete change in colour scheme or style, rather
than having to get a massive rug and spend a fortune.
So, I made an executive
decision to buy the two (before even getting Tom's ok - oops), and they arrived very quickly! Now, our lounge room looks like this!
I love it!
The colours of the two rugs work well together.
And the lighter coloured rug really makes the room feel brighter. It's amazing how dark the red rug made the room. The pop of blue is small enough to not have as much impact.
Here's the view looking in the other direction (apologies about the vacuum cleaner and other junk that I neglected to move out of the shot). I placed two chairs on either end of the big rug to show what I'm thinking of for furniture placement to add a bit of extra seating and fill up the empty space at that end of the room. Better, yes?
Hopefully all the folds marks in the rug come out eventually, or I might have to consider ironing it!