DIY Explanation

pour améliorer, meaning 'to improve', is a humble record of our renovation, home improvement and landscaping projects, with our travel adventures thrown in.

23 December, 2011

Barbie Lives On!


I've been featured!

Cassity over at Remodelaholic has just featured my Black Beauty (with a side of Barbie) vanity transformation on her blog!

Click here to pop over there and see her (that is Black Beauty's / Barbie's) journey. Terence the Tap also makes an appearance.

Alright, I'm officially crazy with all those nicknames. But I'm excited, alright?!

Enjoy!

22 December, 2011

Dining Table or Desk?


As I mentioned here, I will soon be moving to working mainly from a home office. One minor problem with that plan is that it requires an actual home office. We're getting there with some built-in shelving (see here), but what else does an office absolutely need?

A desk, of course!

Originally when I was drooling over pictures of desks online, I was super keen on ones with sexy legs like this.

Sourced here

And then somewhere in the World Wide Web, I came across a photo of a dining table chopped in half and mounted on a wall as a desk and fell in love with that concept! Of course I can't find that photo for the life of me now!

But I have found a couple of pictures of cute little side tables chopped in half...

Sourced here
They're basically exactly what I had in mind for a larger table.

Sourced here

So I went searching for a cheap dining table on Gumtree, and found this guy! Unfortunately I've had a bit of a photo-disappearing-from-hard-drive issue recently, so I've only got a couple of precious photos of him in his original state in our not-yet-reorganised shed (see here for its post-organised beauty).


We actually bought him with six chairs for the grand price of $50, and amazingly, managed to sell the chairs on Ebay for $122. So this desk officially cost us negative $72!


We marked him up, and Tom sawed him in half in preparation for his new life as my desk.


In order to make his boring square legs look a little bit more like the fancier legs that I was lusting after at first, these guys came into play. We actually got them (and two others) for free from the lady we originally bought our dining table from (see here). She'd thrown away the tabletop that went with them, and wanted to get rid of these, so we very willingly took them off her hands.


So... to make the leg switch, we simply unscrewed the existing legs on the table...


And then screwed in the new guys!


They were a little slimmer at the top (although they're upside down so it's actually the bottom in these photos) than the original guys, so the join wasn't perfect, but I wasn't complaining.


Ignoring the horribly mismatched colours, I thought it was an instant improvement!


Then it was time to deal with the cut edge of the table, to make it easier to attach it to the wall. First we had to chop off the back end of the supports underneath the table, to make room for a board along the back.


And then we just attached a scrap piece of pine that was already very nearly the right length along the back, underneath the tabletop!


So there he is, nice and flush along the back!


And nice and strong and secure (although still pretty ugly) from the front!


To solve that mismatching problem, I attacked it with a sander.


At first I was a bit terrified of scratching the timber by using a rougher sandpaper, but let me tell you, it is SO much easier to sand off the glossy finish with a rough sandpaper (40 or 60 grit) and then follow it with a finer one (i.e. 180 grit) than it is to do it all with the finer grit! I was careful not to apply too much pressure with the rougher grit sandpaper so I didn't scratch the surface, and it didn't do any damage at all.


I even attacked the legs with the sandpaper...


But because it was hard to get around all of the grooves without risking sanding off the nice curves, I decided to bring in the ESP that I used to prepare our dining chairs for painting (see here) just to make sure that when I painted them, the paint would stick nicely.


We balanced Mr Table very precariously on an old work table and upturned bucket under the house, to get him up off the ground for easy painting.


I undercoated, and then we decided to paint it with two coats of oil-based white semi-gloss paint. We figured since it will definitely get a few bumps and knocks throughout its new life, it would be sensible to use oil-based paint for a bit of extra durability.


It certainly made the painting process take a while! I had to wait at least 16 hours between coats, and then we left it alone for a full week so the paint could cure nicely.

And then finally.... FINALLY... we could install him!


Although we realised we hadn't actually attached that skirting board to the wall yet, so we gave the screwdriver a warmup with that first.
 

And then I followed with some 'no more gaps' along the top to make it look seamless and beautiful.


So then... finally we got to install Mr Table!


We of course re-encountered the fact that nothing in this house is straight or level, so we had to do a bit of adjusting to get the table top level.


Then it was a simple matter of screwing the back board we had added into the wall...


And he was in! My wall-mounted dining-table-turned desk with new sexy legs is in!


Isn't he pretty?


Of course we've still got a lot to do in there. Adding some artwork to that wall, finishing building and painting the shelves, installing a few filing cabinets, curtains, etc etc etc, but as long as I've got a desk I've effectively now got an office, right?


HookingupwithHoH


Somewhat Simple


Passionately Artistic


With A Shot Of Brandy


Beyond The Picket Fence


The Shabby Nest

Chic on a Shoestring Decorating

16 December, 2011

It's All About the Brackets

In typical style, we're all over the place at the moment. One minute we're trying to finish the railings on our front stairs, the next minute we're digging up sewerage.

Now we're moving back to our home office!

Since we 
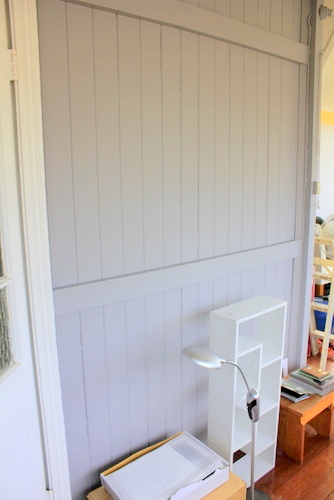
painted it grey a few months ago, not much has happened in there. The pressure's on now though, since the company I work for is selling its office premises and going to a remote work model, meaning I will very soon be working from home and in need of an effective home office!

Lately, it's served as a general dumping ground for general junk.


I'm working on a proper desk for that wall (more to come on that very soon), but something else I'm going to need is shelving. And lots of it!

So we earmarked the wall to the right of where I stood to take the above photo as my shelving wall.


Because of the way houses like ours are designed, those vertical timber boards you see in the photo above are the wall (duh!). What I mean is, there isn't any wall cavity behind them. They're it. One side of those boards is in the office, the other side is in the lounge. Nothing in between! So we don't really want to put those poor boards under too much more pressure by mounting shelves straight onto those boards (not to mention the fact that screwing in shelves from the other side of the wall wouldn't look very good in the lounge room wall.

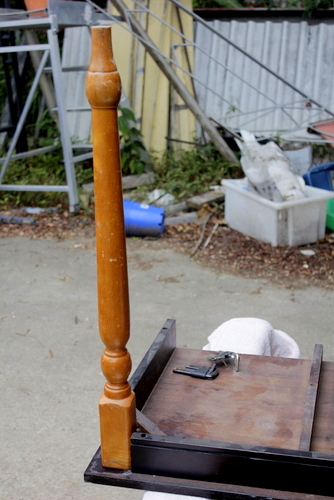
So, we devised a plan to get some nice solid timber posts to attach to the existing timber posts on either end of the wall (on the left it's the door frame, on the right it will become part of the wall that will eventually separate the office from the verandah). We're going to add a third in the centre as well, secured to the floor at the bottom and the ceiling at the top.

You can see the bare timber post on the left here, when we were trialing its position.


But in the meantime, we needed to figure out a few things. Most importantly, how to support the shelves themselves from the timber posts. And the answer? Brackets, of course!

You may remember that we had a surprising amount of trouble getting nice timber brackets for our kitchen shelves (see here), since Bunnings' only brackets had been discontinued, so we knew we couldn't search there for more.


I did some Internet trawling, and am disappointed to say that timber shelf brackets appear to be incredibly rare! Who knew?!

I found a couple of options on Ikea's website...

Sourced here
 
Sourced here

But they're $10 each, which is double what the Bunnings ones originally cost us! Since we need eighteen for our shelves, that's no small investment!

We briefly thought about this kind of bracket used for decorating the top corners of verandahs.
Sourced here

But they're even more expensive, and not particularly structurally strong!

So I went back to the drawing board. And it occurred to me that it might be within our (i.e. Tom's) skill set to make our own curvy brackets modelled off the kitchen ones!

Tom didn't disappoint me, and was willing to give it a shot, so we bought ourselves a 3-metre-long hardwood timber sleeper (the kind used for outdoor retaining walls), and set about drawing up a design for our brackets.


We started off fairly simply, using the kitchen brackets as a template...


But that didn't quite look right, so we eventually settled for a design that involved drawing around the curvy ends at top and bottom...


And then we used the curve on the kitchen bracket to connect the two.


And we ended up with a template that looked something like this, with two opposing brackets contained in a rectangular section, so we could maximise the value we got out of our sleeper.


At first we thought a jig-saw would be able to perform this job for us, but the trusty tool shop man at Bunnings said a jig-saw had no chance of cutting its way nicely through a hardwood sleeper. So we bought ourselves a reticulating saw for $80 (plus a fancy blade for another $10).


Tom enjoyed it a little too much, I think.


He clamped each little sleeper rectangle to the back of his ute with a clamp to keep it still, and put the saw to work.


Allie slept through most of the noise...


Although she did bother to get up at one point in order to go and stand almost directly underneath where Tom was working. And it wasn't quiet! She clearly has no respect for her own hearing!


By the time he was up to bracket number eight, Tom had the technique down to a fine art!


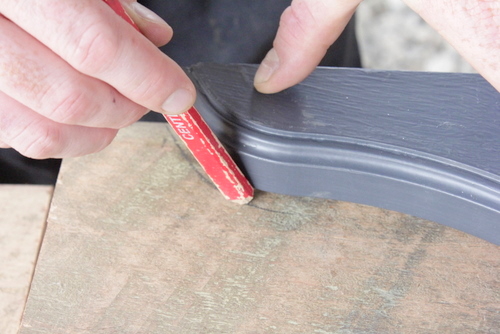
I took responsibility for sanding back each bracket to smooth out the rough cuts.


And at long last, we had ourselves a nice pile of nearly-identical brackets. We figure they won't be sitting right next to each other, so the unavoidable variation between them won't be too noticeable. Hopefully!


They're not going to win any awards for beauty, but they're extremely solid, and should do the job admirably!


And let's not forget that they cost a fraction of the other options I found! The original 3-metre sleeper only cost us $24, and obviously we get to keep the $80 reticulating saw that we bought, so we're still going to get more use out of it. The $10 blade is basically a write-off, so let's say the materials cost us $34 total. That averages out to only $1.89 per bracket! Not bad! Even factoring in the $80 cost of the saw they were still $66 cheaper than the Ikea options would have been!

Allie rewarded us for our ingenuity with Hi-Fives all round!


So now I'm one step closer to having a home office! The next step will be to cut notches out of the vertical posts so that we can slot the brackets into the post a bit for added strength, rather than simply suspending them off the front of the posts.
Related Posts Plugin for WordPress, Blogger...