|
| Sourced from here |
The really important jobs...
Make Allie’s fence more effective- this has been an ongoing job. We built one fence the day before we left for our Europe trip (see here), and attempted to close off the rest of the yard with very attractive dog-wire, old doors, and any lots of bricks (see here). It didn't work, I'm sorry to report. We then built a proper timber front fence (see here). Unfortunately it wasn't totally Allie-proof. Here she is peeking under it.

So now we've jammed that gap up with a bunch of timber sleepers, and redirected some of the dog mesh so that the front yard is entirely enclosed. It's been a week, and she hasn't escaped yet! Fingers crossed we've finally managed to solve this problem!

Install towel rails, toilet roll holder, shower curtain rail (so we can actually hang our shower curtains and be able to shower) in the bathroomConnect washing machine (at least temporarily) for use- Repair leaking roof - still not done, although we've positioned a large bucket inside the roof to catch the drips. Not ideal.
Sell dining chairs as a set (although we've loved our rolled back dining chairs to bits since buying them for our last house, they are a little bit chunky for our dining room now)- that got us a tidy $500. We've now replaced them (at least for now) with some cane chairs that I bought for $30 and spray-painted white.

- Get gas connected to kitchen stove - still not done! (yes, we're still using the old faithful electric frying pan that I referred to here for all stovetop cooking - I'm so used to it now it doesn't bother me at all!)
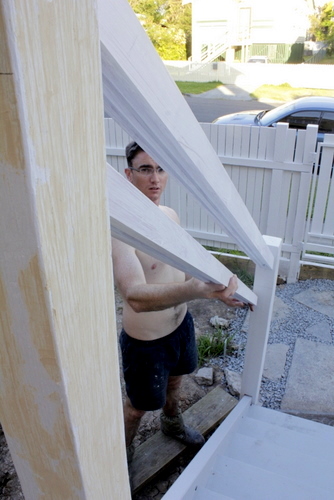
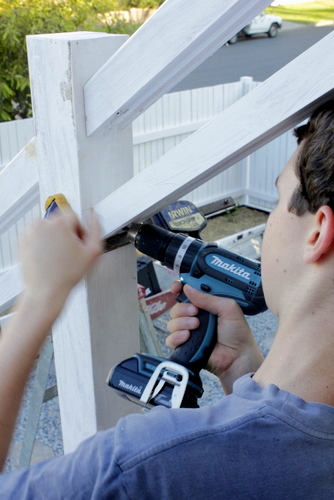
Install shelves in kitchen beneath upper cabinets- Done (see here), but perhaps not completely done yet, now that we've sold the hutch (see here), since that has opened up a nice large section of wall space that I think could use some more shelves.Build front staircase- Done!! Although not completely so, since we still need to finish building the railings. But at least now we have a safe way to get into the house, and no longer have to climb the old staircase that we literally tied to the back door (see here).

- Dig
new sewer hookup,
re-route plumbing for bathroom and kitchen (and get rid of the crazy suspended-in-mid-air right-angled sewerage pipe scenario we've had for months)- Done...sort of... yes, we've re-done the plumbing (see here), but whenever we run the washing machine and large quantities of water flow through the pipe, we seem to have leakage issues, which is just a little bit worrying! Looks like more digging is in order. Demolish old bathroom- Done! The boys enjoyed the destruction immensely. See here for the blow-by-blow, and to watch its final descent.

Fill in old bathroom doorway to close in laundry, remove linen closet,plumb laundry, tile laundry floor, paint laundry cabinet, get laundry tub and tap, tile splashback, install washing machine - we haven't really progressed much with these jobs. The laundry currently looks like this. Still a way to go there!

Arty jobs...
Create gallery walls in lounge above lounges.Done! I love them! See the finished product here, and the process of creating them here.

- Frame Venetian mask (yes, I bought a mask in Venice) - not done yet.
- Make artwork (starburst mirror??) from European coins collected - not done yet either, although I'm now thinking of making something like this with them - probably just a single letter though, not a word.

- Create a map of Europe to mark our journey on (cross stitch it?) - not done.
Frame Last House plans- we hand-drew this little rough sketch of the landscaping plan for our last house, and it's now proudly displayed on one of our gallery walls!

Frame necklaces from Europe- one of them has made it onto a gallery wall

Paint existing frames- done for the gallery walls.Select and print photos to display- also doneHang wedding photos- one made it to the gallery wall- Photoshop and print wedding album (yes, that's right, we've been married for 3.5 years and still don't have a wedding album) - not done yet!
- Hang art in laundry - as you saw above, the laundry is definitely not at artwork stage yet!
Giant jobs that are so large we can’t even comprehend them right now
- Replace gutters - Nope...
- Replace roof - Nope...
- Paint outside of house - and Nope again.

- Build awnings for kitchen windows and dining room windows, possibly also laundry, bathroom and office windows - Not Done
- Build little deck on Western end, reduce size of back doorway, get spiral staircase? - Not Done
- Remove windows and external walls from verandah, build balcony - Not Done
- Remove and repair/replace lounge and dining room ceilings - Not Done
- Reupholster couches in lounge - Not Done

- Don’t even get me started on downstairs and the landscaping! Although I have made some progress with a little bit of landscaping in the front yard. It's not the pretties, but it's better than piles of dirt!

- Install new windows in kitchen - Not Done. And I'm actually thinking of moving the window that we installed along the West wall of the kitchen (see here), into the spot where the hutch used to live, so this job is now bigger than it used to be.
- Cut out wall between master and second bedrooms, build frame, install wardrobes, re-make doors with mirrors and wood trim, install rail and ladder for accessing high cupboards - Not even close to being done!
- Build in ensuite walls, cut door to master bedroom, install new door frame, tile floor and walls, plumb shower, toilet and vanity, either buy new vanity or new base only. Get cupboard to build into ensuite, paint it - Not even close
- Install shower fittings, curtain rail, fan, towel rails and toilet roll holder, toilet, mirror, shower curtain in ensuite - Nope.
All the rest...
Install window blind in bathroom- Done! See here

- Install shelves in laundry, hang art, install window covering, hanging rail, ironing board storage and vacuum cleaner storage - Not even close
- Investigate buying a new washer and dryer (red ones?? Do they even sell those in Australia?) - still not there
 |
| Sourced from ABT |
- Paint laundry walls and ceiling, ensuite walls and ceiling (after applying villaboard to walls) - Nope
- Set up hot water system in permanent position - Nope
- Paint kitchen cabinets (incl. hutch) - Nope. We had a paint fail with the first colour we chose for the kitchen cabinets (see here), so we're taking our time with that decision again.
- Build/modify cabinet for kitchen sink corner, buy sink, create bins, build foundation for kitchen peninsula cupboards, build shelves to fill gaps in kitchen (either side of stove, dishwasher, etc), get kitchen sink window flush, fill in TV nook, fill in nail holes on West ceiling, fix roof to kitchen extension, fix VJs to wall in existing window space, cut and install second single Window on North kitchen wall - we haven't progressed much with these jobs, although what we're doing with the sink corner is much more certain now that we've removed the hutch.
- Research and buy kitchen benchtop - Nope.
- Install lights in kitchen, bedrooms, bathroom, laundry, ensuite, home office, verandah (incl. corresponding light switches) - Nope.
- Install extra power points in bedrooms, lounge, dining, kitchen, laundry, home office and verandah - we've installed some in the kitchen, which was essential since we were running the entire kitchen off an extension lead plugged in at our bedroom. The rest? Still coming.
- Plant passion fruit vine along North fence - Nope. The cuttings I took from our passionfruit vine at our last house (see here) died. Oops!
- Make a herb garden inside the old bath tub - Done!

- Create effective spice storage in kitchen - we got as far as installing a pantry cupboard in the kitchen, but I'm yet to organise it properly.
- Repair watermarks on master bed ceiling - Nope, not done yet.
- Get
coffee tables,bedroom end-of-bed bench, lamps - I found a couple of little $10 tables that are serving the purpose of coffee tables in the lounge room.

Get mirror for above piano (or re-purpose bathroom mirror and get a better mirror for bathroom)- Done!

- Furnish verandah, install curtains, put plants in and even rugs and cushions - Not done.
- Install security gate for verandah - Nope.
- Buy/build desk and storage units for home office - Nope.
- Create chandelier for kitchen, and make little pendant lights out of bowls/colanders?? for kitchen - Nope.
- Create drum (literally) light for dining room, transform drum (not literally) shade for lounge, find chandelier-like lights for both - Nope.
- Transform $10 chandelier for bathroom? Or laundry? Get chandelier for ensuite - Nope.
- Install trim in bathroom - Nope.
- Maybe get glass for top of vanity cabinet? - Still thinking about this one.
- Sand drawers and
inside of bathroom cabinetfor smooth running,organise bathroom cabinet (paint inside?)- The drawers still need a bit of attention, but I'm definitely loving my barbie pink bathroom cabinet!

- Get little shelf and toiletry caddies for bath - Nope.
- Paint trim in master bedroom, second bedroom, lounge, dining, laundry, bathroom, kitchen - Nope.
- Replace mis-matched or coloured panes of glass in windows - Nope.
- Install rangehood in kitchen - Nope.
- Trim headboard and footboard off master bed, extend legs, extend width, move into window seat nook, make bed skirt, install storage drawers underneath - Not done yet!
- Paint and re-trim chests of drawers in bedroom - Nope.
- Paint stools in bedroom and kitchen - Nope.
- Install wardrobe in second bedroom, build in and paint and trim - Nope.
- Make curtains for dining room, lounge, master bedroom - Nope.
- Build in home office walls, install windows, paint, install French doors in office and lounge - Nope.
- Add shelves to and paint bookcase in lounge - Nope.
Get TV stand (and more bookshelves) for lounge- Yes, got them, although still need to install them properly, once we build in the wall behind them.

- Get slipper chairs for lounge - still need to do this. I'm not liking the look of those spindly little cane chairs I painted black.
- Buy new dining chairs - still want to do this eventually, although our white cane chairs are doing the job well.
- Get rugs for master bed, lounge, dining, home office and kitchen - Not done.
- Paint floor of office? - Not done.
- Store unnecessary items safely (and airlocked) in ceiling (if we can’t sell them!) - Still getting there!
- Make window boxes for kitchen, dining room, bedroom, plant herbs - Not done!
- Repair hills hoist, install retractable washing line on verandah - Not done! Bought the washing line months ago, and still have to install it!
- Make manhole more attractive - Not done!
- Paint entry table and Indian cupboard - Not done!
- Organise kitchen drawers, laundry storage, bedroom under-bed storage, bookcases for lounge - Still getting there. Half our belongings are still in boxes in my mother's garage, so we've still got a long way to go.
Well, I think we've done well with the urgent jobs, but there's still an enormous list to tackle! Oh well. Rome wasn't built in a day, and neither is our little house, by the looks of it!