DIY Explanation

pour améliorer, meaning 'to improve', is a humble record of our renovation, home improvement and landscaping projects, with our travel adventures thrown in.

28 February, 2011

By the side of the road

Since I'm on the topic of furniture, I thought I would finally share what I found by the side of the road a week or so ago, that I hinted at here. It really isn't worth the leadup, but I'm pretty happy with the $0 price tag!

While Tom and Daniel were busy sawing up VJ boards to attach to our West Wall extension, I was sent on an errand to collect our lawn mower from my mother's house. Don't ask why, it's not an interesting story. On the way, I spotted a pile of junk on someone's footpath, and what looked like some reasonably nice pieces of furniture amongst it. I made a mental note to stop by on my way back and check them out. Which I did.

One was this little desk with two filing cabinet drawers:


The other was a matching drawer unit the same width as the desk (although nowhere near as tall).

They looked a bit heavy, so I decided to go and retrieve one of the boys to help me load them into the ute. And so I returned with Daniel. Just as we pulled up, another guy pulled up behind us in his station wagon, while I mentally cursed. I'm really not cut out for fighting for pieces of junk on the side of the road.

I jokingly said to the guy "I hope we're not after the same thing!" He didn't appear to have a sense of humour. He looked a lot like the guy on the left here:


As it turns out, he was after the drawer unit that matches the little desk, while I was after both it and the desk. He immediately got pretty distressed, saying he was a flood victim and that he had nowhere to store his clothes, and that he'd borrowed the station wagon from a friend for the sole purpose of coming and getting the drawers. I backed off immediately. No way I was going to fight a flood victim for an old piece of furniture! The boys reckon he might have been lying to me, but he certainly looked more needy than me, so my conscience is clear.

So... Daniel and I loaded the desk into the ute and got out of there quick smart. And now the desk is sitting in the shed waiting for some attention. I'm thinking I can incorporate it (or at least the file drawers) into my eventual home office once I paint it white. It's reasonably sturdy, so not a bad find! Wish I'd got the matching drawer unit too!!

And that's it for my scavenging for the moment! A good wash and a few coats of paint and I might just let it into the house - who knows where it's been!

Guess who just arrived?


This giant box arrived at my office just now.

Guess who it is?

That's right, it's my Louis!!!!!! See here for his story.

Of course I couldn't resist opening up the box immediately, but you'll be proud to know that I have managed to resist the temptation to get him out of it, since it'll be much less embarassing to walk to my car this afternoon with a mysterious giant box than holding a plastic chair. At least I think it will...


I can't wait to take him to the house tonight! His timing is excellent actually, since we're in dire need of some temporary seating around our new dining table. With all the painting going on, I'm not ready to bring back the fabric chairs. Please forgive the dirty state of the floor again. There really isn't much point in keeping it clean with everything we've got going on at the moment. Once we move back in it will be a different story, I promise!


Hooray! Louis is here! I'm so happy.

27 February, 2011

More Paint is On the Wall

We managed to get three coats of paint on the wall today! Hurrah!

But before the painting started, I had to take a shot of my handiwork from yesterday in daylight, from the outside.

Voila!


Pretty different from this, huh?


Anyway, back to the business of the day. As always, it happened much slower than I expected it to.

Mainly because we weren't quite ready to leap straight into painting. Daniel needed to hand sand the master bedroom to prepare it for its third coat of paint (which in retrospect wasn't really necessary, but it's certainly a well-painted room now!), and I had to wash down the walls of the kitchen, and the master bedroom once Daniel was done.


First things first, I used a stanley knife to cut away the tape that we'd put up to protect the skirting boards from the floor stain. The lacquer was almost seamless from floor to tape, so to prevent risking ripping up the lacquer the stanley knife was essential.


The results:


And then I washed and washed and washed. These walls were in horrible condition! The person who originally painted them clearly didn't put in much effort, and who knows when they were last cleaned properly! Oh well. They were scrubbed today.


I then masked the edges of the floor so they didn't get any telltale white drips on them.


So here's how the kitchen started before we started painting.


And now half-way through the undercoat.


And now with the full undercoat.


And then it was time for the actual paint colour. Sandy Day half strength once again by Dulux.


Allie thinks it looks good.


Here I am mid-scaffolding-move.


And cutting in the first coat of paint.


And here's the finished kitchen! Well, finished after the first coat of proper paint, that is. Ignore the bright shiny upside-down-bowler-hat shape on the right wall, I managed to block most of the sun streaming in our new window on the West Wall, but missed the top bit.


In celebration of having finished for the day, Allie and Daniel cuddled up on the floor. Ah, true love.


So where does that leave us? With one more coat required in the kitchen (on the two walls we've painted so far), plus full coats on the West Wall which isn't quite complete yet. And all that remains for the master bedroom is painting the ceiling and the trim. Hopefully we can get it and Daniel's bedroom finished before the power is reconnected so we can move in comfortably. Won't that be nice?!!!

26 February, 2011

Girl Power!!!

OK, it's official. I am awesome.

Guess what I did today? Well! Are you ready?

I (the girl), used power tools (the power). !!!!!!!!!!!


Yeah ok, that nowhere near sums it up.

Yet again, Tom had to work today, so it was just Daniel and me. Let me just make it clear that Tom has certainly pulled his weight with the house this week, so his not being able to help us today doesn't even come close to letting us catch up with his effort.

However! Tom is kind of the glue that holds my house dreams and my eventual house reality together. In other words, he is the one that actually pulls out the toolbox and makes things happen. So without him, we're usually limited to tasks that don't require all that much handy-man-ness to accomplish, such as painting.

Today though, Daniel and I got brave. We decided that if we're going to try to move back into this house within the next week (provided of course that the powers that be - literally, the power company - get their act together and reconnect power to our house), it would be really nice to not have gaping holes in the back wall of the kitchen.

So... Daniel and I decided to put up the windows on the west wall of the kitchen ourselves. FINALLY! How hard can it be, right? In actual fact, it's not that hard. It's just time consuming and frustrating and hard on one's hands.

Here's what happened.

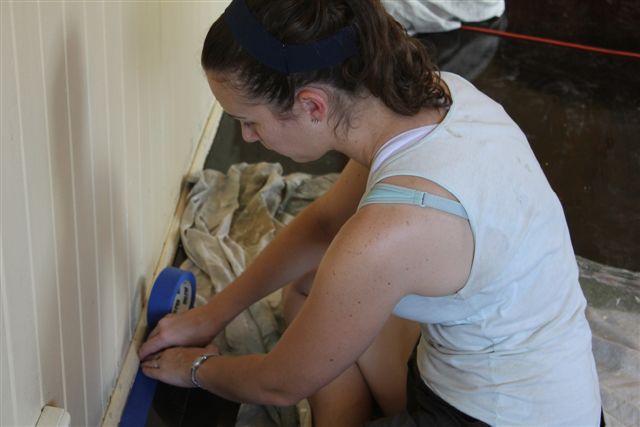
I amazed myself by proving that I could cut notches out of the window frame for the hinges using a chisel and a hammer. Without seriously injuring myself, too!


I was on my fourth notch before I'd mastered it without making a bit of a mess of the surrounding timber, but you're still impressed, right?


We held up each of the windows (which already had their hinges attached) and marked where each of the screws needed to go, and then I, yes I, drilled holes for them. Note: even though screws are designed to be able to make their way through wood without pre-drilled holes, most of our frame is hardwood, which makes for extremely tough going. A little hole considerably smaller than the screw in diameter doesn't affect its grip, but makes it a great deal easier to get the screw in all the way.


The obvious next step was to hold up the windows again (which are pretty darn heavy! An extra pair of hands - i.e. Daniel - was extremely necessary) and then insert the screws in the hinges to hold them in place. This happened relatively smoothly (although not particularly quickly), although I did have to readjust the length of one of my notches which I'd obviously miscalculated slightly.


One window up:


Magic! Two windows up! And looking a bit strange hanging over thin air and looking out to our junk pile in the bakyard.


So, to do something about this situation (the thin air, not the junk pile), it was time for us to install the window sill that we stole from the other kitchen window . To do this, we had to first measure and cut two pieces of wood to act as vertical supports for it. And then came the almost impossible task of actually attaching the window sill to its supports.

We tried drilling a hole and then inserting a screw. Which broke.


So then we tried hammering in an extra long and thick nail. Which bent.


This is one giant hunk of timber. So, after briefly considering admitting defeat, I came up with a brilliant idea (of course, because I'm awesome, remember?). We could use right-angle steel brackets on the underside of the window sill to not only attach it to its two vertical supports (let's call them legs, shall we?), but also the two vertical posts on either side of the window as well. This was also no mean feat, but eventually we were done, and I'm extremely proud to announce that it's sturdy as a rock!


Our thin air is thin no more!

Given that our main goal for this weekend was actually to start sanding and painting rooms in the house other than the master bedroom, we persevered this far in order to get to the point where we could actually install the VJs in that area of the kitchen, which in turn could be sanded and painted! Makes sense, doesn't it? Except that just getting to that point took until about 3:30pm. Daniel did manage to get some sanding done, so the bulk of the kitchen is sanded.


And then his phone rang, and he was called away to work. So then that left just me. Again. Oh, plus Allie, of course, who thought all of this was a big yawn.


I gritted my teeth and started nailing in some of the VJs that Tom had managed to cut last Sunday without disturbing our (current) neighbours, to the left of the windows.
 

And then I cut some more to size myself (yes, with yet another power tool, the drop saw) and installed them under the window.


While of course enjoying the supreme organisation of our collection of nails. Shame nothing else nearby was organised.


Ending with this result. The corner is going to be tricky, and requires better cutting ability than the drop saw can give me right now.


So then I started on the little triangular area near the roof, to the left of the window. On our quiet Sunday last week Tom had also cut these to size.


Except that they were a little too tall for the space, so I got caught up trying to cut a notch out of the second board so it could fit around the roof battens that he had put in.


By this stage it was 6:25, 5 minutes before our noise curfew arrived for the rest of the weekend. I tried to slot it in, but because of the angle the battens are at, it wouldn't fit properly.
 

So I gave up. We'll just have to cope with a few remaining gaping holes in the kitchen, although it's definitely a vast improvement on what it was, if you compare this photo from earlier in the week:


With this from this evening:


If you're interested in why I've left the square to the left of the window VJ-less, wait and see. I'll explain soon. On the topic of explaining soon, I will also eventually tell you about my side-of-the-road discovery. Never fear! It will happen! Potentially soon if I can't get much painting done tomorrow given how little perparatory sanding happened today. Heaven forbid we have to sand by hand!!!!

Sleep well, big day tomorrow as always!

25 February, 2011

Table Talk

Guess what people? I have made my next furniture purchase for the house! And better yet, guess what it cost me? $40 and a drive up to Narangba last night.

Here she is:


That was the photo in the ad. Unfortunately it was too dark and I was too tired last night to snap some shots of my own, but that's her! How good is she for $40?

I have grand plans to paint her a glossy dark brown or black, and to pair her with these dining chairs from our old house (perhaps with their legs painted a darker colour):


We can't keep our old dining table (shown in the above photo) that was a hand-me-down from some kind relatives of Tom's, because we can't physically fit it into the house! It's pretty giant, and no amount of manouvering is going to get it in any of the doors, unless we hire a crane and bring it in through the window. Not exactly in the budget.

So, we figured it was time to say goodbye to it, and I started dreaming of a new table. It didn't take me long to figure out that I wanted one like this:

Capitol Lighting 1-800lighting Photos traditional dining room

or this:

Living Room Becomes A Work Space  living room

or this:

Lindy Donnelly traditional living room

Why round? Because our house is pretty tiny, and a big rectangular table would simply take up too much space. Tom and Daniel are demonstrating the width of the dining room pretty well here in this pre-floor-transformation photo:


Plus, we have a round ceiling rose with a pendant hanging from it in the centre of the space, which lends itself nicely to a round table being centred right beneath it.

So, I hopped on the web and did some Ebay and Gumtree searching. And I found her! Here she is again:


I love the bulbous look to the pedestal, and the rim detail running around the edge of the table top. She's going to look so beautiful all painted and glossy! Now I just have to add her to the list of painting jobs... eek. Considering I've never actually painted a piece of furniture, I'm sure getting ambitious, planning to paint all of our kitchen cupboards and hutch, and our buffet for the dining room! The painting of the rest of the walls inside the house will probably have to come first though.

But how good is that?! $40 plus a few coats of paint, and we've got ourselves a lovely, sturdy, well-made dining table.

That's the plan for this weekend at least! Wish us luck!
Related Posts Plugin for WordPress, Blogger...