DIY Explanation

pour améliorer, meaning 'to improve', is a humble record of our renovation, home improvement and landscaping projects, with our travel adventures thrown in.

31 January, 2013

There's a Hole in my Benchtop

When we moved into our last house, I went on a hunt for a little bin that we could sit on our benchtop and use for all our kitchen non-recyclable rubbish needs.


We're probably quite abnormal in that we don't subscribe to the more common bin-under-kitchen-sink or larger-freestanding-bin-on-the-floor options, but ever since we had an unpleasant maggot encounter in our first house we decided that a smaller, needs-to-be-emptied-daily size of bin in a highly visible location is just the thing for us.

So, back at our old house we settled on this elongated metal bucket as our bin of choice (that fits a plastic grocery bag perfectly), and it came with us to live in our current house. It's given us nearly four faithful years of service.


But it's looking considerably worse for wear, and despite its fairly small size, it is still quite bulky on the kitchen counter. So, I've been planning its retirement for a while. Ever since I first started planning the layout for this kitchen, actually! I even mentioned a drop-in bin in this planning post of yore!

Over the intervening months I've done a lot of searching for the perfect bin for us. And it would appear that these little kitchen conveniences are quite expensive! I eventually settled on this one on an Ebay listing for $35 plus $19 shipping.

Image from Ebay listing

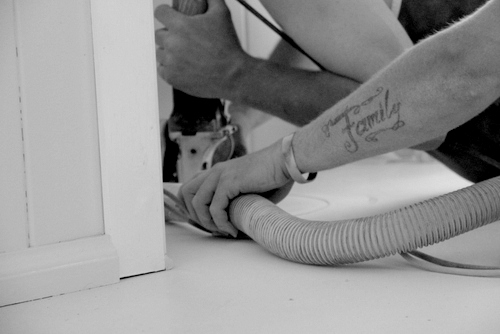
And it arrived literally the day before the benchtop installation guys arrived to install our downstairs kitchen benchtop. Whew! So, I managed to sweet-talk the guys into pulling out their stone-cutting device to cut me a little round hole in this corner of the benchtop upstairs, just to the left of the sink and wine fridge where there is actually no useable cupboard underneath.


I had trouble getting a good angle to be able to capture the cutting action, but I couldn't really complain about this shot.


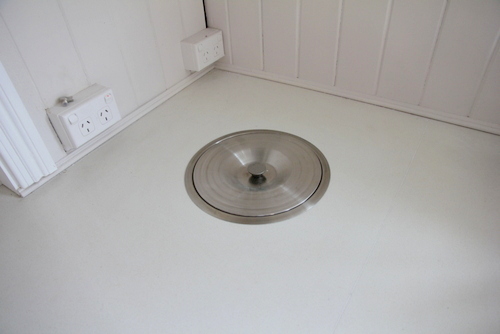
And hey presto, there's a hole in my benchtop, dear Liza, dear Liza.


It didn't take much to figure out how all the bin parts fitted together. No IKEA instruction diagrams required here!


With the lid on, it's fairly inconspicuous tucked in the corner, and I'm so pleased with it! No more bin eyesore sitting on top of the benchtop! And since it uses some previously unuseable and inaccessible space under the benchtop, all the better! I tend to use the bench space to the left of it for most of my cooking prep, so it's very conveniently located a step to the right.


And best of all, it cost me absolutely nothing to get it installed by professional stone mason people, because the timing worked out so well with the downstairs benchtop installation!

I'm in love.

Can anyone else relate to my slightly alarming level of affection for my rubbish bin?

25 January, 2013

Freshly Laundered

Believe it or not, instead of leaping all over the house recording this renovation like I usually do (which to be honest is actually an accurate reflection of what our renovating life is like around here), I'm going to follow up yesterday's laundry post with more laundering progress, in the non-fiscal sense, of course.

Yesterday I got all excited about our lovely new tiled floor.

But let's face it. The laundry didn't look much like a laundry.

I've been auditioning for the role of laundry cabinet for months, hoping to find a nice-looking freestanding buffet that we could slap a couple of coats of paint on and pop a sink in.

But they either needed way too much work...


Or were too shallow to fit a sink.


Enter this guy.


That guy is the second set of secondhand kitchen cabinets that I found on Gumtree and decided to snap up to use in our downstairs kitchen.


But there wasn't room for all of the cabinets in the downstairs kitchen. These guys didn't get a look in at all.


So, I found a perfect new home for them in the upstairs laundry!

Our carpenters built the little sink cabinet a new base to sit on...


Which fitted around the waste plumbing nicely.


And then Mr Cabinet got popped into place on top.


So that the door on the right could open properly without hitting the door frame, they popped some spacers in between the cabinet and the wall.


The rest of the wall cabinets then followed...


And voila, like magic, we had a room that suddenly looks like a laundry!


But I'm not done yet.

When I visited IKEA searching for downstairs kitchen benchtop options, I snapped up a plain white pre-made laminate PRÄGEL benchtop for a grand total of $105 that just needed a little bit of trimming on the sides to slot in over the top of the sink cabinet and span the length of that wall. It took a bit of squishing (and a bit of scraping of our freshly painted walls), but it does the job beautifully.


Then it was time to cut a hole for the sink. I must say, I was pretty anxious about that step. My beautiful new pristine white benchtop!!!!


But with the sink slotted into place, all was well again.


Unfortunately, when the plumber and I consulted over where to place the taps for the sink, we didn't take into account the fact that we'd need the spacer between the cabinet and the wall to allow for the doors opening without hitting the door frame, so the centre of the cabinet doors doesn't line up with the tap and sink perfectly, as it should have. Sigh.


But never mind. I'm sure it's one of those things that you only notice when you're looking for it. Right? Well I'll keep telling myself that, anyway.


In the meantime, how pretty is my laundry??


Still not quite done. The next step was for the plumber to come back to put the taps on and fit the waste plumbing to the sink. Excuse the mess.


So now we have a sink that works, and a proper place for the washing machine to hook up!


Except that all of you super observant readers will surely have noticed that our existing top-loading washing machine would have struggled to slot under our new benchtop, as demonstrated by this photo from earlier.


So, in a move I've been awaiting for a very long time, we bought a new washing machine!


Well actually, we managed to get it secondhand for a very nice price, but it works perfectly fine and looks just lovely sitting there under the bench. With room next door for a dryer when the time comes. I've never owned a dryer before in my life. I'll hardly know myself!

So what do you think of our laundry? Better than this?


And this?

24 January, 2013

Nearly a Laundry

Our upstairs laundry hasn't had much air time on this blog.

When we first moved in to this house, the room we're now calling the laundry was actually just a corridor with a crummy built-in linen closet that led to our disgusting and dingy old bathroom.


And we just jammed the washing machine in the corner there (so you had to hug it as you rounded the corner toward the bathroom) so that we could wash our clothes.


But once we destroyed the dingy old bathroom and the linen closet, this corridor room actually got to edge closer toward truly becoming a laundry. Although it had to share that purpose with that of general storage area for miscellaneous household items... i.e. junk.


And then, as the tiler started making progress with the downstairs bathroom and the ensuite, we realised that it was finally time to focus a bit of love and care on the laundry.

So the back wall was closed in...


The waterproofers came and waterproofed the floor...


And we slapped some paint on the walls and ceiling (after first scraping all of the existing paint off the ceiling - always a joyous task).


So what was next, you ask? Tiling!!!


And because it's such a tiny room, with no need for a floor waste or a sloping floor, it went from un-tiled to tiled in what felt like seconds! Oh the wonders of paying a professional to do the work!


There is unfortunately still very little to hint that the room is in fact a laundry, but it's one step at a time round here, ok?


And one step we will have to get to eventually is putting up a skirting board around the edge where the tiles meet the wall, since you can still see the waterproofing underneath the paint and it's not very pretty. I could have got the tiler to put a little tile skirt around the edge there, but I thought that a timber skirting board would fit the house and those timber walls a bit better.


But let's not get ahead of ourselves. I think I can safely say that that skirting board won't go up particularly soon. I'm much more interested in getting some cabinetry and a sink and a working washing machine in there again! Not precisely in that order. After all, a girl's got to do her laundry!

In the meantime though, I'm happy to celebrate this little transformation. It's hard to believe it took us two years!

22 January, 2013

Set in Stone

Even with the new unintentionally matched bamboo flooring, our downstairs kitchen was still looking decidedly unfinished.

Next item on the agenda? A new benchtop!


Because we've been aiming for this downstairs area to be a secondary little granny flat to the main house upstairs, I didn't think it was necessary to pay thousands of dollars for a stone benchtop like the one in the upstairs kitchen.


So, we started investigating laminate options. I got about four quotes from various people for a laminate benchtop. They all varied quite a bit, but they all were able to shock us with their expensiveness! In our innocent opinion, stone not only trumps laminate, but is at least three times better-looking. So, by that assumption, laminate should be less than a third of the cost of stone, right?

Wrong.

We paid $3,200 for our SmartStone benchtop upstairs about a year ago, so we figured that a laminate benchtop should cost less than $1,000.

Well it doesn't.

The cheapest quote I got was $1,600, with the most expensive being $2,300! I then tried pricing a custom laminate benchtop with IKEA, and it came in at only $769. But there were two problems with that.
1) IKEA's quoted timeframe was about two weeks for delivery of the benchtop, which was longer than I wanted to wait.
2) There were no guarantees that the benchtop would fit perfectly when it was delivered, because they would be relying on my measurements of the space to make it, and if any of our corners were anything other than a perfect 90 degree angle, the benchtop wouldn't be cut to fit that. So I would probably need to get my carpenter to retro-fit the benchtop in place once it arrived, which would of course cost more money in labour.


So. A laminate benchtop wasn't actually looking like the quick, inexpensive, easy option that we hoped it would be. So, in frustration, I decided to get in touch with the guy that made our upstairs benchtop, to see what something similar in stone would cost for our downstairs benchtop. He came around and measured up the very next day, and his quote came in at $2,640. Certainly not cheap, but considering that it gave us the beautiful stone option as compared with the nearly-as-expensive and nowhere-near-as-nice laminate options, we decided to just bite the bullet and fork out the extra for the stone.

And within the week, they arrived with our big hunks of stone.


And the process of gluing it to the tops of the cabinets began.


Oh and while we're in the area, has anyone noticed the black brick tile splashback that's been going on in the back of the kitchen?


It's the same tile that we used on the shower wall in the downstairs bathroom, and because we had a lot of tiles leftover, I decided to ask the tiler if he might be able to use them in the kitchen. Lovely guy that he was, he agreed, and didn't even charge me any extra! That's my kind of tradesperson!


Anyway, back to my beautiful new benchtop!


The kitchen is really taking shape and looking like a real one now, huh?


And I even got the same waterfall edge that we got for the upstairs kitchen. It added about $300 to the overall cost (already added into that original quote price), but I think it's totally worth it.


Look! A real kitchen!


Now to sort out things like a kitchen sink...


And a stovetop and oven!


Minor details!

But those are coming. In the meantime, there's more to this benchtop story! Just you wait. Those benchtop-cutting guys didn't get to escape my clutches just yet... to be continued...
Related Posts Plugin for WordPress, Blogger...