DIY Explanation

pour améliorer, meaning 'to improve', is a humble record of our renovation, home improvement and landscaping projects, with our travel adventures thrown in.

30 November, 2012

Not Rocket Science

Well! I think the last few weeks take the cake for being the most hectic of my life! Getting married was nothing compared to this! The result of that hectic-ness has been quite a lot of progress on the house. But don't let me get ahead of myself!

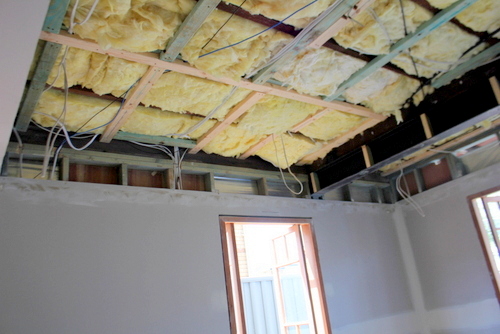
Last I left off, we were here. With super ugly, re-framed and insulated ceilings and strangely high windows and doors in place of what had been beautifully plastered nearly complete rooms only days before. Boo.


But of course, the show must go on! From the very start of the downstairs renovation I had always intended for us to do the internal painting ourselves, since painting is not exactly rocket science. It was definitely within our skill level. As time went on I started getting a bit scared off by the magnitude of that job (since of course Tom wasn't around to help, being away with work again) and thinking wistfully about paying a painter and magically clicking my fingers and having it done. But then I'd have to pay his bill. And in light of the fact that money was disappearing at a really alarming rate, I finally just gritted my teeth and issued my declaration. We would pay painters to paint the inside of the house over my dead body! Perhaps a little dramatic, but I was determined. We would paint the inside of the house if it killed us! No paying tradespeople for something we could do ourselves! Daniel (my brother) wasn't particularly impressed.


With my declaration came a realisation. There are A. LOT. OF. THINGS. TO. PAINT inside the house. And of course the worst thing about painting is that you don't just paint it once and be done with it. No, you paint everything THREE times, undercoating and two top coats. Slightly demoralising. So, even though the inside of the house was back to being nowhere near fully plastered and ready for painting, I decided that we had to take advantage of every available weekend possible and get a head start on whatever painting was possible.

Allie put on her supervision face.


But fell asleep on the job. Typical.


Meanwhile, we got cracking! Daniel whipped a few coats onto the bathroom ceiling and cornice (in Taubmans' Grey Fog, the same colour we painted the upstairs bathroom ceiling). Normally you paint ceilings in a paint specially designed for ceiling so it's not reflective and looks very smooth and seamless, but in the bathroom we wanted what mould protection we could get, so we used a low sheen paint.


And I worked on the cornices in the bedroom whose ceiling could stay as it was.


With me on the brush cutting in and Daniel on the roller, we finished the ceiling and cornices in that bedroom...


We only managed to get the undercoat and one top coat on the ceiling and cornices in the hallway that weekend...


But I spent a couple of early mornings before work the next week doing the final top coat, so it eventually looked like this.


We got as much of the kitchen ceiling painted as we could... obviously the edge that meets the lounge still needed some more plastering work, so since apparently plaster doesn't stick to a painted surface very well, we stopped painting a little short of the edge, hoping we could cover up the seam later on.


We even managed to make a start on undercoating and first coating the parts of the walls in the second bedroom that didn't need much plastering work.


It was once Daniel had rolled the first top coat onto this wall that we realised we'd made a mistake. I had decided that, for the sake of a bit of consistency and ease we would simply paint the downstairs walls in the same colour that we'd painted the upstairs internal walls, Dulux's Sandy Day Half Strength, colour matched to Solver paint. So I bought another giant tin of that paint and Daniel slapped it on.

And then we both stood back and grimaced. It was pink. The paint was pink!!! Not a very neutral, slightly browney neutral, PINK! My first reaction was to just dismiss it and say "Keep going! It doesn't matter! Get that paint on the walls!" But after looking at it for about ten more seconds, I knew we just couldn't do it. We weren't going to ruin our lovely new area downstairs by painting it pink.


Fortunately for us, this didn't then send me into a spin of second-guessing indecisive craziness. While all the drama was happening downstairs I had paid another visit to Bunnings and collected a whole bunch of grey paint chips. No, that wasn't because I'm the most intuitive person on the planet and could sense that I might need them soon, it was actually because I was afflicted with indecision over whether we'd made the right colour choice for the outside of the house when we first painted our front stairs. So since we would soon be hiring painters to paint the outside of our house for us, I got a whole bunch of paint chips to choose another colour. And I was quite confident I'd settled on Dulux's Flooded Gum, the top colour in this swatch (I actually forgot to take a photo of my own swatch, so this is someone else's).


Source
That looked too dark for the rooms inside the house, so I just rolled my eyes down that swatch a little bit, and within about 10 seconds, the decision was made! We would go with the colour a few shades lighter than Flooded Gum, Dieskau (the name's obscured in that photo, but that's its name).


So I sent Daniel off on a paint-purchasing trip to Bunnings, and that was that! Easy peasy! I wish all paint decisions were that easy!

Unfortunately there's never enough time in a weekend though, so we didn't manage to get much of it on the walls. There's always next weekend, though!

08 November, 2012

The Aftermath

So where were we last?

Oh that's right. We're in the midst of a major construction disaster, otherwise known as being royally finagled by our engineer. How could I forget?

Well, as I promised, we eventually got over our devastation and starting coming up with solutions. What else could we do?

And we fairly quickly determined that the only thing for it was to...

Rip out the plasterboard in the ceilings of rooms whose floor needed to rise like the second bedroom...


 And the lounge room...


Cut holes in the walls where plumbing and gas fittings had to move...


Rip out the insulation from the ceilings that needed to change (which I had painstakingly researched so we'd get some good sound insulation between upstairs and downstairs)...


Frame out a new bulkhead in the second bedroom which has two perpendicular steel beams running through it eating into our new ceiling space...


Not to mention a whole lot of waste plumbing for the upstairs bathroom that had to come out and be re-run so that it slots in right next to the steel beam in our new bulkhead...


After which the ceiling could be re-framed and the insulation put back up.


Same story in the lounge room, although thankfully with no plumbing involved.


All of this activity was the result of a lot of checking rules, brainstorming options, and coming up with what we agreed was the best compromise between giving the council what they wanted, but undoing as little of the work that had already been done as possible.

We quickly discovered that the most important thing was to distinguish between what had to be classified as "habitable" space (i.e. lounge and bedrooms), "non-habitable" space (i.e. bathroom, kitchen, hallway, cupboards), and "undercroft" which is essentially nothing-area under the house that you can't officially call storage or anything.

Then in each of those areas we had to consider what the minimum acceptable floor height could be, and what the minimum acceptable ceiling height could be, with our ultimate goal of course being to change as little as possible.

So! I ended up making this drawing to show our plan. Unfortunately it ended up looking a bit like a rainbow with chicken pox. But it did the job, ok?


The end result, as you already saw in the photos above was as follows:
1) Raising the ceiling in Bed 4 while working around the unfortunately placed steel beams.
2) Leaving the ceiling as it is in the Bathroom. Yay!
3) Leaving the ceiling as it is in Bed 3, because thankfully we were smart enough to actually give it an extra high ceiling in the first place since there was no plumbing running through the middle of it. Yay again!
4) Leaving the ceiling as it is in the hallway because it's considered "non-habitable" area.
5) When I made that drawing, we were thinking that we would have to raise the ceiling in a little section of the Wetbar/Kitchen so that we could adhere to the rule that says that 2/3rds of the ceiling in a "habitable" room has to be at least 2.4m. But then I checked with our certifier, and he said that kitchens aren't considered "habitable" space, so we could leave its ceiling as is! Yay again!
6) Raising the ceiling in the Living/Dining room and building a bulkhead around the steel beam cutting across the middle of the room (the orange line).

Interestingly enough, before we got the carpenter to start work downstairs, Tom and I were actually toying with some ideas to make the ceilings downstairs as high as possible by having bulkheads around the steel beams already. We played with these ideas for the kitchen and lounge area...
 

The orange squiggly lines were supposed to be the bulkheads or lower ceiling sections.

After I chatted with the carpenter about it before he began work, we decided that the extra effort and labour involved in framing (and then plastering) all of those extra corners around the bulkheads wouldn't really be worth it, so the only room where our plan for a higher ceiling actually worked out initially was Bed 3.


But of course, with all of the council drama we have now come full circle, and our ceiling plan for the kitchen/lounge area is almost identical to that first drawing in the set of three bulkhead plans above! Go figure! If only we'd just gone with that originally, huh?

So that takes care of the ceilings.

The windows were next. All of the window frames had to go up (and of course new plasterboard then had to go beneath them on the inside, and the weatherboards had to be managed on the outside.The front door got the same treatment, and then all the internal doorframes and wardrobe framing had to come out and be re-framed higher. For a little while there it felt really strange walking in there. It was like we were in Alice in Wonderland and we were too short for everything!


All of this was of course because the floor was going to have to be raised by 35cm. Again, because our plan was to try to change as little as possible, we decided that we would now have a step down from our new extra high main floor into the bathroom, so that we wouldn't have issues with the waterproofing in that room. It would have been hard to install new floor joists in the bathroom without being able to nail them into anything, because that would penetrate the waterproofing membrane! Listen to me talk to the talk, huh?!


So that was that. We were resigned to our fate. We had a plan. And that plan was in action. It felt good to at least know that we had a way of moving on and getting things fixed, but we're honestly looking at an extra cost of about $10,000 to make all of these changes when the carpentry, materials and plasterer costs come into it!

That sure hurts. But we can be (and are) extremely grateful that we've actually got enough height under the house to be able to raise the floor and still manage legal height ceilings. Otherwise we would probably have had to give up on this entire exercise, since we've already raised the whole house to its highest possible maximum legal height. And at least we've managed to limit how much has to change (and therefore the cost), and now it's just a matter of gritting our teeth and getting on with it. So we're gritting. Hard.

05 November, 2012

Disaster Strikes

Those of you who have been following this renovation for a while might remember that we have had a few issues along the way that have caused me to do this.
sourced from Cheri Pryor
More specifically, we've had issues with possessed machinery, power companies refusing to reconnect power to the house, and worst of all, having to raise the house twice because it wasn't high enough the first time, in what was the epic-est of  EPIC FAILs.


Needless to say, we've had our share of troubles. And as I recall, after that succession of troubles in the early stages of this renovation I promised that if anyone else messed with me, they would get this.

sourced from CFO America

Well, that day has arrived. We have been well and truly messed with. And unless we plan on suing, we have to grin and bear it. And fork over the cash.

Here's what's happened.

A year and a half ago (ish), when we discovered that our first house-raising process didn't leave us with enough space below the upper floor to have legal height ceilings downstairs for the extra rooms we planned on building, we were obviously devastated. And very keen to find a solution. So when we mentioned our dilemma to our structural engineer and he said that he had access to more recent research that could prove that we could have a lower legal floor height downstairs, therefore giving us legal height ceilings, we rejoiced.

He gave us a report (at cost, of course!) to confirm our new floor heights, which we gave to our building certifier, who then (at cost, of course), amended our building approval to reflect new proposed floor and ceiling heights. And we rejoiced.


So, we forged on. We laid a big concrete slab under the house at the new floor height, we framed up all of the walls, got the plumbing and electrical installed, the windows and doorways are all in at the ordinary heights, and the walls are all plastered.


In the meantime, we've known since we bought this property that it's zoned to allow development, and we've planned on building two townhouses in the backyard almost from the start. Earlier this year, before we really ramped up the downstairs renovations, we hired a new building drafter and a town planner to submit an application for the townhouse development to council.

Right around when we reached plastered stage downstairs, we got some very bad news. The council would not accept the lower floor heights downstairs as legal. Bad bad bad bad bad. Even though we have a legal building approval. And that approval would be fine if that's all we wanted to do with the property. But it's not. Since we really want to go ahead with building the townhouses in the backyard eventually, the whole property has to get assessed anew. And apparently our structural engineer's assessment that we relied on for the floor heights was completely wrong. Completely. Wrong.


We've spent weeks going back and forth with the town planner, who has in turn gone back and forth with the council, to see if there is a way we can deal with this problem that doesn't involve undoing a whole bunch of the work that we've just paid a fortune to have done.

Nope. Not a chance. No budging. Council have said that if we want the town houses, our floor height in the living areas downstairs needs to rise by 35cm. Full stop. No negotiating. That's it. So, this means that all of the doors and windows need to rise (and therefore the weatherboards around them on the outside need to move as well), the floor needs to be built up, the plumbing and electrical need to go up, the waterproofing in the bathroom needs to go up higher, a new floor needs to go in, and what's worst, the lovely newly plastered ceilings and cornices have to come out and be re-done higher.


Needless to say, we're devastated. And angry. But mostly devastated.


The one tiny silver lining to this very dark thundercloud is the fact that we will still be able to manage to get legal height ceilings downstairs even though the floor has to rise, because we can box the ceiling around the steel beams that support upstairs. Thankfully, as long as two thirds of the ceiling in each "habitable" room is at least 2.4m high, we're still going to be ok.

Still, we're looking at thousands and thousands of dollars down the drain, in wasted work that we've already paid for, and work that now needs to be done to get us back to 'plastered' stage again. Wouldn't it be nice if we'd never met that dodgy idiot of a structural engineer in the first place?

02 November, 2012

We're Plastered

We're plastered.

Not drunk, plastered.

As in... there is plaster on the walls downstairs, and it actually looks like a real live house in there! Here's the main living area.


The big plaster boards themselves go up incredibly fast. And then there's the more painstaking process of covering up all of the seams and corners and putting in the cornices.

But the beauty of that initial putting-up-boards stage means that one moment I was looking at this...


And in the space of a couple of hours, this happened! The walls aren't see-through anymore!


The kitchen is like a real room...


There are clear defined doorways to the bedrooms (although this bedroom wasn't boarded yet)...


There are wardrobe spaces...


And there's a little decorative shelf alcove thingie in the corner of the hallway...


There's a bathroom with walls...


And a bathroom that I can now imagine having a bath in!


It's like a real house!


So after all the boards were up, the plasterers came back to cover up all of the seams between the boards and install the cornices. So the view to the main living area went from this...


To this! So pretty!


It's not hard to imagine it actually being liveable now, is it?

It's certainly a far cry from this!


Looking back at shots like that, and remembering slipping and sliding around in all of that mud makes me very proud of how far we've come, that's for sure!

01 November, 2012

Robed

Since we moved into this entirely cupboard-less house, we have had a serious shortage of storage. As in, the one and only built-in cupboard that we inherited happened to be the kind of disgusting linen cupboard that lost its life around the same time as the old bathroom did.


We managed to at least put a small bandaid on that problem for a little while by shelling out $60 for these three beautiful specimens to stuff our clothes into.


In what was probably one of my craziest ideas, I originally thought we would use the bones of those crummy old wardrobes to then build ourselves lovely floor-to-ceiling wardrobes along that wall of our master bedroom.

But fortunately I had a return to sanity and realised that those wardrobes belonged at the rubbish dump, and that if we want a nice, high quality finish and as little wasted space as possible, we should just build new built-in wardrobes from scratch.

The plan has always been to knock out the wall between the two bedrooms and to steal some space from the second bedroom for the actual master built-in wardrobe - meaning that the doors of the wardrobe would line up with what used to be the wall between the two bedrooms.

Enter the builders! Since most of the carpentry work was completed downstairs, they had to get out of the way of the plumber, electrician and plasterers so that we could continue making progress there. So, I moved them upstairs, to build me some new wardrobes!

Here are the two bedroom doorways. On the left is bedroom two, and the beginnings of the frame for the wardrobe. On the right is the master bedroom, with my temporary clothes rack squished against the window.


Here's a closer shot of the state of chaos that the master bedroom has now remained in for weeks. Everything is piled in that corner near the window, and that poor unfortunate temporary clothes rack ended up collapsing so that the top level of clothes was lying on the bed. I managed to sleep with them like that (and even changed the sheets a couple of times) for weeks. Weeks, I tell you!


Anyway, back to the beginning. Here's the frame being started in the second bedroom. The wall you see on the right is the one bordering the master bedroom, where eventually there will be doors opening onto the wardrobe.


 And here's the matching frame on the ceiling.


They managed to make fairly short work of removing all of the VJ boards that constituted the wall between the two bedrooms (fortunately they weren't structural), and I spent a few minutes dreaming about just kicking my brother out of the second bedroom and enjoying having a giant master suite.


Fortunately for him, I resisted that particular temptation. But we did have to spend one night with no wall between our rooms. That was fine until his alarm went off at some ridiculous hour the following morning.


The next day the carpenters were back, making short work of closing in the frame with pre-made VJ paneling.


And in virtually no time,there was a complete wall between the two bedrooms again!


So then they turned their attention to the master bedroom side.


And it too got sheets of VJ paneling installed on the inside. They even cut small little sections of spare VJs that we had lying around to fill in the area above the doors, so eventually it would look as if the original wall had never moved.


 And then the big doors went on! That was an exciting moment for me.


Although there wasn't much behind them yet!


It didn't take long for that to change, though. They installed shelving and rods, and I couldn't resist testing them out by hanging some clothes in there temporarily.


There's enough space for the hangers...


And it feels pretty spacious in there!


But because they weren't quite finished yet, and because I knew that I would need some incentive to actually paint the wardrobes inside and out, I regretfully removed all of my clothes again to their collapsing temporary rack, and refused to allow myself to use the wardrobe again until it was fully painted. Meanwhile, the builders cut down five extra doors so that we could use their small panel for the high section of cupboards...


And then they covered over all of the ugly door frame sections with architrave, inside and out. Although I only got pictures of out.


And here's where the wardrobes replaced the weatherboards in becoming the most torturous thing in my life. See all of the joins in the corners of the architraving, and all of those little black specks (i.e. nail holes) in the timber? Well they all needed to be puttied and sanded before painting, so that we could pretend they never existed.


And so I spent almost a full Saturday with putty and no-more-gaps all over my fingers, working away at covering up all of those holes and gaps. Inside and out. If you had told me years ago that I would voluntarily spend half my weekend contorted inside a cupboard, I would never have believed you. But there you have it. It happened!


 Until I was left with this work of art. Admire it, dammit!


And admire it some more! Look at all that putty. And imagine that sight repeated on the inside as well. Oh the horror.


But of course, as always seems to be the case with renovating, that was only the beginning! Then came the extra torture of applying three coats of paint to everything. The walls, the shelf supports, the puttied architraving, the door frames, the doors themselves, back front and sides! This night-time (and therefore not very nicely coloured) shot marks the momentous occasion when I could declare the entire thing undercoated.


And then came two coats of white high gloss on all of the shelf supports and architraves, and two coats of Dulux's Sandy Day half strength on the walls and doors. Sounds simple enough, right? But let me whinge for just one second. This painting took DAYS! As in, if I had done all of it all in one go, I would have been at it for more than 24 hours straight. Which is why I'm kind of glad that I forced myself to put up with the discomfort of sleeping in a bed half-covered by my incredibly heavy fallen-over clothes rack. Because without that incentive, I don't know if I would have had the strength to go on.

But now it's done. Big sigh of relief!


So now, at last, my full length clothes have a freshly painted place to hang...


And there's plenty of room for the double hanging as well!


One word? Proud. And I didn't even build the thing, I just painted it! Now I just have to find the time to actually take advantage of all of that beautiful storage space above the clothes and pack everything away neatly!
Related Posts Plugin for WordPress, Blogger...