DIY Explanation

pour améliorer, meaning 'to improve', is a humble record of our renovation, home improvement and landscaping projects, with our travel adventures thrown in.
Showing posts with label Plumbing. Show all posts

30 October, 2014

In The Poo

OK, so we moved into our new very old house.

And tossed out as much of the old stuff in the old house as we could.


But this we couldn't toss out.


Well, except for that incredibly awful shower curtain and other crusty old lady bathroom accessories. The rest we were stuck with, at least until we figured out another bathroom arrangement, because this was the one and only bathroom in the house!

Let's zoom in on the shower, just for fun.


Sigh. Those yellow tiles were actually some kind of laminate board made to look like tiles. Clearly they weren't designed for the 50-or-so years of shower use that they've had, so the lower bits of the board were simply disintegrating. Someone attempted to bridge the gap with a random piece of lineoleum, the grey thing you see sticking out beneath the jagged rotten edge of the yellow board. Eugh.

Of course there were a few other issues with the shower, including the fact that only one of the taps worked (thankfully it was the hot tap), so that meant that you had to complete your shower in the very small window of time when the water was heating up from stone cold to boiling hot. Without touching the wall, of course, because if you did that you'd have to have another shower just to feel even remotely clean again.

Oh, and the bottom of the tub was a bit crusty. So again, shower required to feel clean from your shower.

I think I've made my point. So, for the first few weeks that we lived in the house, we drove over to my brother's place most nights for a shower. Not exactly convenient, but there are worse problems in life.

Like the one that hit us next.


Yes, the toilet. It was old, it was ugly, but it worked. At least we thought it did. Until we realised that there was a bad smell under the house a few weeks later. It turned out that one of the sewerage pipes was clogged, and nothing was getting through. We hired an electric eel, which we had some experience with at our last place (see here), and couldn't make it through the apparent blockage. I'll spare you the rest of the gory details.


So here we were in our new house with no shower, and now no toilet. Oh, and I was newly pregnant. And working from home. Remind me why we renovate again?

The solution we came up with? To abandon that bathroom entirely, and to plumb in a new temporary bathroom in an empty room on the other side of the house. Easy peasy!

Since our ultimate plan for this house is to shift it on the block (see here for the rest of the plan), it would be crazy to go to the effort of tiling a proper bathroom before then, because everything could crack and get damaged during the move. So instead, we decided to make ourselves a temporary, cheap-as-possible bathroom from this blank (yellow) canvas of a storage room.


We invested in the cheapest toilet that money could buy from Bunnings (still about a thousand times better than the one we had), and Tom worked some DIY magic connecting it to the plumbing running underneath the house for the nearby kitchen.


But how to solve our shower problem without spending too much and creating too much work for ourselves?

Gumtree to the rescue with this beauty!


And in case it's not immediately apparent what the beauty actually is, it's a giant all-in-one fibreglass bath and shower that we got from someone renovating their own house for the grand total of $50. With taps, showerhead, even some plumbing included! Hallelujah!

The doorway to the room did require some alterations in order to actually get the thing in there, but...


Once it was in, voila! Instant shower!


Well, instant shower after a bit more home handyman plumbing work.


And it too was about a thousand times better than our existing one!!! Need I show you this again?


It's got to be the ugliest bathroom renovation we've ever done by a very very long way, but at this stage it's function over form! Plus, it unfortunately feels like we've moved sideways rather than forward since we've invested time and effort in something that's not going to stick around in the long run. But we've got a very long road before we can have the bathroom(s) of our dreams, and at least we can now travel that road with the certainty of a decent shower at the end of the day!

09 March, 2012

It's Sinkin' Good

Earlier this week I told you the story of our slightly demoralising (for its deja-vu-ness), but ultimately worthwhile kitchen window relocation (see here).


Not only does it make much more sense to have the window kind of centred in that wall, there was another reason.

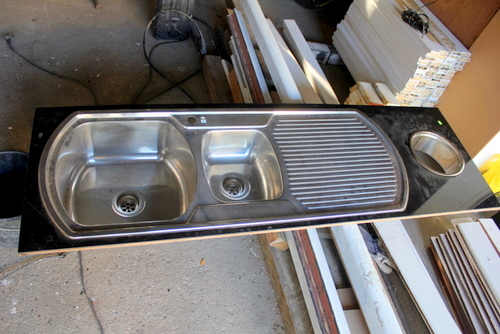
It was this guy.


He's a never-used display kitchen sink, and I found him on Gumtree for $100. Which is particularly satisfying given that he still has a sticker attached with the price that "Carmel" was paying for him - $833.80. I'll take a $733.80 discount on a brand new Clark brand sink any day!


Back when we banished our beloved hutch (the first piece of furniture we bought as a couple) from the kitchen (and from our lives), his spot was quickly taken by our dishwasher and the big farmhouse sink that came with the second-hand kitchen cabinets that we bought. Now with "Carmel" on the scene, it made a lot of sense to reposition the window so that it would sit centred off our kitchen tap.


Of course we could have simply used the farmhouse sink that we already had. It was in pretty good condition, and would look absolutely perfect in a country-style kitchen, but it didn't really fit with the aesthetic that we had in mind for our new kitchen. So unfortunately for it, it had to come out.

Tom dove into the cabinet and removed the drainage plumbing from underneath the sink...


And we moved the farmhouse sink outside to be cleaned and photographed for sale on Ebay. Which earned us a tidy $360 (including delivery to the Gold Coast), by the way. Not bad!


So then we were left sinkless. We filled up a few buckets of water at the looking-a-bit strange spindly taps before Tom turned off the water at the main.


And then we moved out the sink cabinet, which allowed us free access to relocate the window properly.


With the window in its new home (and the wall boards replaced), we moved the old sink cabinet back in, and trialed Carmel in pride of place. It's quite handy that her past role as a display kitchen sink means that she's (notice she's changed sex somewhere along the way as well?) already sitting in a board that can act as a makeshift bench around the sink, until we get ourselves fancy new benchtops for the kitchen.


This is the point at which I got very excited. A new kitchen sink in front of our new kitchen window! Woohoo!


You may have noticed a slight problem with that picture, though. Because the front of the old farmhouse sink was designed to be entirely visible, the under-sink cabinet was deliberately a lot shorter than all of the other kitchen cabinets. Meaning that now, with a sink that's designed to be hidden within the cabinet, we've got a gap to fill somehow.


I thought and thought about what we could do to make that extra space fit in with the rest of the kitchen and look nice and deliberate. I considered having a little recessed nook where we could hang paper towels and dish cloths. But then I thought that it's probably the worst place for those things, since it's not uncommon for water to drip down from the sink if someone rinses something a bit too enthusiastically, and soggy paper towels are never fun.

And then I had a brainwave! Instead of building in something at the top of the short cabinet, we could instead build in some shelves at the bottom where I could store baskets of potatoes and onions!

So we drew an extremely technical plan (the things that look like udders on the left are sinks, just thought you might like that clarified)...


And yet again, my obliging husband got to work. First step was cutting off a bit of extra timber from the existing cabinet to make it a nice flat surface.


And then he built what we now affectionately call "The Basket Case", because we needed a way to refer to it (as the future home of baskets containing potatoes) so we understood what the other person was referring to when we talked about it. No in-progress shots, I'm afraid. Its design is simple enough, although it takes a ridiculous amount of time to construct something like this. Much more than it should! Lots of measuring and checking and re-measuring and checking and cutting and re-measuring and checking... you get the idea.


We made sure that there was a cut-out area at the back for all of the plumbing bits and pieces...


And Tom tested its ability to bear weight...


And then we carefully lifted the sink cabinet on top. It fits perfectly! And brings that cabinet up to exactly the right height to match all the rest of our cabinets!


And then we slotted Carmel in on top! Thank goodness the sink cabinet is just wide enough for Carmel's two bowls to fit inside it, or we would have been in trouble.


Then came the really fun part. Plumbing. This is where we discovered that the big sink bowl took up most of the depth of the sink cabinet, meaning that we couldn't fit a traditional S-bend drain pipe underneath it.

I toddled off to Bunnings in search of something that would be a bit shallower but still perform the same job as a normal S-bend. And thankfully I found this option!


It leaves just less than four fingers' distance to the bottom of the cabinet.


But it works! And that's all that matters!


The final icing on the cake for our new sink was a new tap. We splurged a little bit on a decent quality (but still simple) one for about $200 from The Builders Warehouse, and compared with the under-sink plumbing, the installation process for it was pretty darn simple!


Easy for me to say of course, my job consisted of turning it on when we were done. Ah the wonder of running water!


Every time I use that tap I'm so relieved that we finally have a proper kitchen sink arrangement, not two old outdoor taps sticking up in mid-air! This renovation process has certainly taught me to be grateful for the simple things in life like running water, electricity and a working gas stove top!

09 January, 2012

It's Like Magic!

Guess what?!

We have finally installed our dishwasher!!!


Sorry, that picture doesn't quite prove it well enough. This is better (but only if you ignore the dirty fingerprints).


That's right! He's powered up and connected to water, and making up for lost time washing like crazy! Tom's already run every single plate, bowl, mug, knife, fork and spoon through it to get them sparkly and clean (and possibly make up for any areas in which our hand-washing skills are lacking).


What's kind of crazy is that we've had Mr Dishy for as long as we've lived in this house, which is over a year now. We got him for the fabulous price of $250 when we bought our secondhand kitchen and oven, and we've only now managed to get our act together and get him running!

Although he hasn't been working, he's certainly not been idle in the last year! He's moved around a bit. First he sat with the oven alone in the kitchen while we knocked down walls and raised the house. You can see him here on the right near Tom pretending he's some kind of circular-saw-wielding monster.


Mr Dishy then moved around the house a bit while we redid the floors and then painted the walls. Can you spot him here? Hint: he may be wearing one of our pink curtains...


 Until we moved back in and he at least made it into the kitchen, keeping the fridge company at first...


Until our new computer desk turned pantry replaced him there, and he was relocated to the other wall.


We then set up the farmhouse sink that also came with the kitchen next to him, and even connected the water to the sink! But not to poor Mr Dishy.


It's quite incredible to think just how long it took us to take that extra little step to connect the dishwasher pipes and run an extension lead across for power.

In our defence, it's quite the complicated plumbing situation going on underneath that sink! There were several trips to Bunnings involved in finally getting it looking like this and not leaking (although we've still got the little bucket there just in case).


Just think how much time we've spent hand-washing dishes in the last year, with this guy only metres away! Sigh.

But never mind! The important thing is that we now have this wonderful guy up and running, and are fully appreciating the wonder of elecronic dishwashing! How we have missed it!

Hooray for small victories!

07 December, 2011

Playing in the Muck


It wasn't very long ago that we drastically improved our sewage plumbing situation at our house from this (which still makes me cry-laugh)...


To this.


Unfortunately, although our pristine new plastic plumbing looked pretty good, at least by comparison, the existing underground plumbing that came with the house appeared to be letting us down. As I alluded to here, we've been having leakage and seepage issues. We had initially thought that it was simply a volume issue, since at first we only had leakage issues when we were running the washing machine and a lot of sudsy water was flowing through the pipe.

But then we started noticing a trickle seeping up from the ground near the pipe, and said trickle did not smell very nice. Cue the collective "ewwwwwwww".

So, something had to be done. And unfortunately for Tom (since I drew the line and pulled the "I'm a girl" card on this one), this involved digging up all of the dirt around the pipe, to identify the source of the problem.


And it wasn't pretty.


As it turned out, the very old terracotta pipe that was laid when the house was first built was cracked and broken in quite a few very important places. And once it lost its protective layer of surrounding dirt, it became completely useless and wouldn't keep in any water (or other substances).
 What's more, to our horror, we discovered that not only were the cracked pieces preventing the pipe from holding much water, but there appeared to be a blockage somewhere further along the pipe preventing anything from getting very far. We don't know if we caused the blockage by digging it up and allowing dirt to get inside, or whether the blockage was partly to blame for our leakage issues in the first place.

This all occured on Friday evening last week, and we were faced with the prospect of not being able to use our toilet, shower or kitchen sink until the problem was solved. This was a particularly unpleasant revelation for Tom, who'd been playing with a shovel in a hole filled with dirt and other-things-that-shall-not-be-named all afternoon.


I hit the phone, and started calling all the plumbers I could find in the surrounding areas, and eventually managed to speak to one. The bad news? On a weekend, they would charge us $352 for the first hour, and $44 for every 15-minute increment after that, plus $71.50 for the machine to clear the blockage in the pipe. I'm surprised they didn't want my firstborn as well!

So then we decided... how hard can it be? We checked a few equipment hire websites (since the stores were closed for the day, so wouldn't answer their phones - I tried) and established that the closest ones to us probably had the drain cleaner equipment we needed, for a price of under $100 for a 4-hour hire.

The next morning (after Tom showered himself that night with the hose in the front yard - my apologies to any neighbours who have good eyesight and could see him in the dark), we discovered that we could hire an "electric eel" drain cleaner for the grand old price of $74 for four hours, and we got to work.

image sourced here
I don't have any pictures of this part of the process because it was all hands on deck, but I'm very happy to report that this was actually a reasonably easy procedure! The drain cleaner, which looked almost exactly like the one in the picture above, came with twelve 2.5metre chain thingies (they basically looked like long heavy-duty metal slinkies), that the machine rotated to churn through the inside of the pipe. We made sure we ran the hose at the pipe's opening to try to wash all the nasties off the chains (and into the pipe) as they went, so they weren't anywhere near as disgusting as I thought they would be by the end.

Within an hour or two, we were pretty certain that neither ours nor the neighbour's sewer pipe had any obstructions anymore (thank goodness), and we washed and packed up the machine and had it back at the hire place in record time! We're so used to having to try to pack too much work into a short space of time with other equipment we've hired before that we were amazed at how easy it was to get this job done!

But we were nowhere near finished! This was when the real fun started.

Months ago, when we were first beginning to think about removing our old bathroom, we got the original plumbing plans for the house from the council. They were incredibly primitive (and hand-drawn). Here's a little snapshot showing the division between ours and our neighbour's block, with our house on the right.


The most important thing it told us is that the one and only sewerage pipe running to our block (the heavy dashed horizontal line on the diagram) comes straight across from our next door neighbour's yard, just inside the back wall of each of the houses, and ends on our block. Assuming of course that the diagram was correct, that meant that we don't have anyone else's plumbing running through our block, we're at the end of our little line (or the start rather, since everything obviously has to flow downhill).

Therefore, if we chopped off all of the broken terracotta pipe to the right of the edge of our house on that diagram (roughly where the number '8' is), we could simplify the underground plumbing and eliminate the problem area, without causing ourselves any other problems!

And so we did just that. Tom put the grinder to good use, and simply chopped off the pipe.


As you can see, the open bit of pipe nearly lines up with the back wall of the neighbour's house (it doesn't line up with our house anymore because we slid the house forward when we raised it), which corresponds with the main pipe in the diagram, so we figured we were definitely on the right track.


We could then completely remove all the other bits of terracotta sitting uphill of our cut pipe, giving ourselves a nice, neat, clean slate. Well, as neat as a hole filled with stinky mud can be, anyway.


Then we could finally get to work reconnecting the house's plumbing to the underground plumbing, so we could use our facilities again!

First things first, Tom attached a rubber fitting to the cut terracotta pipe...
 

And then applied some glue to a plastic corner piece...


And attached it to the other end of the rubber piece.


While that was happening I went off to get a load of sand that we could use to fill up the hole we made, since sand will be a lot easier to dig up than clay dirt if we ever have to re-expose this connection (which we will have to do when we do the plumbing for underneath the house eventually).

We popped Allie's food bowl upside down over the opening in the pipe while we unloaded some of the sand.


And then we took about a million photos with a level as reference, to show exactly where the pipe sits in relation to the house, just so we have something to look back at if we ever need to check things.


Allie kept a supervisory eye on proceedings, as usual (and what gorgeous eyes they are)!


And then tried to distract us with ball play, which was interesting, since we didn't really want the ball ending up in our giant sewerage hole.


We would not be deterred, though! A few more plumbing pieces later...


And we were installing the last link, to reconnect the house. Hurrah!


So now we have effective waste plumbing again, nicely buried in a hole filled with sand.


Not only does it look a lot neater than the pipe that used to run across the ground, but it also has the added advantage of completely deadening the sound of everything falling down that long vertical section and hitting the corner at the bottom, which was something we had the pleasure of listening to before. We just need to get a little bit more sand to fill up the hole completely, and we're done!

How's that for a before and after?

Related Posts Plugin for WordPress, Blogger...