
I'll recap that beginning for you.
Here's our earliest plan for the backyard steps.


And here's a wider shot of that area, once we'd started building a little baby retaining wall out of cement blocks to run parallel with the back of the house.


Another shot of the wall, a bit later on I think.

And the view from the alfresco area.

Once the builder handed the house over to us in February 2009, we got cracking building the rest of the wall. Unfortunately we weren't anywhere near as fastidious with our photo-taking as we are these days, so you only get a little insight. But the basic steps are there.
Having built the wall up to almost level with the back corner of the rumpus room, we decided to waterproof it with black tar along the back.


Tom still going brushing the tar on. See the blue ropes in this picture? They were actually our makeshift washing lines as we moved into the house, because:
1) We didn't have any washing line yet
2) We'd bought a whole bunch of linen, curtains, etc etc at the Boxing Day sales that hadn't been removed from their packaging yet, so had to wash everything. This washing line extended in double across the backyard, and then down the Northern side of the house as well. I wish I'd taken a photo of it full!

The wall itself didn't progress much further for quite a while after that point, although we did install turf at the bottom, and pavers along the top in the meantime. Before we could build the wall any more (and extend the pavers), Tom wanted to run some electrical cable across to the shed from the house, so that in the future we can have power connected to the shed if we choose to. That's what's in the brilliant orange pipe.


Here is where my photo inventory is decidedly lacking. I don't seem to have ANY photos of the unfinished back steps, except this one, which I took of the next door neighbours' puppy playing in our yard. The steps stayed in this condition for months on end, while we dealt with other much more important tasks (such as building the driveway and planting the front garden). Whenever Tom was concreting something in, if he had concrete leftover he would come and build another layer of the steps.

Here are Leila and Allie playing in the backyard again. You can see that the retaining wall has no capping bricks on top of it yet, and that nothing had been built along the shed side yet.

Here we are down the shed end of the yard, obviously concreting in the other section of the L-shaped wall. Allie actually managed to fall asleep with her head on a concrete block! How is that in any way comfortable?!

Daniel thought it was a good joke.

BAM. Surprise! The wall is now complete! How annoying that I can't give you the blow-by-blow record in pictures, because there were a LOT of steps between the last photo and this photo - from concreting in all the blocks, to removing the crummy dirt from the garden bed at the top and replacing it with nice dirt, to planting the plants, to laying a sprinkler system that feeds off the water tank, to mulching the garden, to painting the wall in a render-like paint (the same colour as any external painting on the house), to laying leftover house bricks cut in 2/3rds along the top of the wall to cap it off. You can see at the very bottom of the picture that we've got bricks holding up the end of the garden, because there are no stairs yet.

Ooh pretty.

The view from the other end. Allie has random bits of junk (toys, milk bottles, buckets) spread across the lawn. She particularly enjoys chasing buckets around the yard and growling at them at about midnight.

The completed paving along the top of the wall (water tank's on the right)

The top of the wall along the shed side.

And the view towards the rumpus room when we moved out.

The view across the yard, looking towards the alfresco, where you can just make out the stairs.

The corner of the retaining wall.

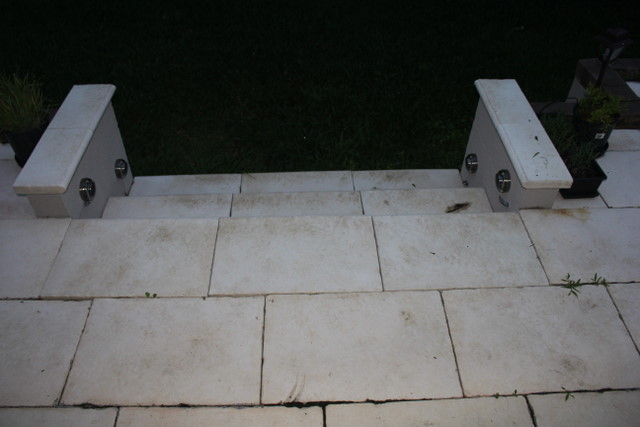
And voila, the beautiful stairs that were about 1.5 years in the making. Those lights work, too!


And that brings us to the completion of Our Slow Retaining Wall. To see our other retaining walls for our Next House, click here.
No comments:
Post a Comment