
Our front fence at our Next House was one of those projects that we started fairly early on, but didn't actually finish very quickly because we got caught up doing other projects. Very similar to Our Slow Retaining Wall.
As newbie landscapers at the time, we tried our best to plan ahead so that we wouldn't miss anything important along the way. It seems to be inevitable that almost every task turns into a house-that-jack-built scenario where one thing can't happen before another thing has happened, which in turn can't happen before another thing happens.
The front fence was one of those thigns. We wanted to put in the pavers for our Roundabout as one of our earlier landscaping tasks. But in my infinite wisdom, I realised that because the plan was to have the pavers come all the way to the fence line at ground level, then have a little baby retaining wall along the front boundary to bridge the height difference between the yard and the footpath, then build the fence on top of the little retaining wall, we needed to concrete in the fence posts BEFORE paving, or we would have to rip up the furthest pavers in order to put the posts in later. Sounds clever, right?
Well it was. Tom went and bought some nice second-hand hardwood posts from a salvage yard to concrete in. There were two reasons for going the second-hand option. The first, that they're cheaper than buying them new (only marginally, really). The second, that we could choose posts that are nice and straight. In our experience, the brand new hardwood posts from places like Bunnings tend to be only fairly freshly cut, which means that they warp a bit in the coming months. The disadvantage with the posts we got was that they were already painted (which meant they needed pretty serious sanding later before we could paint them our colour), and a few of them had notches cut out of them that I had to attempt to putty up with Selleys No More Gaps later on.
Here's a photo of the front posts concreted in, while Allie checks out what's happening.
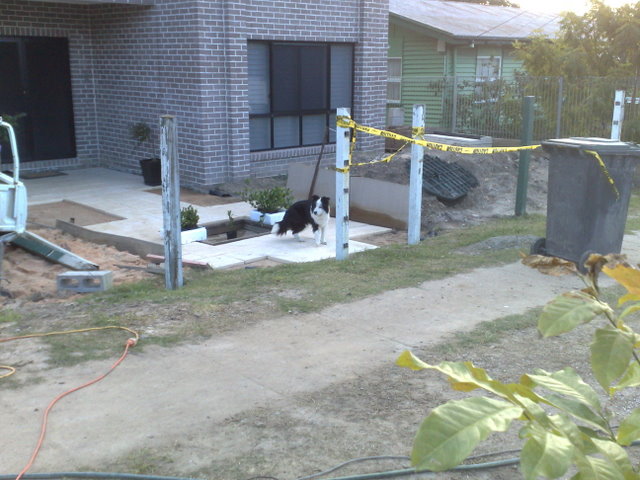
And here's the side post concreted in. For some reason that I can't remember, we didn't end up concreting in the rest of the side posts for quite a while (i.e. until we wanted to tidy up that part of the front yard).

And here we are a bit later on, with our stringline strung up over the top of the posts. We decided to paint them a colour called Kona (can't remember what brand), and the retaining wall boards were painted Wallaby (a Solver colour, the same as the painted external bits and pieces on the house and the back retaining wall). We later decided that Kona was a little bit too purple, so we changed to the colour Dark Mood (also can't remember which brand).

Here's a closer view of that section.

As usual, we needed to run some drainage along the high side of the retaining wall, so in went the ag pipe and drainage gravel.

We also always put black plastic between the retaining wall itself and the gravel etc, in an effort to protect it from moisture as much as possible.

On the topic of drainage, here is the little side corner where the fence was to meet the garage (the same corner you see in the second photo above. This particular corner was the only place in this part of the front yard where we could tap into the house's stormwater pipe, so we had the driveway drain (the one at the bottom of the picture), the front yard draing (the one on the right), the house's downpipe (one on the left) and the garden in front of the study window to the left of the front door (the one higher on the left) all draining to that one point. Tom's pretty proud of this effort.

Allie likes it too.

So much that she wants to celebrate the occasion with a game of throw-the-rope-toy, once we covered up all of the pipes with gravel and made the area a bit safer to walk on.

Again much later on, once we'd knocked off a few other tasks (i.e. planting the front yard), it was time to start actually building the fence itself. Like with the posts, we decided that we would prefer to go with second-hand fence palings instead of buying new, because they're cheaper, and they don't warp as much. We did some searching online, and found someone out past Ipswich that was selling their existing fence. So we trotted out there and collected their entire fence in the back of the ute.
We had decided that we wanted the front fence to be at a consistent height, even though the footpath slopes downwards from left to right, so obviously we needed varying sizes of palings depending on where they were to go. It was then a matter of measuring the various heights that we needed. We had a few moments of panic when we realised that the average height of all of the palings was a lot less than we had originally thought, so we were really stretching it to get enough palings for each panel. As seemed to happen a lot with our landscaipng projects though, we just scraped by with what we had, and no-one would ever know how hard it was (unless I complained about it on a blog).
Once we had all of the palings cut to the right sizes and laid out in their various sections, it was time to begin the awfully tedious task of sanding and painting them.


We made life hard for ourselves wanting to be thorough and paint them before we nailed them up on the fence, but it was worth it in the end.


We had the choice of two options for the actual construction of the fence. The first was to simply nail the horizontal support beams onto the back of the vertical posts. This would have looked like this:

The biggest advantage of that option is that it's easy. You just bolt the horizontals onto the verticals, nail the palings onto the horizontals, and you're done. That does mean that your fence takes up a lot more space though, from the front of the verticals to the back of the horizontals, and we wanted ours to be nicely in line with the top of the retaining wall beneath it.
So, we decided to go with the second option:


Here I am looking across the notches.

Once we had the horizontals up, it was time to attach our freshly painted palings (my poor wrist didn't forgive me for all that painting for a while). We laid them all out in their sections along the front of the fence.

At the same time we cut out the nature strip from our gate to the footpath so we could lay our pretty pavers all the way to the footpath.

And then Tom borrowed the neighbours' brother's nail gun (they were building their front fence at the same time, which worked out extremely well for us), and attached the palings to the horizontals.


The almost complete fence. All that remained outstanding was the horizontal beam we eventually put on top of the palings to tie it all in together and neaten the look up a bit.

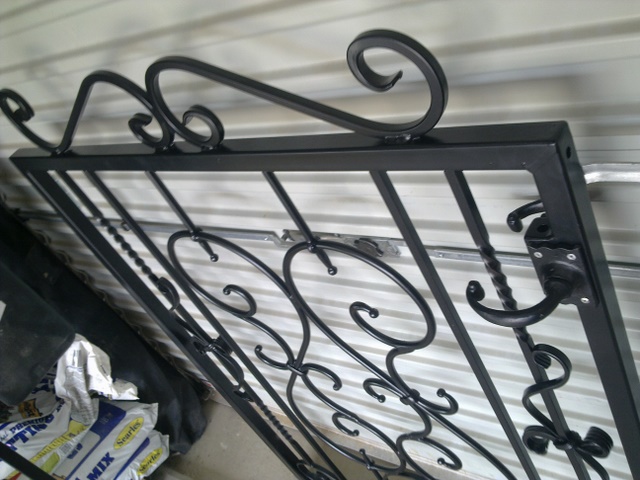
We then moved onto the question of gates. From the very beginning, I had my heart set on a wrought iron gate. We had fears that this would be ridiculously expensive, but didn't actually start testing the price waters until we had the fence finished. We got a couple of quotes. One guy brought us an old looking brochure full of various pre-fabricated pieces in various designs which he said he could put together any way we liked to make a gate. The next guy came the next day with a different approach. He sat down and drew me a drawing of a very ornate gate. He makes the entire thing from scratch.
We waited anxiously for the prices. The first guy quoted about $800 for the two gates we needed. The second guy quoted about $1600 for the two. Needless to say, we went with the first guy. He was fantastic. I changed my mind about the design about four times along the way, and he patiently put up with me. Tom and I also managed to find two sets of black handles (a bit more fitting than the plain steel ones) in a discount bin at a local woodworking shop for $20 a pair.
Eventually, we had our gates.


And then Tom installed them. One at the front, one at the side.


Much later again, I decided to dig out about 500mm of dirt in front of the fence along the nature strip in order to plant a little hedge and decrease the bare-ness of the view from the street. I must be a sucker for punishment. I've done enough mattocking with this house to satisfy me for a lifetime.


And that's our front fence!
No comments:
Post a Comment