
It's finally time!
The time I've been impatiently waiting for for over two years, ever since we bought our little house!
It's time to paint the outside of the house, and get rid of that awful yellow (no offence people who like yellow houses, I'm just sooooooooooo sick of this yellow) outside, after having systematically banished it from the inside (see here and here)!

At first, i.e. when I was even more idiotic and crazy than I am now, I thought we could paint it ourselves. But it quickly became apparent that there was way too much work involved for us to manage it on the weekends. Particularly since our house has very long legs, and we'd need scaffolding to be able to reach the very top. And hiring scaffolding for weekends upon weekends is expensive!
So, I got some painting quotes.
And they were ridiculous! One guy applied this gooey stuff to the walls, left it for a day, then came back and peeled it off to test which product would strip the peeling paint the easiest. And then he quoted me $30,000 to do that all over the rest of the house and then do the painting. Ouch!

I thankfully found a much more sensible painter, who quoted a much more reasonable $10,000. Although that still hurts the bank account, that's for sure!
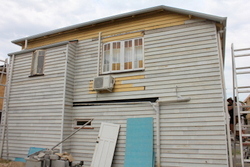
And they began on the back wall of the house, which looked like this.

As I mentioned in this post, the colour I had chosen for outside was Dulux's Flooded Gum, a slightly darker, slightly browner colour than the Taubmans Gunnard Grey that I had originally chosen and painted on the front stair treads.

So! Enough suspense, here's where the action really begins! Voila!

There's something so beautiful about watching this progression but not having to do the work yourself!

Here it is with the back wall completely painted, with just the windows and sills left to go.

And a close-up of that two-storey bit at the back of the kitchen...

And then... like magic... the finished product, with windows and sills complete. I simply opted for black on the sills and white on the windows themselves. And I was definitely loving it! As you can see in this shot though, that's only one of the four walls down. The side wall was next.

So how about a little trip down memory lane! Let's look at how that rear wall of the house has progressed.


Virtually unrecognisable, huh?
I'm so excited. I CAN NOT WAIT to see the front of the house painted!!!!!!
No comments:
Post a Comment