
But it looks like I'm not very original, because I've used both of those titles before. Hmm.
So... here's the story of me "manning up" while building a wall! That's right, original or not, I can now proudly say that I have built a wall all by myself, no man included.
This old shot of our house's front doors marks the location of said wall.

Since my brother Daniel and I had successfully managed to open up a new doorway to our future ensuite, we were now free to close in the old one, namely the doorway in the top left of that photo above.
Which looks like this.

First step was to remove all of the fibro boards covering up the wall...

Until we were left with this. Ooh the nakedness! I think we've now managed to find the one colour that is actually more sickly than all of the yellow this house is covered in!

And then, in a brilliant feat of manliness (and his last contribution to the wall-building), Daniel whipped up this pine frame to fill in the old doorway space.

While I sanded and sanded and sanded VJ Boards.

And then Daniel went off to work... (why do all the men in my life keep leaving me to go to work?), and I got to work attaching the VJ boards to our wall frame.

Not before I had a genius moment though, and remembered that I'm going to need some electrical wiring running to a sensor light at the front of the house (the low end of the sloping wall in the above photo), so I bought a length of wire and ran it along the edge of the ceiling, drilled a hole in the front of the house, and voila! Ready for an electrician to come and do his thing!

I then spent the next six hours cutting boards, hammering in nails, and generally wrestling with the fact that it seems virtually impossible to get a VJ board that is actually happy to sit straight.

I won out though, even managing to show off my own amazingness by getting the cut angle for the last VJ board exactly right so it matched up with the crooked front corner (nothing in this house is even close to straight or level).
I hammered in the last nails a few minutes before our 6:30pm noise curfew, and got to stand back and admire my handiwork. Isn't my wall beautiful?

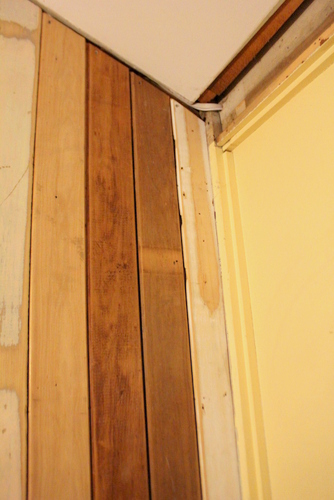
I called it a night then, but the next weekend I decided it was time to tackle the unfinished edges around the window. Again, because nothing is straight in this house (including the existing window), I attempted to cover up the dodgy edges with some leftover VJ board scraps when I finished off the wall...

But it needed some architrave to cover over those ugly edges and make it look like it's always been there. So... I decided to steal the architrave that lived on the other side of the original doorway (i.e. the one we'd just blocked up on the outside).


And with some careful measuring and cutting of the remainder, I just managed to squeeze four lengths to surround the outside of the window.

Unfortunately I didn't quite have enough length to get a perfect cut on my fourth piece, but I figure I can putty up that gap in the corner and no-one will ever know! Hmm... perhaps not no-one. If that was my goal I probably shouldn't have just shared it on the Internet!

So there it is. My almost entirely girl-powered (oops, used that title already too) wall, complete with trimmed out window frame!

Next step is obviously to putty and no-more-gaps and paint. Although I'm holding off on doing that until I can paint all of the verandah/sleepout walls at once. That's got to happen eventually, right?
No comments:
Post a Comment