

It used to look like this, before we closed in half of the existing window (and brought in cabinets and appliances that actually made it seem like a kitchen again).

From the very beginning, our kitchen plan has been to split that double window in half and separate the two panes so that they sit symmetrically on either side of the oven.

So, it was time to hack into the wall to open up the second little window half. We sawed through the wall at the same height as the top of the other window, and then started pulling out the VJ boards.

Until we were left with this.

And then we measured the exact distance between the edge of the stove and the right window, and marked the position of the left window so that it would be exactly the same distance from the stove.

And then Tom sawed through the line we'd marked on the external weatherboards, while I was on vacuum duty.


And then Tom climbed up a ladder to start pulling away the weatherboards from the outside.

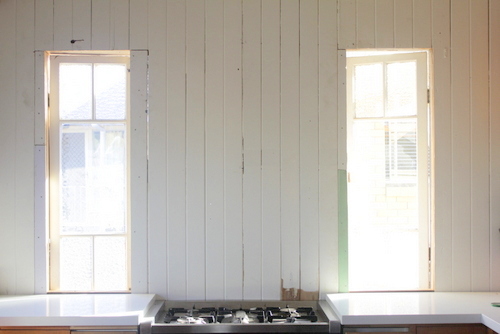
Leaving us with this.

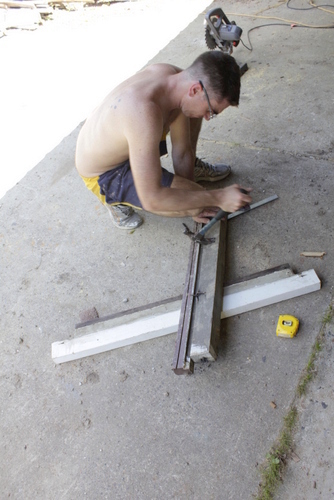
Tom then cut through the vertical beam that was now in the middle of our new window.

May I suggest that you don't try this particular method at home? Not the safest.

So that was the easy part, leaving us with two roughly matching openings in our wall.

Then came the hard part. Finishing it all off! First step was window sills. We had somehow managed to salvage two other chunky window sills from somewhere else in the house, so we carefully cut them down to size...
It took quite a bit of trial and error until we settled on the right angle to cut so that it would slot into the existing window space properly.

And then we just replicated it on the other side so that it slotted in nicely.

Please ignore the embarassing cluster of bolt holes in the window sill in this picture. We changed our minds about where to bolt it in, and you won't even know they're there once I get the putty happening. The real problem was the height difference between the top of the window sill and the top of our benchtop. There was no question that we'd need to put something in that gap to cover over the ugly tops of the VJs (sitting between the benchtop and the window sill), but it would need to be especially deep, so that it also covered the height difference.

After a bit of measuring, I drew this not-very-legible diagram.

We located a suitably large old piece of fence post in our timber pile, and Tom got to work with the circular saw, turning my concept into reality.

Thankfully it worked, and we then had a nice smooth piece of timber sitting just a little bit above the height of the bench, so it no longer looks so strange having the window sill significantly lower than the benchtop height.

Then it was time to finally make the windows look exactly the same, by framing up our new hole in the wall.

It too involved another complicated diagram from me. The issue was trying to make sure that there would not only be exactly enough room for each of the windows themselves, but that the inside edge of each would be the same distance from the edge of the stove. It sounds simple, but it was hard!

Tom got to work attaching some ply to the edges of our new window frame, to build it out just enough...

And we cut up some extra bits of VJ boards to cover over the exposed bits of frame. They will eventually be covered by trim. Oh, and we hung the windows!
It's so lovely finally having that window plan turn into a reality! It was a hard slog, but we got there! Now I can't wait to get some trim around those windows to really finish them off.

No comments:
Post a Comment