

As I mentioned here, I will soon be moving to working mainly from a home office. One minor problem with that plan is that it requires an actual home office. We're getting there with some built-in shelving (see here), but what else does an office absolutely need?
A desk, of course!
Originally when I was drooling over pictures of desks online, I was super keen on ones with sexy legs like this.
 |
| Sourced here |
And then somewhere in the World Wide Web, I came across a photo of a dining table chopped in half and mounted on a wall as a desk and fell in love with that concept! Of course I can't find that photo for the life of me now!
But I have found a couple of pictures of cute little side tables chopped in half...
 |
| Sourced here |
They're basically exactly what I had in mind for a larger table.
 |
| Sourced here |

We actually bought him with six chairs for the grand price of $50, and amazingly, managed to sell the chairs on Ebay for $122. So this desk officially cost us negative $72!

We marked him up, and Tom sawed him in half in preparation for his new life as my desk.

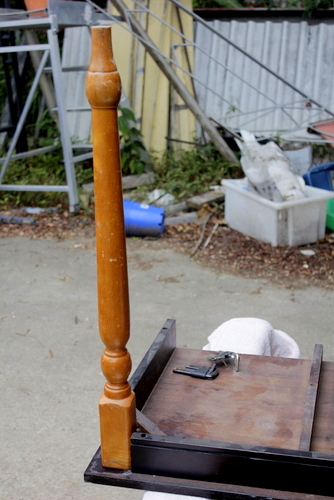
In order to make his boring square legs look a little bit more like the fancier legs that I was lusting after at first, these guys came into play. We actually got them (and two others) for free from the lady we originally bought our dining table from (see here). She'd thrown away the tabletop that went with them, and wanted to get rid of these, so we very willingly took them off her hands.

So... to make the leg switch, we simply unscrewed the existing legs on the table...

And then screwed in the new guys!

They were a little slimmer at the top (although they're upside down so it's actually the bottom in these photos) than the original guys, so the join wasn't perfect, but I wasn't complaining.

Ignoring the horribly mismatched colours, I thought it was an instant improvement!


So there he is, nice and flush along the back!

And nice and strong and secure (although still pretty ugly) from the front!

To solve that mismatching problem, I attacked it with a sander.

At first I was a bit terrified of scratching the timber by using a rougher sandpaper, but let me tell you, it is SO much easier to sand off the glossy finish with a rough sandpaper (40 or 60 grit) and then follow it with a finer one (i.e. 180 grit) than it is to do it all with the finer grit! I was careful not to apply too much pressure with the rougher grit sandpaper so I didn't scratch the surface, and it didn't do any damage at all.

I even attacked the legs with the sandpaper...

But because it was hard to get around all of the grooves without risking sanding off the nice curves, I decided to bring in the ESP that I used to prepare our dining chairs for painting (see here) just to make sure that when I painted them, the paint would stick nicely.

We balanced Mr Table very precariously on an old work table and upturned bucket under the house, to get him up off the ground for easy painting.

I undercoated, and then we decided to paint it with two coats of oil-based white semi-gloss paint. We figured since it will definitely get a few bumps and knocks throughout its new life, it would be sensible to use oil-based paint for a bit of extra durability.

It certainly made the painting process take a while! I had to wait at least 16 hours between coats, and then we left it alone for a full week so the paint could cure nicely.
And then finally.... FINALLY... we could install him!

Although we realised we hadn't actually attached that skirting board to the wall yet, so we gave the screwdriver a warmup with that first.

And then I followed with some 'no more gaps' along the top to make it look seamless and beautiful.

So then... finally we got to install Mr Table!

We of course re-encountered the fact that nothing in this house is straight or level, so we had to do a bit of adjusting to get the table top level.
Then it was a simple matter of screwing the back board we had added into the wall...

And he was in! My wall-mounted dining-table-turned desk with new sexy legs is in!

Isn't he pretty?
Of course we've still got a lot to do in there. Adding some artwork to that wall, finishing building and painting the shelves, installing a few filing cabinets, curtains, etc etc etc, but as long as I've got a desk I've effectively now got an office, right?


LOVE IT!! What a great turn out!!! BEAUTIFUL... VERY creative.. I LOVE this!!!! Thanks SO much for linking to Pin'Inspirational Thursdays.. : )) Wishing you the Happiest Of Holiday's.. xoxo.. Marilyn..
ReplyDeleteThat table is my new favourite thing! You did such an amazing job with it, it looks fantastic! The legs honestly make all the difference! What a great idea too to cut a table in half - I just saw a dining table with similarly gorgeous curvy legs that I LOVED at a thrift store but had no use for it, now I wish I'd bought it :)
ReplyDeleteAwesome job!! It really looks amazing! I would love for you to come link up today at Passionatleyperfect.com!! Your newest follower!
ReplyDeleteJust to echo Marilyn, thanks so much for linking up to our party. Fab project and one that even netted you some cash! :-) Happy new follower.
ReplyDeleteYou are awesome so I featured you at my Hookin Up with HoH Party!
ReplyDeleteFeel free to stop by for a button if you'd like. :)
xoxo
Allison @ House of Hepworths
So creative.. I LOVE this!!
ReplyDelete