
After destroying our old bathroom, this is what was left.

Unfortunately it stayed like that for a few days, although thankfully there is a door that divides that little room from the rest of the house, so we weren't completely open to the world!
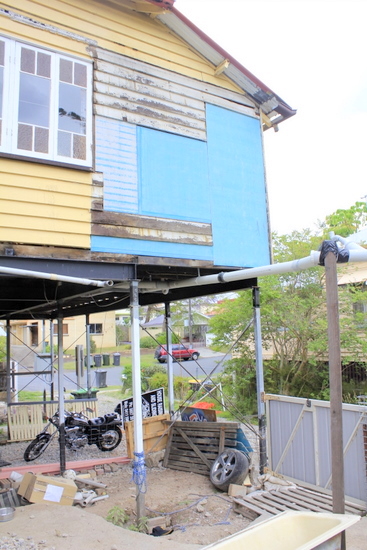
It wasn't the ideal situation though, so something had to be done, although Allie did vote to keep the view!

Weatherboards like those that are currently covering the outside of the house are quite expensive, and Tom isn't feeling quite carpentry-confident enough yet to invest the energy into learning to install them properly. So, instead of replicating the house's current weatherboards to fill that gap, we decided to go with a temporary option - blue board.
We measured the gaps and Phil (Tom's brother) began cutting the board to size. Note that he's using a grinder for the purpose, which is not normally the way it's done. We couldn't find our proper cutting tool.

For some reason, Allie really loves noisy tools!

The first board we put up was the largest. And let me tell you, it was not easy! Blue board is extremely heavy. And our house is now up really really high. So lifting that blue board up to the right height and holding it there long enough to screw it into the house frame was T.O.U.G.H.

We ended up attaching a couple of clamps to the bottom of the wall so that we could then rest the blue board on top of those while we got it into place.

Phil used the impact drill to screw the boards into the house. I've only recently been introduced to the concept of an impact drill. Apparently they've got a lot more power than normal power drills. Go figure!


I'd love to say that "in no time it was all up!" But it wasn't fast, or easy. It's done, though, and that's what matters!
Since there's no point quitting while you're ahead (or did I mix that one up?), we moved on to the other side of the same wall, to our little kitchen extension.

I'm sorry to report that it's looked exactly like that for months, since we first extended that wall.
But no more! Phil hopped up there to make sure there were no nails and things sticking out...

We repeated our clamp treatment...

And we got the boards up with relatively little drama.

Now at long last, our kitchen is much more watertight.

Since we're on the topic of closing up gaps in walls, it's high time I mentioned another little gap we've filled up. Our kitchen looked like this for quite a long time. If you look at the space between the window and the oven in this photo, you will see that it's filled with boards just leaned up against the wall.

You can see it better here. When we downsized this window from having two panes to just one, we didn't actually get to the next step - closing in that gap.

Eventually we found the time, and Tom got to work.


Because the bottom part of that wall will be hidden behind the oven and cabinets, we decided to cheat a little bit and fill the under-bench-height with smaller boards (of which we had a few spares), and use the boards that we had gained from opening up our new bathroom doorway above, to run to the ceiling.

That join shouldn't even be visible once we put the oven and cupboards in front.

Now they're just in need of a fresh coat of paint!

In the meantime, it's really lovely not having gaping holes in your house!

No comments:
Post a Comment