DIY Explanation

pour améliorer, meaning 'to improve', is a humble record of our renovation, home improvement and landscaping projects, with our travel adventures thrown in.

15 February, 2013

Tinny Tales - Part 2

See here for "Tinny Tales - Part 1

Right! So we're up to the stage where we've finally decided that pressed tin panels are the way to go for the back of our kitchen peninsula and splashback, and we've put in our order for the Snowflakes pattern!

Source


Then we hit the snag.

It's out of stock.

And it would probably be a four-week wait before the manufacturer would have another batch ready.

So, we went back to the drawing board and looked at all of the other options again...

Source

But as much as it seems almost inconceivable that we couldn't find another preference amongst all of those patterns, we just kept coming back to our Snowflakes as our clear favourite. So we decided to wait the four weeks. It's not like we didn't have plenty of other things to do to keep us occupied!

And then, at the end of the four weeks, the manufacturer revised their timeframe, and we were looking at them "maybe" being ready within another two months. Sigh.

I will say that Jean, the owner of Heritage Ceilings, was absolutely fantastic during this whole process. She couldn't have been more apologetic, even though it clearly wasn't her fault.

But we weren't willing to be that patient, so we went back to the drawing board again, and very nearly put an order in for the 'Original' pattern instead.

Source

But then my brilliant husband (yes, sometimes he's extremely brilliant) decided to do a bit of a ring-around potential Brisbane-based suppliers to see if they might have some Snowflake in stock. And lo and behold, Restoration Station had exactly five panels in stock. And we needed four! Hallelujah!

Tom got straight in the car and drove over there to snap them up before they could disappear, and we finally had our tin panels!

The mathematicians amongst you (what, my blog isn't that popular with mathematicians?) may be wondering why we would need four 1.8m long panels when we're only covering our kitchen peninsula and a small splashback above our stove.


And that would be because we decided to cover a few more things too!

Like the splashback above our laundry...


And the back of our downstairs kitchen peninsula!


So, we double and triple checked our measurements, and then Tom got to work marking each of the panels...


And then using the grinder to cut each one to the right size.


We had to make a decision as to exactly how high above our stovetop our rangehood would eventually sit before we could cut the tin...


And we popped it in! It looked remarkably small without a rangehood to ground it. One step at a time!


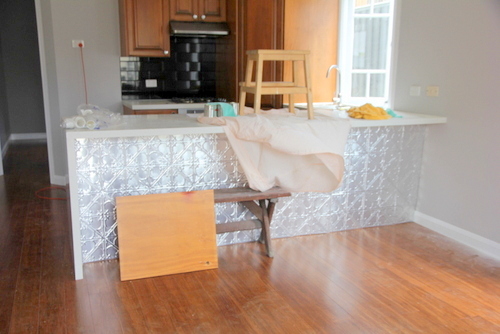
And then the moment we've all been waiting for, the panel on the back of the peninsula went in!


And voila! We have an extremely shiny kitchen now!


That situation is only temporary though, since neither of the panels is actually fixed in place yet (thus the stool stopping the big panel from falling over). I have plans to paint them, since they're pretty full-on in their raw silver colour. Just have to decide what colour!

Then it was the downstairs kitchen's turn! Because of the giant length of that bench, one full panel was not long enough, so we cut an extra piece to size to cover the gap. The panels are designed to overlap each other on certain edges, so the join is hardly noticeable.

But again, the raw silver colour was a bit intense for us!

And I wasn't conflicted about what colour to paint this time. Any guesses?


I wanted a lovely gloss black finish to match the glossy black tile splashback behind the stove. So, I decided to spray paint the panels rather than rolling on the paint, for a completely clear finish. I went through FOUR cans of spray paint! It was a really strange experience. I'd sprayed about four coats of light misty spray (as you're supposed to do), and I'd get some areas where it almost looked like I hadn't sprayed them at all, and others where there were hints of the beautiful black glossy look I was going for. So, I just kept going until I completely ran out of spray paint. I think it's something to do with the way light hits the peaks and valleys of the surface. It makes it really hard to actually be sure about whether you've got good coverage!

It looks pretty good in the end, though!


And then it was time for installation! I was super super excited.


The recommendation is to use small zinc nails that you hammer through the tin into whatever is behind it. We decided to double up and use glue as well, just to be extra safe.


And we discovered that the nails themselves have a bit of trouble penetrating the tin's surface, and added to the fact that we'd used some of the leftover flooring as the board behind it, we really struggled with the nail-hammering part of it.

So, we adapted our system, and I used a small drill bit to pre-drill the tin and a little way into the board behind it so that the nails had a clear run before gripping into the board.


In order to avoid hitting my lovely paint job with the hammer, we would hammer the nails until they were almost in, and then use a nail punch to provide a bit of separation between the nail and hammer for the last couple of hits.

The funny thing about the panel is that it's very ripply! Some areas would sit beautifully flat against the board behind them, and there were others where we had to put a nail in almost every section of the pattern in order to try to iron out the ripples.
What do you think? Beautiful yes?


I then went over all of the nail heads with a little dab of black nail polish once we were done, and you'd never know they were there unless you were really looking for them!


How's that for an instant transformation?


The upstairs kitchen and laundry have to wait a bit longer for their final installation. Stay tuned!

14 February, 2013

Tinny Tales - Part 1

Happy Valentines Day! I realised this morning that this is Tom's and my seventh Valentines Day together! And for the first time, I've told him not to send me flowers. Because really, I'm just not that keen on seeing hundreds of dollars added to our credit bill for the sake of it. Hopefully he finds a simpler, more creative way to show he loves me. Hint hint, honey!

In the meantime, let's get back to this renovation, shall we? Because let's face it, it's the other love of our lives.

Let's move upstairs and have a chat about our kitchen peninsula (otherwise known as a breakfast bar), shall we? Here it is looking from the lounge. And obviously this shot was taken while we still had a back door.


A little unfinished, right? That's just the raw backs of the cupboards and the little MDF plinth we built for it. Probably not the best look if we want this renovation to actually look complete, right?


Right. Well I've dithered (as always) for a long time over whether I should just stick some ordinary VJ boards on the back there and be done with it, or whether I should try to do something a bit more special and interesting to make a feature of it.

I really wanted to go in the interesting direction, but there's a fine line to tread between interesting and off-putting. I didn't want my choice to prevent prospective buyers in the future from wanting to buy the house.

And then one day, I can't remember now what gave me the idea, I decided to google "pressed metal panels", thinking that that might just be my good safe zone between off-putting and boring. And that is how I stumbled across the Heritage Ceilings website. It has pictures upon pictures of tin panels installed in houses, shops, you name it.

Source
As the name 'Heritage Ceilings' suggests, pressed tin panels have traditionally been used on ceilings.

Source
But as the pictures testify, there are no laws saying you can't be creative.

Source
I found examples upon examples of the panels used on the backs of benches...

Source
And even as kitchen splashbacks!

Source
In fact, in last year's season of the Australian renovation show 'The Block', Dale and Sophie used pressed tin in the 'Original' pattern as their kitchen splashback.

Source
I'm proud to say that I actually came up with the idea before seeing them use it, though. So there!
 

Anyway, the more pictures I looked at, the more convinced I was that I was on the right track.

Source
And the best part? It's not that expensive! Just in case you can't read this price list from Heritage Ceilings, a 1828mm x 915mm panel (more than enough to cover the back of our kitchen peninsula) costs only $95 (plus GST and delivery).

Source
I figured that we could even order a second panel and cut it to fit in the gap between the two windows on either side of the kitchen stove, as a splashback.


But deciding on our interesting-enough material to put on the back of the peninsula was only a third of the battle. The next third?

Deciding on the style.

Because there were a lot of patterns to choose from!


We eventually narrowed it down to 'Snowflakes' and 'The Shield'.


We really liked the larger patterned look of 'The Shield', particularly on a big wall like this.

Source
But because we had a much smaller area to cover, we worried that the larger pattern would be a bit overwhelming. Particularly for the section of splashback above the stove, since just one repeat of the pattern is about 610mm x 610mm, and our splashback would only need to be about 920mm x 700mm, meaning we'd get only one-and-a-bit repeats of the pattern, which could look quite messy.

So, we were down to Snowflake.

Source
Which I loved the look of over a larger area, but which had a small enough repeat that we thought it could give us a nice (but not overly floral like some of the other patterns) textured look.

Source
So the decision was made, and we put in our order!

But the course of true love never did run smoothly, so we inevitably struck a snag. More to come!

12 February, 2013

Lock it Up!

Up until now, our entire new downstairs area has been completely un-lockable. Anyone could have just walked in and made themselves at home. We probably wouldn't have even heard them, thanks to the acoustic-rated insulation I had installed between the ceiling and our upstairs floor.

But that is the case no more!


Somewhere along the line, I decided that I would have black door and window hardware, to play nicely with the grey, white and black colour scheme I had settled on for the outside of the house (see here for how that turned out). I didn't realise at the time how difficult that would make my life! Black door handles (and window hardware for that matter) are incredibly hard to find! My choices were extremely limited, which of course meant that I was paying a premium for everything.

Nevertheless, the new black entrance handle on the front door (the only door in the downstairs area that isn't brand new - I scavenged it from a demolition yard and made the carpenter figure out how to hang it in its slightly-warped state) looks beautiful, doesn't it? Especially with the original key hole still in place on the door? I just have to figure out how to mask the original door handle hole next to it.


The windows also got their share of black bling, with little lockable teardrop handles and spur catches at the bottom. Actually the colour isn't black, it's called antique bronze, and it's essentially a very very dark brown, with little tiny rubbed touches of bronze on the extremities. They certainly look the part.


I considered the option of leaving the black there, on all of the outside windows and doors, but going with a cheaper, brushed steel look for all of the internal door handles. But for the sake of consistency and not cutting corners in order to save a relatively trivial amount of money, I decided to persist, and bought black passage sets for the three internal doors as well.


I'm glad I did. They certainly add to the overall look, I think!


We did strike one snag with my lovely handles, though. Although granted, we would have had the same problem with any handles, really. They threatened the un-dented-ness of all of our lovely walls, since they stuck out from the door itself so much.


A quick zip down to Bunnings to buy some $1 plastic door stops and a bit of fiddling around though, and that problem was solved.


But let's not leave it there. Next under the general category of 'hardware' falls the wardrobe doors!

You got a brilliant sneak peek at them in my last post about the lighting going in


I was keen for them to be installed, if only to get them away from my lovely painted walls!


We opted for plain white vinyl on the linen closet, with a brushed steel trim...


And mirrored doors on each of the bedrooms, with the steel trim again.


You just can't beat the effect of a mirror in a space, can you?


Can you believe these are the same rooms that used to look like this?


 And how about this for a before (after the frame went up) and after of the wardrobe corner of the second bedroom?

08 February, 2013

Let There be Light!

It's magical what a lick (or a million licks, more accurately) of paint can do, but it's even more magical setting the electrician to work for a couple of days and seeing the transformation. Now our downstairs area looks like a really and truly house that people might live in!

Let's start small so we don't all get too overexcited. Because let me tell you, this is exciting! Got it?

This is the little niche cut out of the corner of our hallway with its very own special little downlight.


And here it is with much better lighting in daylight, cosying up with the new hardwired smoke alarm.


Now onto the bedrooms!

In the master bedroom we decided to put in bedside pendants, each with a switch on either side of the bed (and also one near the door). I did a lot of dithering over what I wanted for those pendants, and eventually just grabbed these two cane woven shades, thinking that I might spray paint them a different colour later on. But then they blended so nicely with the floor colour that I just decided to leave them!


What with the darker paint colour and the warm, woven pendant shades, that bedroom is lovely and cosy now!


The second bedroom is quite different. Much more suave and sophisticated with its fancy ceiling, which I'm now going to call 'coffered' because it sounds as fancy as it looks. When the electrician ran the wiring in the ceiling, we'd planned on centering the downlights off the main walls, but once the ceiling got built in, we realised that they wouldn't then be centered in the recessed sections which would look strange. So, we had some anxious finger-crossing time while the electrician made holes where we wanted the downlights to go and tried to pull the wiring through. Thankfully it worked!


We had also planned to have another fan light like in the master bedroom in the central bulkhead there, but unfortunately the fan would have hung too low to comply with the legal height for fan blades, so we had to scrap the fan idea and just go with an ordinary batten fitting.


I then popped down to Bunnings and grabbed something with a bit of bling that I thought might work nicely there and not hang down too low. I'm pretty pleased with the result!


And now to the bathroom! The bathroom caused me quite a bit of disappointment, actually, because almost from the very beginning I'd had my heart set on having a black chandelier in there to play off the black brick tile wall. I found a chandelier for the bargain price of $100 at Masters, and the electrician installed it. Cool, huh?


I even found a matching wall light in black online at Oz Lighting that is actually the same design as the silver wall lights in our upstairs bathroom.


But then we hit a snag. The electrician was worried about my chandelier, because it wasn't waterproof and was within direct splashing distance of the shower head, so if some crazy person decided to point the shower straight at the chandelier we'd be in trouble. Apparently he wouldn't be able to sign off on the compliance of the light fitting with legal standards if we left the chandelier there.

I was sad.

But there's no arguing with legal standards, so I bought an external ceiling coach light that I was sure was weatherproof since it was designed to go outside, and the electrician installed that. It's not so bad, it's just nowhere near what I wanted. Sigh.


But after that disappointment, let's move on to the really exciting part! The main living area!

Here's the view from the garage door to the kitchen.


And if we turn slightly once we're inside, aah, beautiful pendants! They're the HEKTAR pendant light from IKEA, and they set me back $99 each.


And looking toward the lounge, we have another fan light.


We also positioned three downlights in the lounge, two on the front door's side of the bulkhead, one on the kitchen side. I figured that since we put the TV point on the window-less feature wall, the couch would probably go in the corner, so with the downlights there, it should be lighting a-plenty!


The electrician and I spent so much time trying to figure out the correct placement of those pendant lights. You wouldn't think it looking at it now, considering that they look like they line up perfectly, with the kitchen ceiling light centred between them, but a lot of thought went into that! The more intuitive positioning would have been just to place them at equal thirds along the benchtop. But they looked weird and non-aligned at thirds. So, we tried this quarter and three-quarter placement along the benchtop with a larger gap in the centre, and moved the kitchen light a little way along from its original placement so that it was centred between the pendants. And now I'm super relieved that I put in that much thought, because it looks so much better now!


What do you think? Does the lighting make the home?
Related Posts Plugin for WordPress, Blogger...