
Right! So we're up to the stage where we've finally decided that pressed tin panels are the way to go for the back of our kitchen peninsula and splashback, and we've put in our order for the Snowflakes pattern!
 |
| Source |
Then we hit the snag.
It's out of stock.
And it would probably be a four-week wait before the manufacturer would have another batch ready.
So, we went back to the drawing board and looked at all of the other options again...
 |
| Source |
But as much as it seems almost inconceivable that we couldn't find another preference amongst all of those patterns, we just kept coming back to our Snowflakes as our clear favourite. So we decided to wait the four weeks. It's not like we didn't have plenty of other things to do to keep us occupied!
And then, at the end of the four weeks, the manufacturer revised their timeframe, and we were looking at them "maybe" being ready within another two months. Sigh.
I will say that Jean, the owner of Heritage Ceilings, was absolutely fantastic during this whole process. She couldn't have been more apologetic, even though it clearly wasn't her fault.
But we weren't willing to be that patient, so we went back to the drawing board again, and very nearly put an order in for the 'Original' pattern instead.
 |
| Source |
But then my brilliant husband (yes, sometimes he's extremely brilliant) decided to do a bit of a ring-around potential Brisbane-based suppliers to see if they might have some Snowflake in stock. And lo and behold, Restoration Station had exactly five panels in stock. And we needed four! Hallelujah!
Tom got straight in the car and drove over there to snap them up before they could disappear, and we finally had our tin panels!
The mathematicians amongst you (what, my blog isn't that popular with mathematicians?) may be wondering why we would need four 1.8m long panels when we're only covering our kitchen peninsula and a small splashback above our stove.

And that would be because we decided to cover a few more things too!
Like the splashback above our laundry...

And the back of our downstairs kitchen peninsula!

So, we double and triple checked our measurements, and then Tom got to work marking each of the panels...

And then using the grinder to cut each one to the right size.

We had to make a decision as to exactly how high above our stovetop our rangehood would eventually sit before we could cut the tin...

And we popped it in! It looked remarkably small without a rangehood to ground it. One step at a time!

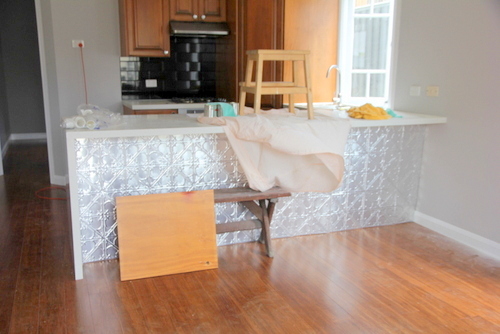
And then the moment we've all been waiting for, the panel on the back of the peninsula went in!

And voila! We have an extremely shiny kitchen now!

That situation is only temporary though, since neither of the panels is actually fixed in place yet (thus the stool stopping the big panel from falling over). I have plans to paint them, since they're pretty full-on in their raw silver colour. Just have to decide what colour!
Then it was the downstairs kitchen's turn! Because of the giant length of that bench, one full panel was not long enough, so we cut an extra piece to size to cover the gap. The panels are designed to overlap each other on certain edges, so the join is hardly noticeable.
But again, the raw silver colour was a bit intense for us!
And I wasn't conflicted about what colour to paint this time. Any guesses?

I wanted a lovely gloss black finish to match the glossy black tile splashback behind the stove. So, I decided to spray paint the panels rather than rolling on the paint, for a completely clear finish. I went through FOUR cans of spray paint! It was a really strange experience. I'd sprayed about four coats of light misty spray (as you're supposed to do), and I'd get some areas where it almost looked like I hadn't sprayed them at all, and others where there were hints of the beautiful black glossy look I was going for. So, I just kept going until I completely ran out of spray paint. I think it's something to do with the way light hits the peaks and valleys of the surface. It makes it really hard to actually be sure about whether you've got good coverage!
It looks pretty good in the end, though!

And then it was time for installation! I was super super excited.

The recommendation is to use small zinc nails that you hammer through the tin into whatever is behind it. We decided to double up and use glue as well, just to be extra safe.

And we discovered that the nails themselves have a bit of trouble penetrating the tin's surface, and added to the fact that we'd used some of the leftover flooring as the board behind it, we really struggled with the nail-hammering part of it.
So, we adapted our system, and I used a small drill bit to pre-drill the tin and a little way into the board behind it so that the nails had a clear run before gripping into the board.

In order to avoid hitting my lovely paint job with the hammer, we would hammer the nails until they were almost in, and then use a nail punch to provide a bit of separation between the nail and hammer for the last couple of hits.
The funny thing about the panel is that it's very ripply! Some areas would sit beautifully flat against the board behind them, and there were others where we had to put a nail in almost every section of the pattern in order to try to iron out the ripples.
What do you think? Beautiful yes?

I then went over all of the nail heads with a little dab of black nail polish once we were done, and you'd never know they were there unless you were really looking for them!

How's that for an instant transformation?


The upstairs kitchen and laundry have to wait a bit longer for their final installation. Stay tuned!
Those metal tiles are absolutely gorgeous, good thing you perserveired until you found the right ones. Of course you spray painted them black! I am just planning my kitchen renovation at the moment and was leaning towards glass tile splashback but now looking at these metal tiles they really do look something special. Great idea for a kickboard too.
ReplyDeleteHi Michelle,
DeleteGlass splashbacks are very expensive in my experience, so the tin panels are probably a much cheaper alternative if you like the look. I highly recommend them!