DIY Explanation

pour améliorer, meaning 'to improve', is a humble record of our renovation, home improvement and landscaping projects, with our travel adventures thrown in.

07 February, 2013

Will it Never End?

I could be referring to many many things.

This renovation? My blogging incessantly about it?

I think the safe answer to those two questions would be no. This renovation will never end, and I'm going to persist with this blogging thing as long as I can! You're stuck with me!

But I digress. The matter at hand is actually the internal painting downstairs. I feel like I've been painting those rooms for decades now! Can it only be months? That's still a long time, right? It's not just me?

Well let me tell you. I have a new sympathy for the painting profession. It's not difficult. Once you get the hang of it it's actually pretty easy. But there is SO. MUCH. TO. PAINT!!!!

And I've said it before, I'll say it again. The whole undercoat, first coat, final coat procedure has to be one of the most demoralising things ever. Not only do you have to do the job once, you have to do it THREE times before it can even be considered remotely finished! Isn't the definition of insanity something along the lines of doing the same thing over and over again expecting a different result?

Well that explains a lot, then.

Fortunately for you, you get to look back on those days and days and days of pain and just admire the pretty pictures.

Here we go!

I present the first of the single car garages, all plastered and battened up.


And the second!


The agreement with the painters we hired to paint the outside of the house was that they would paint only the outside perimeter... so the weatherboards in the above shot and the front side of the battens on the front wall of the garage were their territory, but we had to do the rest.

So, while the plasterers were still tidying up their bits and pieces inside, Daniel and I got to work undercoating all of those battens (not a fun task at the best of times, let me tell you! Painting the sides of battens is torture)...


And then, you guessed it! Two more coats! We chose to use up the tin of Gunnard Grey that we painted the front stairs with, thinking we would paint the whole house in that colour. Walls, ceiling, cornice, everything. Keeping it simple, folks! Unfortunately my brilliant plan to use up otherwise un-useable paint backfired slightly, since we ran out of that colour before we were quite finished, meaning I then had to go out and buy more of it. Drat.

 
So then we moved inside.

We painted most of the walls in Dulux's Dieskau, a lovely, soft but vaguely warm-ish light grey. But I painted the window-less wall in the lounge room a darker shade of grey than the rest of the internal walls, Dulux Flooded Gum, actually, which is the same colour we painted the master bedroom and most of the outside of the house!


Cutting in carefully around the ceiling beams of course (which you can see in this picture needed some more touching up with ceiling paint to get a consistent colour)...


And I continued that darker colour all the way across that wall, past the door leading to the garage...


And around into the hallway, so the little triangular niche cutout in the wall in the hallway is in the darker colour.


You can see the different shades of grey on both sides of the hallway in this shot.
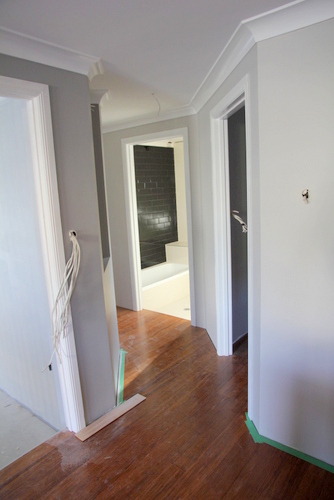

It sounds like it might be a bit strange in person having a different colour on each side of the hallway, but there's actually very little exposed wall on the left side, because it's all taken up with linen closet. I think it has turned out very well.


On the topic of closets, and in the same spirit of using-up-paint-colours-we-don't-need, I decided that for the wardrobes and cupboards we should use the giant tin of Sandy Day Half strength Solver paint that we had originally bought, thinking we would paint all of the downstairs walls in that colour. Before we realised that it looked pink.
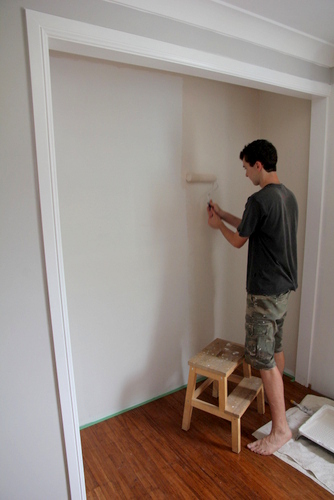

It still looks a little bit pink-ish, but it's really not too bad, and on the inside of a wardrobe, who cares?


I think it's kind of nice having a slightly warmer colour in the robes.


But that's not the full story. I was so overwhelmed by the sheer volume of all the painting we still had to do that I was not coping. So, what do I do when I'm not coping? I write a list.

Yep, this is pretty much my motto.

Source

But this was no ordinary list-making situation. I felt the need to write FIVE lists, and bulldog clip them to the curtain by the front door upstairs. What can I say? I'm a control freak, I was overwhelmed, and I'm not happy in my sense of accomplishment completing a task unless I can cross it off a to-do list!


And just because this is so much fun, how about some close-ups of my lists?


Insanity. I'll leave it up to you to decide if it's the volume of painting still remaining or myself that I'm referring to there.


This bathroom doorway is a prime example of the puttying required. Every single seam, every single nail hole. Woe is me.


But the doors are what got me. Every single door needed a couple of coats of gloss. And it takes a long time to paint a door with all of those grooves! I knew that from my time painting the wardrobe doors upstairs.


So, every single door got a couple of coats of gloss.


Painting all of the trim in situ was so painful that we even tried to get a head start on any remaining trim and skirting board pieces that were yet to go up by undercoating every piece of timber in sight that we thought might be used, to try to save some time and effort 


But even then, I still ended up spending the good part of an entire weekend sitting on my toosh painting the skirting boards once they were installed.

I can't show you those though, because that would give away too many secrets of what else happened in the meantime! We're nearly at finishing touches time people, and I could not be more happy about it!

Now can someone suggest how I can remove this paintbrush that is now fused to my hand?

05 February, 2013

No More Back Door

Our back entrance has been through a lot.


It started out with a rotting little balcony outside, which quickly disappeared when we raised the house and removed those back stairs.

Which left us with this arrangement. The only way to get into the house!


And that ladder certainly did the hard yards. We all made our way up and down it countless times. Allie dog included!


Because they were longer, we moved the original front stairs to the back of the house, tied them on to the house with a snatch-'em'strap in what has to be one of the shoddiest stair-construction moments in history, and they became our access into the house.


Until the construction of our lovely new front stairs made the back stairs a little less essential.


But we still kept the back stairs, as the most convenient way to pop down to the shed from inside the house.


We even re-hinged the back door before our kitchen benchtop was due to arrive (because the bench would obstruct part of the doorway) so that we could still open the door to get down those stairs.


But its glory days were over. The stairs certainly couldn't be called safe, and since our ultimate plan for the backyard is to build a pair of townhouses out there, having a back access to the house is not part of that plan at all. So... when the carpenters were cladding the back wall of the house in weatherboards, this happened.


They dismantled the stairs, then removed the door, slotted a little pine frame in there, and slapped some builders wrap on the outside. Goodbye back door!


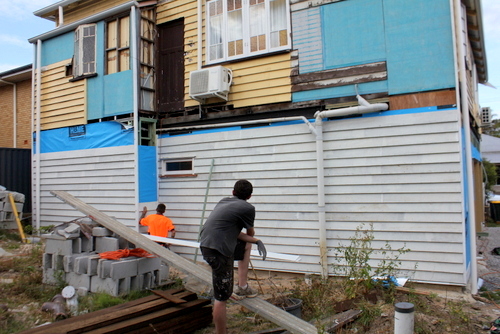
So from the outside, we went from ugly brown door in awful-looking patchwork of blue and yellow walls...


To builder's-wrapped...


To completely weatherboarded, as if the door and stairs never existed! See here for a shot of that wall once it was finally all painted.


On the inside, we lived with this framed and builder's-wrapped area for a while.


But then the carpenters got to work eventually, and started removing the picture rail so that they could muck around with covering up our doorway with VJ boards.


The plan was to simply pull out all of those VJs above the doorway and replace them with full-length floor-to-ceiling ones. I had even gone to a demolition yard and purchased nine full-length VJ boards for that very purpose, and even sanded them in preparation for them to be painted. But somehow, along the way, those VJ boards got mixed up or used, and they weren't there anymore. I was pretty upset. But, as with every other thing that goes wrong on a building site, there's not much you can do about it once it's done, so we moved to trying to come up with an alternative.


And that alternative was to use other sections of VJ that we could scrounge together, knowing that we could afford to have a seam behind where the picture rail goes near the top...


And along where the chair rail goes at about kitchen benchtop height.


Thankfully we had enough lengths to make that work, and you'd never know there was a seam behind the picture rail once it was re-installed!


Nor with the chair rail!


All it took then was some sanding (which I'm still grumpy about having to do inside the house, since I'd thought I was being so clever pre-sanding all of the boards that we planned on using so I wouldn't have to do it where our entire kitchen would get dust all over it. If only they hadn't disappeared!), and a few coats of paint, and voila! What back door?


Oh, and I forgot to mention the putty step, since the sections of the picture rail and chair rail that were cut out needed a bit of puttying so that the join isn't obvious. Once the paint goes on, you'd never know there was ever a back door!


It's not entirely complete because we still have to buy a bit of skirting board to extend across that new section at the bottom. We were lucky with the chair rail, having salvaged a fair chunk of it when we prepared the ensuite for tiling, but no such luck getting matching skirting board. But nevertheless, we've still got a giant improvement on this look, right?


Functionally, we have missed that nice convenient back door access to the shed a bit, but this is still definitely an improvement. Even fairly minor changes like this make me so happy. We're just inching closer to a house that feels complete, rather than a house where everywhere I look there's at least fourteen jobs that need doing. Now we're down to maybe six.

01 February, 2013

Practically Naked

It's alright, don't worry. I'm not going to strip.


I did neglect to describe the event in detail when our house did, though!


I speak of that momentous day when the front of our house not only got some long long long long long overdue paint slapped on, but had some fairly major walls/windows stripped off!

Enter our sleepout, as it was.


In fact, that's the remarkably clean, junk-removed shot of it not long before I threw that crummy brown falling-apart dresser out the window in preparation for the carpenter to come and start work.

The other side of the room was looking less tidy, holding a whole bunch of light fittings ready to be installed downstairs.


I wouldn't call it much of an improvement from this shot taken before we even moved in.


But this room has never really made much sense as an enclosed sleepout. It has suited us incredibly well as a store room, though!


This house would almost definitely have started out its life with a lovely open verandah at the front, and our intent has always been to bring it back to that former glory. So, while the painters were busily working away removing all traces of yellow on the front of the house, the carpenter started the very quick work of removing the ugly windows and walls.


Voila! Verandah!


Allie particularly enjoyed her new uninterrupted view of the entire neighbourhood.


Love that beautiful girl.


The removal process was repeated on the other side near the door at the top of the stairs...


And the next day all of the balustrade went up.


We replicated the handrails we built for the stairs, with one rolled hand rail at the top, and then the railings themselves between two flatter top and bottom rails, separated from the top hand rail a bit.


I know it's a cliche, but it opened things up so much! Not just literally, since of course without walls and windows the space feels more open, but it feels like the amount of space has doubled! Hooray for giant verandahs!


We do have a few concerns about this new open area to the right of the door, since someone energetic could probably just vault straight over it, making it a bit of a security worry. We're working on a plan to enclose (but without actually enclosing) that area above the railing though, so stay tuned.


In the meantime, you've already seen it, but how good does our new verandah look all painted white?!


Love love love love love love love it! And we get the most amazing breezes coming straight through the door at the top of the stairs. It's a wonderful place to sit in the evenings. You'd think the house was designed that way or something!
Related Posts Plugin for WordPress, Blogger...