
But who's going to stop me? You know how we added pressed tin to the back of the kitchen peninsula downstairs (after painting it black)...

And the upstairs kitchen (after painting it the same colour as all of the cabinet doors)...


And the downstairs laundry...

And I have always threatened to do the same in the upstairs laundry!

So we did! And I completely forgot to talk about it!

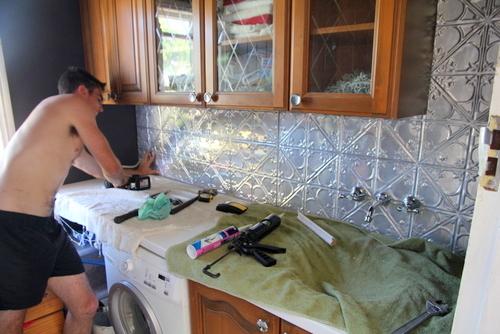
For a while the pieces we scavenged from the offcuts just sat there on top of the bench preventing us from being able to install the laundry taps so we could use the laundry sink.

But eventually we pulled our fingers out and decided to install it properly! We started by drilling holes in the panels to slot over things like powerpoints and taps...

And they slotted very nicely over the tap fittings.

And then it was installation time! We learned a valuable lesson here. Tin panels need to have a decent chunk of wood behind them for the nails to grip into when you try to knock them in. Most of the wall above the laundry bench was made up of a fairly thin sheet of fibro board, which wasn't really enough for the nails to cling to. We punched as many of them into the wall studs as we could, but because tin paneling is quite floppy (for want of a better word), it needs to be secured in more places than the wall studs would allow us to.

We compensated by coating the wall and the back of the tin with glue to make it stick, but in the future we would add an extra timber board along the back before installing the tin, to guarantee that the nails would work.
Lesson learned!
After the tin was installed Tom installed the laundry taps (note that we'd turned off the water for this whole procedure, so he accomplished this without flooding the place).

I rediscovered the wonders of Gumption in removing nikko pen marks...

And the little nook near the sink because really useable.

We actually then finished off all of the edges of the tin by cutting some little timber trim to size, spray painting it silver and nailing it in so that there were no more exposed tin edges visible, but in a move that's becoming all too common as we race to the finish line of this renovation, I completely neglected to take ANY photos of that. Sigh. That's what unrealistic deadlines will do for you!


As you can see, I went on a bit of an organisation spree before taking these photos.

We even added a little chandelier that I bought on Ebay for about $70, for a bit more glam.

What do you think? Most glamorous laundry ever? Or you've seen glamorous-er?
Definitely the most glamourous laundry Iv ever seen! I love how you've used it as a splashback it looks so good! How does it go being so close to the water, will it get rusty or is it water proof?
ReplyDeleteHi Michelle,
DeleteSo far so good being close to water. We were told when we bought the tin that it's been sealed, so we were fairly comfortable with that. I think it's recommended that you coat it yourself in order to ensure that it's definitely sealed, but we're taking our chances for now!
Love your laundry!! Mine just looks so shabby in comparison.
ReplyDeleteThanks Trishie! I love it so much!
Delete