
Until we get to our new house, at least!
In the interests of speeding up this chronicle of our little house's renovation so I can finally start talking about the new house, how about I condense about a week and a half's intensive work into a single blog post?
Sound fair?
You won't know the half of it. Try to feel our pain anyway, ok?
So the ceilings...
Remember when the builders replaced some sections of the ceiling in our lounge and dining rooms that were in awful condition?

And then my brother Daniel hopped up on a ladder and did a bit of puttying and undercoating so that they would look semi-normal again?

Well we've always known that that was nowhere near the end. Because some panels still looked like this.

Yes, that's paint peeling off. And for the vast majority of the non-replaced panels it was the same. The builders couldn't care less about leaving us a whole bunch of paint scraping, sanding and patching work. They filled the brief, which was to replace the damaged panels.
So... with the knowledge that this was never going to be something we would tackle once the house was tenanted, we sighed, gritted our teeth, and got to work.
First we had to remove the furniture, in order to make a clear path for ourselves. In a small house, that always makes for a fun time, particularly in the rooms that have to absorb the overflow furniture!

And then Tom hopped up on the scaffolding and paint-scraped, sanded, and puttied his heart out. Believe me, this kind of task on a ceiling that's made of old horse-hair plaster is not for the faint-hearted. Tom had to cover almost every inch of the older boards in a layer of putty in order to get a smooth finish, in the end!

And then he sanded, which explains the curtains draped up all over the place. Putty dust is pretty pervasive stuff...
And then we could finally paint. Which was of course a painstaking process with paintbrush and roller because of all of those battens dividing up the space.

And that was just the first undercoat.
There were two more coats after that.

But it was worth it (which is easy for me to say, since I wasn't the one holding my hands above my head almost non stop for days). They look beeeeeaaauuuutiful now!
The lounge...


Aren't they just the smoothest, creamiest-looking ceilings you ever did see?
Yes? Good.
Moving on!
There's another ceiling that needed our attention desperately.

It's our verandah's ceiling (and since we're here, I might take the opportunity to take the credit for slopping a coat of grey paint on that triangular wall area above the main balcony that used to be yellow - goodbye yellow...finally!). It's made with some kind of cheap fibro sheeting, and all of the seams between the boards are clearly visible (UGLY!). Not to mention the fact that the whole thing is in dire need of a good paint.
So... you guessed it... the process began again. Sanding...

And of course, there were a few areas where the existing paint wasn't too keen on sticking to the ceiling. So there was then some paint scraping and puttying.

And more sanding. And then we gave it a good undercoat. Which I didn't take a photo of. Whoops!
But we still had the problem of those ugly seams. You may recall that our solution in my office to the same problem (those same boards extend in there) was to attach some boards (I'm going to call them battens) along the seams to create a little timber pattern along the ceiling, similar to the pre-existing ones in our lounge and dining ceilings above (see here for a more detailed account of that process).

Well guess what? We decided to do exactly the same thing on the verandah ceiling. Surprise! We took some measurements and I grabbed some boards at my next trip to Bunnings (a not infrequent occurrence), and one evening we tackled it!

Voila! Much fancier!

We managed to get some of the boards undercoated before we put them up, but not all. Makes for some super attractive halfway-through shots!

And then came a couple more coats of paint, so the whole thing gleamed with milky-white smoothness!
Except I didn't take any photos of that. Not a single one. Bad blogger.
I'll take some eventually and show you, I promise!
In the meantime, let's quickly cross to Ceiling Number Four! That's right, FOUR CEILINGS WE'VE HAD TO WORK ON!
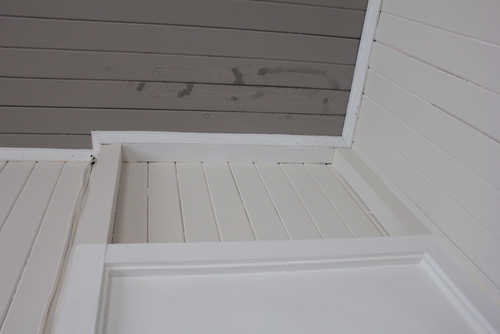
It's the master bedroom ceiling that used to leak before we got the roof replaced, leaving some not-very-lovely watermarks on my painstakingly-chosen paint.

So I paint-scraped, I sanded, I puttied, I sanded, I undercoated, and I coated, twice more. I also tackled patching the other two areas of the ceiling where this off-centre fan and this no-longer-necessary light used to hang. That's right, we FINALLY got the electrician in to install a new fan in a central location and install my two bedside pendants. Glimpses of those to come soon.

And that's it for ceilings... for now.
Can we get a round of applause? Or perhaps a back rub? Three ceilings completely made over, a fourth repaired... what can I say, we're a lean mean ceiling-painting machine!!!!
So what do you think? Please tell me they look amazing. In gushy, over-enthusiastic language that forces me to play it cool and act like it was no trouble at all.
If not, I was serious about that backrub.
No comments:
Post a Comment