

I told you all about attacking the wall to open up the doorway. Stage two of the process started with a horizontal beam for the top of the doorway.

Which we tried to ensure was level.

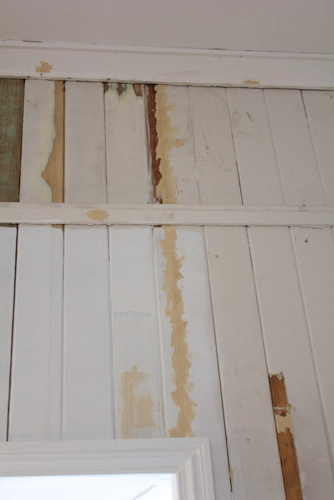
And then we had to close up the gap we'd created above the doorway, with VJs that were the right length.

Somehow, we reached the join just above the top right of the doorway, and realised that we must have attached all of the boards much closer together than they must have been originally, because we ended up with a small gap from one VJ to the next (plus, we'd forgotten to cut only the doorway section out of the VJ immediately to the right of the doorway, so we had to make up for that too).
So, we cut a little piece and screwed it in, hoping that a bit of putty would cover the seam.

The next step was the all-important door step, which was even more important for this doorway than for the office doorway, because of the gap left in the floorboards and the height difference between the sleepout floor and the lounge floor. First, Tom had to chisel away the section of the sleepout floor that had never been sanded and polished, meaning it sat a bit higher than the rest of the floor.

He cut down a piece for the door step. You can see here that he'd cut a 45 degree section on the front edge that he hadn't yet sanded down to a nice curve.

Then, Tom spent a day sanding back some of the door trim that we'd salvaged from elsewhere in the house, so it looked like this. And he's never doing that again! Horribly time consuming!

All of the various bits and pieces of trim and doorstep then got a undercoat...

And the trim went up! And got the putty treatment.

The same went for the doorstep (we'd added an extra board on top of the bottom one here, to give it that lip).

Then the VJs got puttied as well (particularly that mid-VJ seam)...

And Tom adopted a new precarious sanding (while vacuuming) technique to smooth it all out.

And then I undercoated... makes a big difference, huh?

And now I have a whole series of not-very-good finished product photos. First, photos at night...
Without the flash (with a reclining puppy in the background)...

With the flash (and an on-guard puppy in the background)...

In the morning with the flash (and no puppy in the background)...

So I think the best time of day to get a good photo will be the afternoon. I might try that later and do an update.
Here's the VJs above the doorway from the inside.

And here's the not-quite-so-finished-looking view from the other side (please ignore the mess in the lounge room). We'll paint that wall once we're ready to do the full sleepout coat.

Can't wait to see it with doors attached!
No comments:
Post a Comment