
Here's what our lounge room used to look like, before we opened up the new doorway in that far wall.

Also in that same wall, sat this bookshelf. Which is actually the bottom half of a dresser that we bought for $140 (and then sold the mirror for $20), and two tall IKEA Billy bookshelves that we used to have in our last house. In this photo, the bookshelves were standing on the floor behind the dresser.

The dresser and shelves had to move out while we closed in the doorway behind them to eventually become the future wall of our ensuite.


We took the dresser downstairs, gave it a good sand (although we had to be careful, since it has a timber veneer surface), and stripped off some of the veneer that was peeling off the front edge.

We removed the handles and puttied the holes they left...

And sanded the bookshelves as well.

And then we undercoated with a little foam roller.

Until everything looked like this.

Such a dramatic difference already, even with just one undercoat!

Two more coats of our wall colour (Dulux's Sandy Day Half colour-matched to Solver paint) followed, and then stage two of our bookshelf transformation began.

We used up some of our salvaged hardwood timber building a little frame to sit behind the dresser.

This is because the little shelf on top of the dresser is too shallow to fully support the bookshelves sitting on top of it, so we needed to put another board on top to extend the shelf's depth, and then supported that shelf with our new makeshift frame.

The extra board on top doesn't look particularly fantastic from the front, but I've got plans to solve that problem.

We then pulled another salvaged board from our pile to cover over our ugly frame...


We had to cut through the chair rail to be able to slot our frame into the wall as closely as possible.

And once the dresser slid in in front of the frame, you couldn't see the ugly wood anymore. Perfect.

Tom even took a walk along the top, just to make sure it was nice and strong.

And you can see above that we also added a little supporting piece halfway beneath the shelf, to give it strength in the middle.
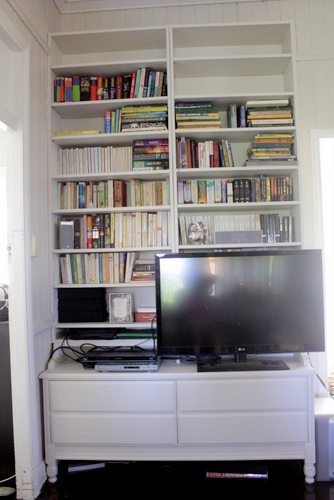
The next layer was of course the bookshelves!

Tom screwed them into both the wall and the top of the dresser, to ensure they would stay nice and secure. And then we slotted in all of the shelves. Unfortunately, because I wanted to make the most out of the space, we ran out of shelves. Each of the Billy shelves only come with four individual shelves (not counting the fixed middle one or the top and bottom), so we made sure to pick up a few more during our visit to IKEA. In fact, at $20 a pop, each new shelf is not cheap! It actually worked out cheaper for us to buy an entire new shelf unit that came with four separate shelves for $79, saving ourselves $1 and gaining another bookshelf (without many shelves) that we can use in the shed or something.

I know many people would prefer the original timber colour of the dresser and shelves, but they blend into the wall so much better now, and the room feels so much lighter without that big tall menacing brown-ness in the corner! With our dark stained floors, we're going to need to try to make our furniture a bit lighter in colour, or the room gets too gloomy.

Our new "built-ins" aren't perfectly finished yet. Where all of our bits and pieces meet in the back right corner it does look like a bit of a mess.

But I've got plans to try to soften all of those edges with the addition of some trim, that will hopefully complete the "built-in" look.

But I couldn't wait to stock the shelves with books again. The trim will come later! Oh, and handles for the drawers.


There are still even a few empty shelves at the top, waiting to be filled. That is unfortunately a sign that I still have many boxes of books yet to be unpacked.

So how about a before and after?

BEFORE AFTER
No comments:
Post a Comment