DIY Explanation

pour améliorer, meaning 'to improve', is a humble record of our renovation, home improvement and landscaping projects, with our travel adventures thrown in.

29 March, 2012

Trash The Wedding Dress Shots - A Sneak Peek

I have a little peek of the photos from our 'Trash The Dress' shoot!

You've already seen this one of me getting ready...


We took Allie along with us, oh and also an old iron bed that we bought off Gumtree for $40. A friend let us borrow a double mattress to put on the bed, and we were all set for a pillowfight in the forest. No sneak peeks of that yet!


After we had de-feathered, we popped over to the Brisbane Powerhouse and took a couple of wedding-ish shots. It has a very cool giant brick wall.


And an equally cool old concrete bunker thing with a rustic door and vines. Aren't my descriptions romantic?


And to top it all off, we fell backwards into a pool. Since the 'Trash The Dress' shoot had to actually involve some form of "trashing", right?


Can't wait to see the rest!

23 March, 2012

It's Trash Day!

Today's the day!

The day we are destroying my wedding dress!

To give you a hint, we've settled on something a bit like this...

Sourced here
With a bit of this thrown in...

Sourced here
 And maybe with a splash of this...

Sourced here
Here's a peek of me getting ready this morning...


Are you as excited as I am to see all of the proper photos?

22 March, 2012

Australia Has No Rugs

I've been searching for a rug for my office for what feels like an incredibly long time.

In fact, I 'pinned' this particular image on pinterest 29 weeks ago (I think it's the IKEA Stockholm Rand rug) as a possibility.

Sourced here
And many others followed as potential inspiration...

Sourced here
This particular rug was actually the one I featured in the mood board that I made for my orange-focused office colour scheme.

Sourced here

Sourced here
Sourced here

Sourced here
I was intrigued by this option. This lady actually painted the pink pattern on this rug, which started out in life as a cheap IKEA flat woven rug.

Sourced here
I didn't want to commit to a rug until I had my curtains up in the office, so I could properly gauge what colour my rug should be. I was expecting the vibrant colour of my curtains to be pretty dominant, and thought I might need to tone it down a bit with a soft grey-coloured rug.


The problem was, I could not find any rugs that I liked that were available in Australia! I didn't travel the country exhaustively of course, but I searched every website I could possibly find that sold rugs, trying to find a pattern that I could like. And I came up with virtually nothing. Why doesn't Australia get decent rugs?

All it took was a quick search for "grey rug" on Overstock.com to find half a dozen rugs that I would have happily purchased.

Sourced here

The problem? Every single one of them says this.


So I began to think I would have to be more realistic, and settle for something a little less fancy, that I knew I could get in Australia.

I considered this option...

Sourced here
 And even this option!
Sourced here
And I found this option on Ebay...


But I just wasn't in love.

Then, I received an email form Urban Outfitters, a US store that does in fact ship to Australia, with a one-day offer of $5 Economy Delivery to Australia. Hallelujah!

I found this soft grey chevron patterned rug, and loved it.
Sourced here
 I popped it straight into my 'shopping bag', and got this far with checkout. But then no further!


In case you can't read that horrible red error message, it says "There are item(s) in your cart that cannot be shipped to Australia. Please return to your shopping cart and remove them before proceedig through checkout".

I was so disappointed.

So my search continued, without turning up much. When we made a little trip to IKEA, we decided to pick up a Nastved rug for $30. It fit in the room nicely...


And it looked nice with the curtains...


But I wasn't in love. It made me realise that I really would love some more orange on the floor of the room, to tie in with the curtains.

Then one day, I just happened to read this post on the blog Making it Lovely, referring to a bedroom makeover she had done. It had been featured in Australian online magazine Adore Home, and a few of the products she used were from West Elm.


I had always thought that West Elm was a U.S.-only shop, so that pricked my interest. West Elm in Australia? I had no idea that they could ship overseas!

So I headed straight over, and guess what I found?!


It was love at first sight. It's the Iznik Dhurrie rug in colour "Sorrel". I was a bit worried by the fact that the colour "Sorrel" implies that it might be more of a rusty-orange sort of colour rather than a vibrant orange like my curtains. So I did a bit of googling for other pictures of it.

And I came across this one!

Sourced here
After all my rug disappointment so far, I was determined that this wouldn't be a mistake. So I decided to contact the owner of that living room, to see what her thoughts on the actual colour of the rug were. Courtney (of A Little Glass Box) was lovely. She responded in record time, and calmed my fears. The rug is a vibrant orange.

I didn't need to be told twice.


I slapped down my credit card for the $138.70 (including discounted shipping), and waited with baited breath for it to arrive.

Which it did, a couple of weeks later!


And I couldn't wait to roll it out in its new home.


At first I was a bit worried that it wasn't close enough to the same shade of orange as the curtains, but because it's not directly next to them, the difference is not actually that obvious. And I love the extra shot of vibrant colour it adds to the room.


Allie loves it too.


What do you think? Orange enough?

19 March, 2012

All Slabbed Up

The transformation of the area under our house continues!

I already covered the area being leveled out and the footings fitted...


The next step was bringing in a truckload of road base, and compacting it...


And then came some black plastic and sheets of reinforcement bars...


The edges got boxed up with lengths of timber...


And it was nearly ready for concrete!


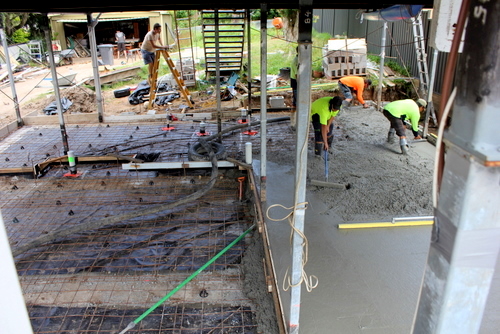
Once the concrete arrived, everything happened incredibly quickly.


In almost no time, we had a slab!


After a few hours, once it was reasonably dry underfoot (although still squishy), a guy came back with a machine that vibrated it so it's nice and strong and air-bubble-free...


And it was done! We officially have a slab!


Isn't it beautiful?!


OK, beautiful may be pushing it, but it's a LOT better, right?

15 March, 2012

Benched!

We are benched. Or more accurately, our kitchen is! And we are soooooo happy!


But let's start at the beginning, shall we? This is how our kitchen has been looking lately. The cabinets that we bought secondhand came with an existing marble benchtop. But because we've added a few extra cabinets, a new sink and a wine fridge, oh and mixed up the layout a lot, there was absolutely no way that the old marble benchtops were going to cover everything properly.


Plus the giant problem with this marble was that it's both soft (in stone terms) and incredibly porous. So it's scratched and stained and not particularly nice-looking.


As you know (or may have figured out by now), we ordered a new benchtop last week. We got four different companies out here to quote, just to be sure that we had covered all of our options. The first guy that came out said that he was using this particular stone for a big 86-unit project in a few weeks, so he could give it to us at a much cheaper price than the other stones.


Since I was always planning on going for a light-coloured man-made stone option anyway (to go with my future dark grey pained cabinets), I was perfectly happy with that stone, so he quoted us a price of about $4,500 (plus tax). But we still had three guys to come, all offering slightly different things.

We didn't like the second guy very much, the third guy we liked quite a lot, and the fourth guy was ok. The third guy (the most professional guy) was the last to offer his quote, and he came in the lowest, at about $3,800. The main reason for this was because he could get larger-sized pieces of stone in a particular brand, which meant that he would only need two pieces to fit our kitchen instead of three.

The first guy though, kept checking in with us to see if we'd made a decision yet. We mentioned the other larger-slab quote to him, and he said he could do the same thing with the cheaper bulk-buy stone he was suggesting, for $3,200.

Done!

Aside from the cost, the other advantage in going with the first guy was that his timeframe was much much quicker than anyone else's. Less than a week after we agreed to go ahead with him, his guys arrived with our new benchtops in their truck.


They had a good system. The pieces of stone were cut to roughly the right sizes, and they just set themselves up on the footpath to cut them to the perfect size after double-checking all of their measurements.

The first piece went in...


The second piece went in...


The stonemasons had to recruit Tom's and Daniel's help to carry in the biggest peninsula piece...


They lowered it into place carefully...


Slotted it in...


And then brought in the sink piece, the moment of truth, to see if it all fitted together nicely.


It did, although the seam where it meets the peninsula was not perfect.


They checked all of the levels to see what had to move in order to make that seam sit nice and flat.


The easiest solution? Cutting a little sliver off the front of our under-sink cabinet so that the stone would sit a little bit lower at the front. The boys accomplished that quickly with the circular saw and then a chisel...


And thank goodness, it worked!


Then came the pièce de résistance, our "waterfall". We'd decided that to add a little bit of 'wow' factor to the kitchen we would have an extra piece of stone running vertically down the side of our peninsula. And it made a HUGE difference!


The next step was gluing everything into place and covering up the seams as much as possible...


And so... without further ado, let me introduce our completely transformed kitchen!!!


The guys said that we should leave the counters overnight to let the glue absolutely harden before giving them a proper clean, so because I couldn't wait to take photos, the counters aren't perfectly clean and shiny here.


I'm so very much in love. They're so beautiful!


The extra 'waterfall' has limited the opening to the kitchen a little bit, but it's still roomy enough to pass through ok. And to be honest? I couldn't care less. It's totally worth it.


Months and months ago I found this little hall table on Gumtree for $40. We've been using it as a bit of extra working space in the kitchen. With a little slab of stone on top of it (with rounded corners to save me from bruising myself when I inevitably crash into it), its role is now official! We just have to raise the height of the legs a bit so that its top will be at the same height as all of the benchtops.


The room feels almost entirely unrecognisable now. I'm so happy,


Now I have to start thinking about stools to sit on the other side of our peninsula! Perhaps not until our bank account recovers from all of these major purchases. And not until I decide exactly what material I want to use to cover over the plywood back of that cabinet.


The mismatching colours of all of our cabinets are also now letting down our fabulous new benchtops in a big way. I might just have to make up my mind about a colour and get painting!
Related Posts Plugin for WordPress, Blogger...