DIY Explanation

pour améliorer, meaning 'to improve', is a humble record of our renovation, home improvement and landscaping projects, with our travel adventures thrown in.
Showing posts with label Electrical. Show all posts

16 January, 2012

Powering the Office

We don't yet have an ending (happy or otherwise) for our latest machinery nightmare, but I'll keep you posted when we do. In the meantime, let's think of other things!

Something that my gradually-taking-shape home office is missing entirely is lighting.

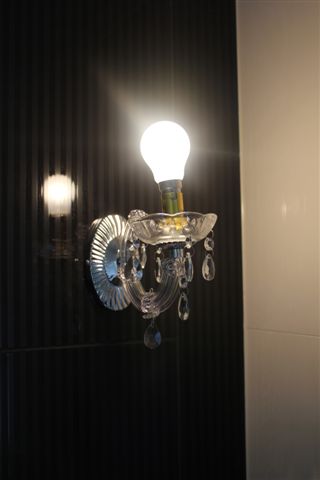
See this light?


Well it used to be the only form of illumination in the entire L-shaped verandah/sleepout. And when we closed in the corner for the office (see here), it ended up on the other side (i.e. the verandah side) of our new wall. Here it is - that really bright spot you can see on the top right.


So that means that there is no lighting to speak of in the office, which is obviously not fantastic.

The other problem with the office is that there is virtually no roof space at all, through which to run electrical wiring. Nevertheless, since the best option for lighting the room is a light hanging from the ceiling, we really wanted to make it happen!

So, we bought some electrical wire and ran it up alongside the existing doorway (the one that leads directly to our lounge room, near my new desk). Note: We didn't connect it to the existing wiring in the house. That's the electrician's job. We're just working with non-live wiring right now.


And we drilled a hole to run it up into the ceiling.


Then we very carefully pried away one end of that board on the ceiling, and fashioned a very sophisticated  hook mechanism out of an old wire clothes hanger to pull the electrical wire through to the gap in the virtually non-existent ceiling cavity. How clever are we?


We dragged the wire along to the join of the next board...


And pulled it through the hole we had made where my future hanging light would go, then tied a nice generous knot so that we don't run short on wire for the light fitting.


Then we carefully hammered the board back into the ceiling so it didn't actually fall down...


And moved to the other end of the ceiling, where the next ceiling board met our newly-built wall, and pried it away just enough to push the wire through it as well...


And then pulled it through a little hole directly above the VJs of our new wall, that we could cover later with a cornice.


The ceiling boards got another hammering just to make sure they were back in securely...


And then we ran the wiring through our new wall and down neatly alongside one of our new doorposts back through the floor, to be covered in the future by some timber trim.


Before it made it all the way to the floor though, we poked it back through the wall and knotted it again at an appropriate height for a light switch...


And labeled it "chandelier" (while also running some additional wiring next to it for a light to go above our new doorway on the verandah side as an "outdoor light") with a new knot.


Safety Note: Since all electrical work in Australia should be completed by a licensed electrician, we don't recommend even going this far running non-live wires yourself. Of course we never follow our own advice. In the interest of saving ourselves some cash, we decided to undertake the slightly complicated ceiling wire running on our own instead of paying an electrician $200 an hour to do the same thing, so everything is in place and ready to go for the actual connecting of the wires.

It will certainly be a happy day when my chandelier goes in! Yes, I'm getting a chandelier in my office! My boss can't understand why an office deserves a chandelier, but I'm determined. Why can't an office be interesting, huh?! I'll be spending most of my life in that room! It's going to be interesting, by hook or by crook!

08 April, 2011

We Gots Power!


Isn't that the most beautiful sight ever?

If you don't think so, read this post and then answer again.

Yes, that's right. Almost FOUR months after we moved out of our house to allow the house raising to begin, we can FINALLY flick a light switch and actually create light! It's magical.

It started with the arrival of the meter box guy. Allie wasn't as excited about it as we were.


In fact, she thought it was so uninteresting that we needed a different game to occupy us - ball?


The council men arrived to control traffic...


The up-the-ladder guy climbed up and attached a power cable to the front of the house (we had some very stressful moments when it was called into question whether our original incompetent electrician had installed the ibolt in the wall correctly.


And then we waited. And waited and waited and waited and waited, because this happened.

sourced from yhen1027

Finally it stopped, and the cherry-picker man started ascending towards the heavens.


And after much, much mucking around (and a scare when the wrong wire appeared to be getting power), we... officially... had... power.... connected! There are no words to express how that moment felt. Here are the pictures:


Beautiful, huh?

31 March, 2011

Light? What Light?

Generally creating light requires power, and that we certainly do not have that yet.

That hasn't stopped me dreaming about the light fittings for our house though! I already gave you a peek into what I'm thinking for the master bedroom, and I will soon give you a peek into what I'm planning for the bathroom, but in the meantime my mind (which can't seem to stop and think about one project at once but bounces between them all incessantly - wouldn't you love to be in my head?) has moved onto the kitchen light.

After we'd bought our second hand kitchen, the lady also offered me their existing light fitting for $50. At the time, I wasn't thinking of going too fancy for the lighting for the house, so decided to agree, since it's quite a large fitting, and they tend to be pretty expensive to buy brand new.

Here's the picture of that kitchen with the light in place.


Sorry it's blurry, that was the picture in the ad, the only one I've got of it. It's made of wrought iron, with little wrought iron vine leaves in the surrounds. To be honest, it's really not my style, but at the time I figured it worked, and that I'd live with it.

Then while we were finishing the final gates at our last house, Tom accidentally dropped something on it and smashed the glass bowl section that hides the bulbs. Hmm. So, if we're going to use it (and it would be a real shame to waste the $50 we spent on it) we'll need to do something about that, which started my mind ticking. I know! I can use that as the perfect excuse to re-make it into something that pleases me more!

And this is where my mind is heading at the moment...

sourced from Design Crisis


Birdcage Light sourced from Urban Outfitters


This is someone's homemade version:

sourced from A Penny Saved

I'm not a huge fan of how messy the strands of beads become in the home-made version, but then again, I'm totally in love with that first chandelier that's almost a complete mess. Go figure!

Who knows, I'm still not sure... and I might change my mind entirely... but it's definitely fun speculating!

30 March, 2011

Tap Dancing

Yesterday I caught you up on the first part of the process of preparing our third bedroom for its transformation into extra-special bathroom. But wait, there's so SO much more!

Covering the floor in villaboard!


And before we coated all of the walls (and new timber framing) in villaboard, we had to sort out the plumbing and electrical connections that we wanted concealed behind the walls.

It's amazing how long it takes just to decide at exactly what latitude and longitude a light fitting should go at, so multiply that by three for this room, and then add two power points and a light switch, and we've got a reasonably complicated electrical plan. We definitely had to call in the professionals for this part of the process (fortunately we used a different electrician than the one that has helped oh so much with getting our power reconnected, so we were very impressed with the work). Whew!

A light point coming off the previous door post


A power point a little further down.


And then it was time for the plumbing plans. Our biggest problem here was deciding exactly what plumbing fittings we needed where. See the type of fitting you choose to have has an enormous impact on what actual plumbing is required. Meanwhile we'd been thinking we didn't have to make too many hardware decisions yet.

So time to fast-track tap shopping! Originally we were thinking of having a wall-mounted spout and taps above the vanity sink (on top of our fancy schmancy vanity unit), and a fairly standard tap, spout, shower-head arrangement for the bath/shower. But then we hit a snag.

I couldn't find any tap/spouts that I really loved! They were either really modern, or really boring! And I had to make a decision, because the entire plumbing plan relied on me saying whether I wanted an all-in-one spout and mixer, or whether I wanted a separate spout and two taps, etc etc etc.


And then I found this.

And I was in love. But guess what? They usually retail at over $1,000. Ouch.

And then we realised that when we bought our second hand claw foot bath, the seller actually threw in the existing 'telephone' bath tap set. You should have seen our faces. We immediately dashed out of the house and straight to the little junk pile next to the shed where we'd stacked a whole bunch of miscellaneous items that we weren't planning on using again. And it was there!

The poor darling had been sitting out in the elements for months, but here she is:


The ceramic handle is cracked and an unfortunate shade of pink, the pewter faucet bit needs a proper shine, and the hose and shower head are a little dated and also in need of shine, but considering it was F.R.E.E. we're certainly willing to work with it! We even asked a plumbing store and they said we could get a brand new hose and shower head attachment for $170. Not a bad option, although we might see what we can do with this one first.

Allie's pretty pleased with the idea.


Tom is certainly enjoying the whole 'telephone' reference.


He's supposed to be simply gesturing with his hands while on the phone in the bath here, apologies that this isn't obvious. I wasn't the photographer.


He enjoyed that so much he decided to make a real phone call.


Once we'd decided what spout we were using for the bath and shower, Tom could work out the placement of the plumbing. Fortunately, the fact that the spout itself is separate from the taps means we could buy a pre-welded bath plumbing set, which makes things a LOT easier. Tom drilled a few holes in the frame he'd built to fit it through, and it's now nice and snug.


Here's Tom demonstrating how the shower head will actually work (i.e. not as a telephone handset).


The taps that came with the 'telephone' section were not particularly impressive.


And then Tom found these on a trip to Bunnings:


Done! They were $80, which is not exactly cheap cheap, but it appears to be hard to find lever-handled taps (as opposed to the full cross-handled ones like the old ones we already have) at a price under $100. These looked like an excellent option.

For the vanity, we decided that instead of having a spout and taps coming off the wall (which would have required plumbing inside the wall instead of simply from within the vanity), we would have a traditional-looking kind of mixer. Something ike this one, that will go with the traditional look of our bath tap.

sourced from Restoration Online


Here's the trial run of the old telephone bath spout with the new Bunnings taps beside it, above the bath. Looks good, huh?


So we're very very very happy that we've managed to get ourselves a bath and shower set plus taps for a big...fat...zero...dollars that will actually match the look of the claw foot bath and be pretty and not too modern. Hooray!

Much more to come of course! This bathroom is a big project!
Related Posts Plugin for WordPress, Blogger...