DIY Explanation

pour améliorer, meaning 'to improve', is a humble record of our renovation, home improvement and landscaping projects, with our travel adventures thrown in.
Showing posts with label Paving. Show all posts

14 March, 2013

Up For Rent

As you probably already know, our intent all renovation long has been to turn the area beneath our house into a separate little unit that we can rent out.

Well, with the bulk of the work done inside and the front yard well on its way to being finished, we wanted to get this baby renting ASAP!

So, even before we got everything finished, I zipped around and took some shots that we could put on a rental listing, so we could line up a tenant to move in once we'd finished everything.

 
As you can see, this was before I sprayed the tin on the back of the kitchen bench black and put up the curtains...


Or painted the bathroom mirror black (or installed it properly for that matter - it was precariously leaning up in this shot) and put handles on the vanity...


But the house looked mostly finished, if you didn't actually look down at the front yard...


So we had a few inspections and settled on a tenant, and then began the mad rush to get the finishing touches completed before they were due to move in!

First item on the agenda? Finishing the front yard! We quickly decided that we would just focus on the side that would belong to downstairs and not bother completing the upstairs side yet, with the tenant's move-in date looming.

So, to get us to the stage of being able to plant some plants and call the yard done, first we had to dig any rocks and yukky stuff out of our proposed garden beds. Lucky for you, I've covered up the part of Tom's anatomy that was on display while he shovelled out the garden beds.


He then whipped out the concrete mixer again and concreted in some black plastic garden edging along the edge of each garden bed, so we would have a clear division between garden and pavers.


Meanwhile, I hopped in the ute and took a trip to the landscaping yard to buy me some nice rich soil to fill the garden beds up with (note that I had already made a trip to the markets a couple of weeks prior to buy some plants). And we temporarily removed a big section of the front fence so that we could back the ute in and unload the soil directly off it into the garden. As you can see, we laid a drop sheet over the pavers to try to protect them from getting completely covered in soil. It worked fairly well.


And I mucked around with the plant placement until I was happy.


Then, of course, came the extremely enjoyable process of planting every plant. And that's when I realised how very many plants I'd bought! What made the process a bit more time consuming (and difficult) was the fact that we decided to put weed mat over each garden so that they could be as low maintenance and weed-free as possible. This therefore involved cutting little slits in the weed mat where each plant would be and then carefully lowering it while pulling the leaves of each plant through the slits. Not rocket science, but it takes it out of you when you're crouching on your haunches the whole time!


I'm afraid I didn't document this process with photos very well, since I was too busy groaning as I lost feeling in my legs. Interestingly enough, the more exhausted I am and/or the more pain I'm in, the less photos I take.

Nevertheless, we were determined to get this side of the yard finished before the day was out, so we forged on, and voila! Magic! It's done!


After I planted and weed-matted each garden bed we laid some basic sugar cane mulch over the top and gave everything a good water.


Meanwhile, on one of my landscaping yard trips I had bought a whole heap of bags of white pebbles to put between all of our crazy pavers. We had originally planned on concreting them all in, but with our tenant deadline looming, we gave up on that idea quick smart, and went for a high contrast white pebble to really play up the craziness of the crazy pavers. Reckon it worked?

The boys had the fun of putting in all of the pebbles while I slogged on with the planting, and they certainly played their exhaustion card too. Although it looks more like they're on a firing line here than relaxing!


So that was that! A loooong hard slog, and finally at least one half of the front yard could be considered done!


It looks just as good in the morning sunshine as it does by night. Whew!


So thank goodness, we're nearly there!

With downstairs, that is. There's still a mountain of jobs to keep us occupied upstairs. Like painting our kitchen cabinets, for one! That'll be a fun weekend!

Anyway, what do you think of our front yard?

12 March, 2013

We Crazy!


Well no-one's going to argue with that, are they? We've undertaken a giant renovation with a budget that we now know was absolutely ridiculous, and we've spent all of our spare time for the last few years working on it.

But hey. We can't help ourselves. That's old news.

I'm actually talking about a different kind of crazy.

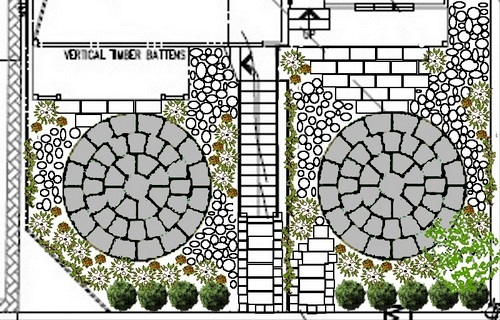
Remember this front yard landscaping plan I came up with?


Well yes, those paved circles were crazy, so we replaced them with 'diamonds' of pavers, but as you can see, we still had a lot of spare space that needed filling.


So, following my design, we decided that we needed pavers in varying sizes to fill those gaps. We did a bit of trawling online, and didn't really come up with anything that fitted that bill other than 'crazy pavers'. Aha! Finally see where I was going with that blog title?

We found an option online that was called Byron Black Random Crazy Pave from a store called 'Bricks Blocks Pavers Online'. You could only buy them by the crate, and including shipping, they would cost us about $680. Certainly not cheap!

Source
But they were exactly the kind of look we were wanting, and we did a ring-round and didn't find anything else even remotely as appropriate. Plus, given that each crate contained about 19 square metres of pavers, that worked out to only $35.79 per square metre, which is not a bad price for a good quality limestone product.

So, we bit the bullet and ordered. And this extremely heavy crate arrived on our driveway.


And as I'm wont to say, then the fun part began.


I actually busied myself laying out the crazy pavers while Tom was concreting to his heart's content, so it kept me nicely busy. I started with the little strip of space between our fancy pavers at the front gate and the diamond in the downstairs area's front yard.


And then just kept going on the area towards the front door.


I actually enjoyed this task immensely. Aside from the fact that it involved carrying around extremely heavy blocks of stone, it also involved two things that I love:

1) Jigsaw puzzling


2) Hitting things with a heavy object without fear of the consequences

Okay, that last one made me sound like a bit of a psycho. But who doesn't enjoy guilt-free destruction? See quite a few of the pieces of stone in the crate were very large and in need of breaking up to actually accomplish our whole 'crazy pave' look. So, all I needed to do was perch the big piece of stone at an angle on a brick and hit it in roughly the right place with a swing of the mattock. It was good fun. Wish I had a photo. You'll just have to enjoy the result instead.


So with that side of the front yard done, I moved on to the other.


Our makeshift garden bed edging (i.e. pieces of timber and concrete blocks) worked very nicely to separate the areas that needed paving from the areas that would become garden eventually.


Allie of course had to have her say in some of the placement of the stones. After all, getting four feet all standing on pavers at the same time without falling through the gaps is probably a lot harder than two!


And in a surprisingly short time, we had a transformed front yard!


So even though we're still not finished, I think it's still a good time for a 'Before' a 'During' photo comparison!


Not a bad improvement, huh? We've still got quite a bit of work ahead of us though, fixing the crazy pavers in place and filling up all of the gaps between them (we're thinking of concreting them in), making garden beds and planting them, and finishing up all of the fencing that is currently lacking. We're getting there, though!

08 March, 2013

Diamonds are a Girls Best Friend

As this mid-painting shot of our house testifies, our front garden has been letting down our street appeal quite a bit. Unless of course front yards full of old furniture and junk are considered attractive nowadays!


The front staircase essentially divides our front yard in half. There's this side near the driveway (this photo was taken from above on the front verandah)...


And after a bit of junk-clearing, this other side to the right of the stairs as you look at the house (this photo was taken from above standing on the landing of the stairs... front fence on the right, house on the left).


With the bulk of the inside jobs now done for our new downstairs area (that I'm calling the Granny Flat), it was high time we paid a bit of attention to the front yard. So I started playing around with the plans and figuring out what we might be able to do. I knew that I wanted to make the most of the fact that the area was divided fairly nicely in two, and make them look roughly symmetrical from above. I got a bit carried away, though.


Since making things easy is boring, I decided to make things super hard and designed the areas around pavers laid in circles as the focal points, with other pavers and garden laid around them. I figured that maybe someone somewhere would have come up with a way to make it easy to lay pavers in a circle by making kits with pavers all cut to the right sizes! Apparently I was dreaming.

That doesn't exist.

So, I had to revise my plan, and we came up with the option to replace my paver circles with diamonds! Tom loved that idea because it meant that there would be no need to cut any of the pavers, thus making the process of laying them much easier!

But before we could get to that point, first came the messy part. Preparing the front yard to be ready for pavers. We were very fortunate in our timing, because our plumber had his own earthmoving machine that he was using to dig the trenches to lay our stormwater pipes for the house.


So we asked him to spend an extra couple of hours moving dirt out of our front yard, since the council had dictated that the finished height (i.e. top of paver height) of our front yards couldn't be any higher than the natural lay of the land. Because we'd brought in dirt previously thinking the opposite, that we'd have to build the front yard up to the height of the house's slab (see here for the reason for the change), this was a bit frustrating. But what can you do? Roll with the punches!


Whenever we move dirt around Allie seems to feel the need to lie on what's left and protect it from removal! Or perhaps it's just a nice cool spot to lie?


Our carpenter let us borrow his dumpy level so that we could make sure that once we brought in road base and sand, our finished heights would be right. This was fairly complicated, since the staircase was in the way most of the time, and we also had to make sure that the yard would drain properly.

Laying out the four corners of each of our paver diamonds helped us work out which areas needed to fall in which direction around them.


And so that I would get my symmetry on each side of the yard, we also had to make sure that the two diamonds would line up with each other.


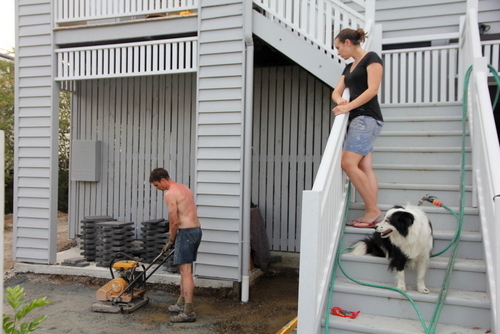
Then we hired a wacker packer for the weekend and began the process of compacting all of the road base on each side.


My job was to spray water on the areas that needed it before Tom ran over them with the machine, so I perched myself on the stairs with Allie. And I must say, spraying water at one's defenceless husband is a little too much fun!


And then, after our layer of road base was nice and compact, we brought in some more sand as a softer layer for our pavers to sit on.


Then it was screeding time...

Tom uses a big metal level to scrape the sand in arcs so that is flat and not-bumpy and also falling in the right direction.


And then finally it was paver time! That's the fast part!

We bought some charcoal-coloured concrete paver seconds at a discounted price from a local landscaping yard, and carefully selected the ones that were roughly the same colour as each other.


And then we dashed upstairs to admire from above. Unfortunately something went wrong somewhere along the way, because the diamond on this side of the yard actually ended up a little bit crooked, so its two centre points didn't line up with the house perfectly. We considered just leaving it like that, but we knew that every time we walked up the stairs that would be all we'd notice.

So, poor Tom picked up every paver and started again, trouper that he is.


And then we repeated the process on the other side (thankfully having already learned from our original mistakes).


The next area of interest was the little space between the two sides of the yard at the bottom of the stairs where the entrance from the front gate is.

We realised at this point that we needed some pavers with a bullnose edge to meet the front footpath, and also create an extra step up to the timber stairs, since they were a bit too high off our new lower ground level. Unfortunately I didn't take a picture that demonstrates that properly, but I'm sure you can imagine a giant step down from the last timber step.


And that was when we discovered that the pavers we had bought for our diamonds didn't have a bullnose option! So, Tom did a big ring-around and found some similar-looking pavers that did come with a bullnose option. They're actually a much nicer (and much more expensive) paver, so we figure that it's quite nice that we have the fancy pavers at the entrance.

To fit them around the front fence posts, we had to carefully measure and mark them, and Tom cut them with the grinder.


And they fitted beautifully. Thank goodness!


And it didn't take long to get the rest of them (that didn't need cutting) laid.


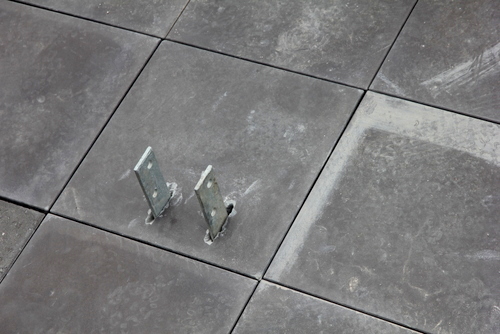
Although there was one that Tom had to give a bit of TLC to, so that it fitted around the steel fence post bracket that we'd previously concreted into the ground. You can just see it next to the timber level lying on the ground next to Tom in the above photo. More on that later.


In the meantime, it feels great to have a good start on making our front yard less of an eyesore!


We've still got a way to go, though!
Related Posts Plugin for WordPress, Blogger...