DIY Explanation

pour améliorer, meaning 'to improve', is a humble record of our renovation, home improvement and landscaping projects, with our travel adventures thrown in.
Showing posts with label Fences. Show all posts

28 March, 2013

No More Combat Rolls Required

Okay! Back to the front yard again!

We really need to address the fact that our little wire dividing fence requires a combat roll in order to actually enter the downstairs front yard, and even that access will disappear when we install a couple of rails at the bottom there.


So... how to solve that problem?

Well, fortunately we were clever enough to plan ahead when we first built our front fence. See how there are two posts very close together on the right end in this photo? Well our current front gate is to the right of that right post. The future downstairs front gate is to replace the fence palings between the second close-together post and the next one over to the left.


This shot when we had temporarily removed the big fence panel displays it better. The two gate spaces are easily visible, with the little tiny bit of fence panel between them, where the dividing fence joins the front fence.


So what to do? We didn't have any spare fence palings leftover to make a second gate, and the existing gate wasn't made with the original fence palings anyway. It was one we bought cheaply on Gumtree and just painted white. So, in the interests of getting some symmetry, we decided to make two brand new gates that would look exactly the same.

And we decided on pickets!


Which I painstakingly painted white (actually they look white, but they're really 1/8th strength Gunnard Grey). We went with pickets because I have a plan to one day re-build this fence. When we first built it we just recycled the old timber battens that used to live underneath the house, so all of the palings are a bit too twisted and warped for my liking.

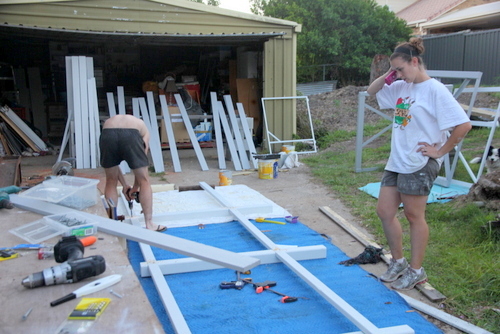
We managed to find another steel gate on Gumtree that was roughly the right frame size, and we recycled the steel frame on the existing front gate, so we had two. Then, Tom got to work screwing all of the palings into the steel frame, with his trusty supervisor looking on closely.


Although her supervision became a little disruptive when she decided that it was time to play ball with her hardly-recognisable rope toy.


Which she then supervised very closely as it got itself wrapped around Tom's drill.


Love that girl. Anyway! Despite the interruptions, Tom did manage to get both gates completed, and then it was time for installation!


And voila! Magic! Two matching gates!


And the view from the other side of the upstairs gate...


And the view of the other new downstairs gate... 
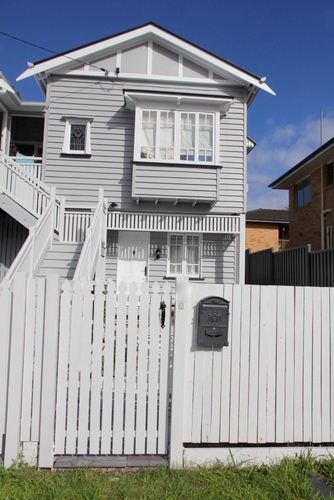

Not bad, huh?


For now, although I think I still plan to replace the flat-topped fence palings with pickets in the future, I quite like the fact that the gates look different from the rest of the fence.


So that's that! The downstairs area of the front yard is now officially accessible! I think I can even comfortably call it finished! Woohoo!


Wait a minute, does this mean that the entire downstairs area is complete? I'm going to say yes! Although there is one more gate-building exercise we need to go through in order to enclose the two garage spaces, and of course there is no shortage of jobs remaining upstairs... stay tuned!

15 March, 2013

Long Division

I've kept something from you.

I know, I'm sorry, I really couldn't help it.

With the time pressure of the tenant moving in, we've been working like crazy people trying to get everything done in time. So we've been doing about six jobs at a time, moving from one to the other as we wait for paint to dry, or when the sun moves so that we could work in a different area of the yard without melting, or who knows what else. No kidding. This is what my to-do list looks like.


So as much as I try to blog about only one thing at a time, real renovation life doesn't fit in a nice, neat little before...during...after progression.

Which means that sometimes you get little sneak peeks of other jobs that have been done in and around whatever I'm blogging about, that I haven't had a chance to mention yet.

Maybe we should turn this into a game. Spot the secret job completed!

I've got the first challenge for you... this shot from yesterday's garden creation.


Surprise! There's a fence between the garden bed and the stairs, dividing the front yard in half!

Here it is from the other side of the stairs. As you know, our intent all along has been to give the little unit downstairs its own private little front yard, so the easiest way to accomplish that was to simply run a fence down the middle beside the stairs.


We didn't want it to be a really solid fence (and I really didn't want to have to paint all of the palings it would require to do that), since one day we might sell this house to someone who wants to use both the upstairs and the downstairs areas themselves, so our fence would need to be removable to allow them easy access.

We toyed with a few different ideas, but settled on a design where we would have ordinary fence posts bolted into steel brackets in the ground (like this one that we had to pave around near the front gate - see here)


And then we could run horizontal timber beams between the posts, top and bottom, and attach some wire to cover the gap in between. Is that confusing enough? Don't worry, I'll explain.

Tom had some peaceful alone time while he notched out sections of each post to house the horizontal beams.


And then I had my own peaceful alone time painting all of the various bits and pieces while Tom moved onto something else (probably concreting), which of course I didn't get photos of.

And then it was assembly time! This was pretty late in the day, so both our light and our allowed noise-making time were running out. Can you spot our little canine supervisor in this shot?


We pre-drilled and then screwed each of the horizontal beams to each post, carefully measuring the distance between the posts first so that it would line up with the distance between our already-concreted-in steel stirrups that the posts would be bolted to...


And I followed with a little paintbrush to paint over the screws so that everything would be the same colour, because once we attached the wire I wouldn't have much access.


And as you can see, we then rolled out the wire ($20 for a 5m roll in black powdercoat from Bunnings), and it was time to attach it. We bought some little galvanised staples that were basically just little pieces of metal in a "u"-shape with sharp pointy ends. We hammered each one in at intersections of the wire, trying to hammer it outwards so that it would pull the wire nice and tight. Wish I had photos to explain it, but we were fast running out of time to make hammering noise, so we were going like the clappers! No time for frivolous photography!


But we got it done! Just! And carried it into the front yard to test its position before we signed off for the night.


We can't quite call it finished, though. Not only are the posts not actually bolted in yet, but you also can see that there's a fairly large gap between the bottom rail where the wire stops and the actual ground level. Allie can wander through there almost without crouching at all, so we have to add something extra at the bottom to actually make the fence dog-proof.

Meanwhile though, can you see something else peeking out in the corner of that shot above? Surprise! Yet another sneaky job that I haven't mentioned yet!

It's a tricky one. See we hadn't designed our wire division fence to make it all the way from the front boundary to the house. It made it as far as the posts holding up the landing on the stairs, but no further.

So, I set out to fix that. I added top and bottom horizontal rails using little steel brackets to attach them to the landing posts.


And then popped around the other side to attach a level so I could get a consistently straight line for my...


Fence palings!


We had decided that for a little more privacy right near the downstairs front door, we would make that area a bit less see-through than the wire fence. So when I was painting all of the fence bits and pieces, I also painted eight fence palings in readiness for this job.

And then I screwed them all in ALL. BY. MYSELF. Man I'm good!


So looking from the other side of the yard, privacy accomplished! Hooray!


So knock a couple more jobs off the list, we're getting closer! Of course now that our dividing fence is in place, we've got a little problem. The dividing fence, combined with replacing the section of front fence that we temporarily removed so we could get soil in, completely prevents all access into our lovely new garden area!


Well not ALL access...


While rolling under the dividing fence does have its advantages... it certainly offers a pretty great view of our lovely painted house...


It's not exactly an ideal way for our new tenant to get to her front door.

Perhaps a second front gate might have to bump up the priority list?

18 November, 2011

A Touch of Greenery


After we filled the front yard with pieces of concrete as pavers...


We bought a couple of loads of drainage gravel to fill in the gaps between them and make it a bit less hazardous. Tom then chopped up the old bathroom and toilet doors (saved from the bathroom demolition) to use them as temporary retaining walls, so we could box off the area along the inside of the fence for a patch of garden.


Eventually, when we pave that area properly, its height will be roughly the same as the garden bed, but until then we need to retain the load of nice soil we've also brought in.


I bought some Murrayas from the markets for $20, and left them sitting there in their pots for far too long.


And now I've finally taken the next step and planted them!


I also spread a thin layer of sugar cane mulch around them to try to limit weed growth.


It will be lovely when they grow! A lovely lush green hedge!


And it will be really nice to get a bit of greenery in our barren landscape at long last!


Of course the temporary retaining wall ruins the view a little bit, but as always, it's small steps at a time!

10 November, 2011

Letterbox Lovin'


When we were building our front fence, I was originally thinking we would get a letterbox like this.

Longbeach Fencing

In fact, I actually went to Bunnings and bought exactly that letterbox, thinking we would need to build it into the fence palings. It wasn't cheap, at $119!

And considering that our intention to one day turn the area under the house into a self-contained flat will require another matching letterbox in the fence, that number multiplied by two is not very friendly.

While I drove home with our new letterbox, for the first time in my life I actually started noticing what everyone else does with letterboxes in timber fences. And very few had the type that I had chosen!

Most had ones like this.

Gemma Wiseman
And I knew for a fact, having just come from Bunnings, that these house-shaped letterboxes (metal ones) were about $60, almost half the price of the one I'd bought.

By the time I actually reached our house, I'd made up my mind. My letterbox had to go back. It just wasn't special or perfect enough! And it was certainly too pricey to not be special enough!

So the letterbox sat in the back of my car for a couple of weeks waiting to be returned to Bunnings and switched for a replacement.

And then it occurred to me! I could search on the Internet for the perfect letterbox! A bit of unsuccessful trawling later, and I remembered DinoDirect, where I'd got our fabulous bathroom tap for a fraction of the Australian retail price.

And I found this guy!


And instantly, I was in love! It's unique-ish and not boring (it's certainly not available at Bunnings), and it reminds us of the mailboxes we spotted on our Europe travels! Plus its price was $59.50, and I found a coupon for free shipping!

And in almost no time at all, it arrived... with a twin, since I figured if we'll need a second one down the track for the downstairs flat, it's probably best to buy two that match now in case I can't get another one later. And since the two combined cost me less than the original one from Bunnings, I'm definitely not complaining! Although it does hurt a bit that they're now on sale for $32.69. Damn.

Oh well! It happens. And we were happy to pay the original price, so they were worth it.

Next came the hard part. We had to wait impatiently to pop it into place while the paint on our front fence had enough time to dry and set nicely.


And finally Daniel and I set out armed with our battery drill and some screws. Daniel held it up for me to check the position.


Here's where I made a mistake. The very hot morning sun was shining on us, and I was feeling lazy. So I roughly measured where the holes in the back of the letterbox were in relation to the sides of it with my pen, and started drilling holes into the fence.


That was a stupid idea. Don't do that at home.

Finally my common sense kicked in and I decided to leave it until after work when the area was in shade (it's amazing how much being really hot can affect your judgement). I even remembered the strategy I'd used to position all of the frames on my gallery walls, and decided to do the same thing here.

I traced the outline of the letterbox onto a piece of newspaper and cut it out.


And then I poked holes through the paper into the pre-drilled screw holes in the back of the letterbox with my pen. Easy peasy!

Shame about this poor girl's ankle, though!


And then I simply held the newspaper up against the fence...


And drew little dots on the fence through the holes in the paper.


And then it was a fairly simple matter of just drilling holes in the places where I'd marked the dots.


We had to give up on the screws that actually came with the letterbox, and brought out the tougher screws we'd used to attach palings to the fence. The flap at the top was very conveniently located to allow us easy access to put them in.


And while we were at it, I put up some bright shiny new house numbers on the post next to it. I've had to edit those out though, because it's probably not so sensible to broadcast our house number all over the Internet. You'll just have to imagine how pretty they are.


We're thrilled. In our eyes, our new letterbox is the perfect guy. Hardworking, dark and steely, with a European accent. Mmm... perfect.

Related Posts Plugin for WordPress, Blogger...