DIY Explanation

pour améliorer, meaning 'to improve', is a humble record of our renovation, home improvement and landscaping projects, with our travel adventures thrown in.

29 October, 2012

Torture by Weatherboard

The obvious next step for our all-wrapped-up-in-blue-foil house was for the external cladding to go on. Namely, weatherboards!

The builder and I decided to get proper hardwood weatherboards instead of cheating and going for a modern fabricated board that simulates weatherboards, because the clean straight lines of the newer man-made version would probably look too perfect directly beneath all of the existing not-perfect timber boards on the house.

So we ordered 900 linear metres of them, and I got very excited when the crane truck arrived to deposit them in the backyard. Thus the Instagram shot...

But my excitement was a little shortlived. It didn't take long to discover three things:

1) That 900 linear metres of weatherboards means LOTS of weatherboards.


2) That all of the boards were covered in wet, gunky sawdust. So because two boards were always sandwiched together in the pile (wet, sawdusty side inwards), they hadn't had a chance to dry out.


3) That all of the boards should ideally be primed, both sides, before fixing them to the house, so that they would be nice and sealed and there would be no chance of seepage of anything.


And so began my extreeeemely slow torture by weatherboard. Because, having just paid my builder's first invoice, I was in no mood to pay anyone to stand there for hours on end scraping sawdust and painting the things when I could do it, so do it I did.

I eventually developed a system where I would lay out a batch of to-be-painted boards sawdust side upwards in the yard to dry out.
 

Meanwhile, I would use a flat shovel to scrape off all of the sawdust, then brushed off the excess sawdust with a little brush.


And then I used a mini roller to roll on that primer. Board after board after board.


A batch of about 8-10 boards would take me about 1.5 hours. So by spending every morning before work and with a concerted effort by Daniel and I over the course of a full weekend, we managed to get the bulk of the boards painted.

I don't think I'd be upset if I never saw another weatherboard.

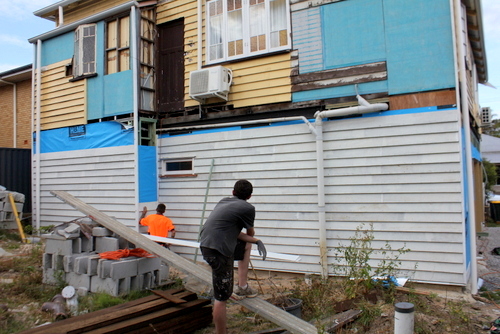
But at least then we finally got to start seeing the fruit of our labours as the carpenters started attaching them to the house! The back...


The side...


Around the garage door openings...


The other side...


That same other side a bit later... Daniel chipped in to help them for a couple of days when he wasn't working, as it sped up the process considerably having a third pair of hands.


When we reached this point it had to be one of the most exciting moments to date for me. It looks like a real house!


I also celebrated the moment with an Instagram shot from the stairs.


So that got the lower layer of weatherboards on the bulk of the house. Next it was time to move up to the second storey, which was looking like a crazy patchwork still, with the pieces of blue board up there that Tom's brother and I had installed for a bit of weather protection.

The blue board got replaced by more foil wrap.. equally unattractive.


But not before the blue board came down and I got to enjoy my extremely open air laundry from inside once again!


 And then the weatherboarding continued.


How's this for a before and after of the back of the kitchen?


Even with just the kitchen section fully weatherboarded we were seeing a major improvement!


But lets take a little walk down memory lane, shall we? First is a shot of the house very shortly after we first bought it, with the old bathroom still hanging on the back for dear life (see here for details of the day it died). Next is a shot of the back of the house at what I'm calling the height of its ugliness...


And now, a streamlined, weatherboarded picture of perfection! Well nearly. There's a bit more work to do to tidy up the plumbing and that ugly black steel beam running along the back wall that's sticking out from the line of the weatherboards.


But we now have a proper timber two-storey house! Hooray! It's amazing how much you can achieve when you pay people to do the hard yakka, huh?

26 October, 2012

All Wrapped Up

The last I showed of the area underneath our house was this, while I was playing around with possible layouts for our downstairs kitchen. In fact, that particular post marked my introduction of a new word to the English language - Renotivation. Renovation motivation = renotivation.


Since my husband has been away a lot with work this year, I was experiencing a serious renotivation slump. Since progress is very slow with only me, and despite my newly found wall-building prowess, tackling this downstairs area is a little beyond my skill level.

So, I decided that there was nothing for it but to bring in the professionals. I found and hired a builder (who is also a carpenter), and things started happening rapidly!

The first step was to finish up the framing that the other carpenters we'd hired had run out of time to finish. Mostly, this was involved putting up the internal walls, since most of the external walls were framed up and ready to go. This photo is taken from the same angle as the one above, except now there is a framed up wall where the work bench used to be! That's now the wall that divides the kitchen from the first bedroom.


Here's the corridor...


And here's the bathroom...


And here are the doorways to the garages.


Speaking of which, the original carpenters had actually made these openings a little smaller. We decided that, since the turning circle to drive into those garages is pretty tight, we should extend the openings as wide as possible.


And while they were making changes, I asked them to shuffle the window across a little, since the original carpenters hadn't left much room for cabinetry beside it. Here's the before and after. It's kind of hard to see, but the timber line on the ground in the left photo is the same one as in the built wall on the right shot. Much further away from the window in the second shot!


The original carpenters hadn't had a chance to frame in the ceilings either, so they got some attention...


 And we could finally call the downstairs area officially framed up! It's starting to really feel like a house!


But of course that only marks the completion of step 1 of about 3,000, so the builders moved on. This time to the outside. They wrapped up the house in what they called 'builders wrap'. Its vibrant blue colour certainly added flair to the overall attractiveness of our yellow house.


I scavenged a nearby demolition yard for two doors that had roughly the same pattern so that we could put one on either side of the downstairs front walls (hard to tell that they match from the photos, but they do!)...


The garishness of the blue builders wrap at the front of the house was nothing compared with this sight at the back. Oh the horror! Is that ugly mess really my house?


Even just with the addition of that wrap (which has a silver backing), the rooms inside were really feeling like proper rooms! Here's the lounge...


And the first bedroom...


And the bathroom! With a bath installed! I got so excited when I realised the bath was in!


And the next very exciting step was windows! We needed a total of five pairs of casement windows to fit out downstairs. And I quickly discovered that this was not going to be a cheap exercise! At just over $500 a pop, the windows bill cost us more than $2.5k! Ouch! We did consider the alternative, which was to just buy the sashes themselves from demolition yards and get the frames built around them, but decided that the extra effort and labour (for not just us but the carpenters - which is pricey) was simply not worth it.


And they were certainly beautiful once they were in!


I have to keep pinching myself. I can't believe that we actually have something that feels like a house downstairs! It's a far cry from what it was last year!


Can you believe it's even the same house? Who's excited to see what happens next? I know I am!

22 October, 2012

Manning Up

The first titles I could think of for this post were "I Built a Wall!" and "Who Needs a Man?"

But it looks like I'm not very original, because I've used both of those titles before. Hmm.

So... here's the story of me "manning up" while building a wall! That's right, original or not, I can now proudly say that I have built a wall all by myself, no man included.

This old shot of our house's front doors marks the location of said wall.


Since my brother Daniel and I had successfully managed to open up a new doorway to our future ensuite, we were now free to close in the old one, namely the doorway in the top left of that photo above.

Which looks like this.


First step was to remove all of the fibro boards covering up the wall...


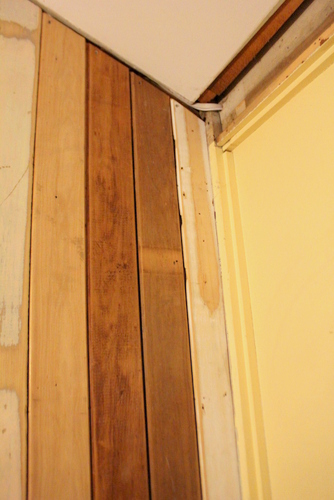
Until we were left with this. Ooh the nakedness! I think we've now managed to find the one colour that is actually more sickly than all of the yellow this house is covered in!


And then, in a brilliant feat of manliness (and his last contribution to the wall-building), Daniel whipped up this pine frame to fill in the old doorway space.


While I sanded and sanded and sanded VJ Boards.


And then Daniel went off to work... (why do all the men in my life keep leaving me to go to work?), and I got to work attaching the VJ boards to our wall frame.


Not before I had a genius moment though, and remembered that I'm going to need some electrical wiring running to a sensor light at the front of the house (the low end of the sloping wall in the above photo), so I bought a length of wire and ran it along the edge of the ceiling, drilled a hole in the front of the house, and voila! Ready for an electrician to come and do his thing!


I then spent the next six hours cutting boards, hammering in nails, and generally wrestling with the fact that it seems virtually impossible to get a VJ board that is actually happy to sit straight.


I won out though, even managing to show off my own amazingness by getting the cut angle for the last VJ board exactly right so it matched up with the crooked front corner (nothing in this house is even close to straight or level).


I hammered in the last nails a few minutes before our 6:30pm noise curfew, and got to stand back and admire my handiwork. Isn't my wall beautiful?


I called it a night then, but the next weekend I decided it was time to tackle the unfinished edges around the window. Again, because nothing is straight in this house (including the existing window), I attempted to cover up the dodgy edges with some leftover VJ board scraps when I finished off the wall...


But it needed some architrave to cover over those ugly edges and make it look like it's always been there. So... I decided to steal the architrave that lived on the other side of the original doorway (i.e. the one we'd just blocked up on the outside).


Here is that other side. I pulled off the vertical architrave pieces that ran all the way down to the floor, Cut them to 45 degree angles, and cut another piece to run along the bottom. Instant window frame!


And with some careful measuring and cutting of the remainder, I just managed to squeeze four lengths to surround the outside of the window.


Unfortunately I didn't quite have enough length to get a perfect cut on my fourth piece, but I figure I can putty up that gap in the corner and no-one will ever know! Hmm... perhaps not no-one. If that was my goal I probably shouldn't have just shared it on the Internet!


So there it is. My almost entirely girl-powered (oops, used that title already too) wall, complete with trimmed out window frame!


Next step is obviously to putty and no-more-gaps and paint. Although I'm holding off on doing that until I can paint all of the verandah/sleepout walls at once. That's got to happen eventually, right?
Related Posts Plugin for WordPress, Blogger...