DIY Explanation

pour améliorer, meaning 'to improve', is a humble record of our renovation, home improvement and landscaping projects, with our travel adventures thrown in.

06 May, 2013

If we never see another celing again...

Yes, it will be too soon.

Until we get to our new house, at least!

In the interests of speeding up this chronicle of our little house's renovation so I can finally start talking about the new house, how about I condense about a week and a half's intensive work into a single blog post?

Sound fair?

You won't know the half of it. Try to feel our pain anyway, ok?

So the ceilings...

Remember when the builders replaced some sections of the ceiling in our lounge and dining rooms that were in awful condition?


And then my brother Daniel hopped up on a ladder and did a bit of puttying and undercoating so that they would look semi-normal again?


Well we've always known that that was nowhere near the end. Because some panels still looked like this.


Yes, that's paint peeling off. And for the vast majority of the non-replaced panels it was the same. The builders couldn't care less about leaving us a whole bunch of paint scraping, sanding and patching work. They filled the brief, which was to replace the damaged panels.

So... with the knowledge that this was never going to be something we would tackle once the house was tenanted, we sighed, gritted our teeth, and got to work.

First we had to remove the furniture, in order to make a clear path for ourselves. In a small house, that always makes for a fun time, particularly in the rooms that have to absorb the overflow furniture!


And then Tom hopped up on the scaffolding and paint-scraped, sanded, and puttied his heart out. Believe me, this kind of task on a ceiling that's made of old horse-hair plaster is not for the faint-hearted. Tom had to cover almost every inch of the older boards in a layer of putty in order to get a smooth finish, in the end!


And then he sanded, which explains the curtains draped up all over the place. Putty dust is pretty pervasive stuff...

And then we could finally paint. Which was of course a painstaking process with paintbrush and roller because of all of those battens dividing up the space.


And that was just the first undercoat.

There were two more coats after that.


But it was worth it (which is easy for me to say, since I wasn't the one holding my hands above my head almost non stop for days). They look beeeeeaaauuuutiful now!

The lounge...


The dining room...


Aren't they just the smoothest, creamiest-looking ceilings you ever did see?

Yes? Good.

Moving on!

There's another ceiling that needed our attention desperately.


It's our verandah's ceiling (and since we're here, I might take the opportunity to take the credit for slopping a coat of grey paint on that triangular wall area above the main balcony that used to be yellow - goodbye yellow...finally!). It's made with some kind of cheap fibro sheeting, and all of the seams between the boards are clearly visible (UGLY!). Not to mention the fact that the whole thing is in dire need of a good paint.

So... you guessed it... the process began again. Sanding...


And of course, there were a few areas where the existing paint wasn't too keen on sticking to the ceiling. So there was then some paint scraping and puttying.


And more sanding. And then we gave it a good undercoat. Which I didn't take a photo of. Whoops!

But we still had the problem of those ugly seams. You may recall that our solution in my office to the same problem (those same boards extend in there) was to attach some boards (I'm going to call them battens) along the seams to create a little timber pattern along the ceiling, similar to the pre-existing ones in our lounge and dining ceilings above (see here for a more detailed account of that process).


Well guess what? We decided to do exactly the same thing on the verandah ceiling. Surprise! We took some measurements and I grabbed some boards at my next trip to Bunnings (a not infrequent occurrence), and one evening we tackled it!


Voila! Much fancier!


We managed to get some of the boards undercoated before we put them up, but not all. Makes for some super attractive halfway-through shots!


And then came a couple more coats of paint, so the whole thing gleamed with milky-white smoothness!

Except I didn't take any photos of that. Not a single one. Bad blogger.

I'll take some eventually and show you, I promise!

In the meantime, let's quickly cross to Ceiling Number Four! That's right, FOUR CEILINGS WE'VE HAD TO WORK ON!
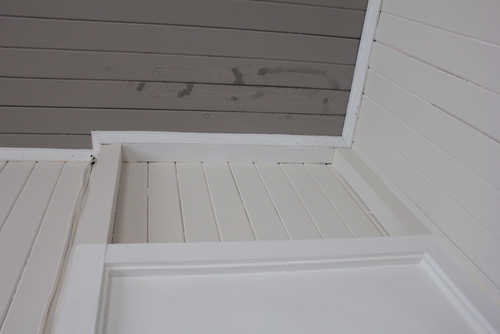

It's the master bedroom ceiling that used to leak before we got the roof replaced, leaving some not-very-lovely watermarks on my painstakingly-chosen paint.


So I paint-scraped, I sanded, I puttied, I sanded, I undercoated, and I coated, twice more. I also tackled patching the other two areas of the ceiling where this off-centre fan and this no-longer-necessary light used to hang. That's right, we FINALLY got the electrician in to install a new fan in a central location and install my two bedside pendants. Glimpses of those to come soon.


And that's it for ceilings... for now.

Can we get a round of applause? Or perhaps a back rub? Three ceilings completely made over, a fourth repaired... what can I say, we're a lean mean ceiling-painting machine!!!!

So what do you think? Please tell me they look amazing. In gushy, over-enthusiastic language that forces me to play it cool and act like it was no trouble at all.

If not, I was serious about that backrub.

03 May, 2013

Elm Down Under!

I just couldn't resist sharing this amazing news with you guys.

West Elm has opened a store here in Australia!

The reason for this excitement?

Well... a little while back, I wrote a post documenting my home office rug search journey, the title of which was "Australia Has no Rugs!"

The story ended happily with my realisation that American store West Elm is willing to ship some items to Australia at fairly reasonable shipping rates, and my office rug and I were united and are living happily ever after.


But the fact remains that we seem to be stuck in the 70's with rug fashion here in Australia. It's shagadelic down under, let me tell you!

Of course, as some of the lovely commenters on my Australia Has no Rugs post mentioned, places like Freedom Furniture and Etsy are offering a few pretty good-looking options these days, so my tantrum over there being NO rugs might have been a bit of an overreaction. But at reasonable prices, the good ones have still been pretty hard to find!

But now, with West Elm moving into the Australian market, I see good things for our home decor fashion future!

Just look at these beauties!!!


And of course they sell more than just rugs, I just get all hot and bothered over the rugs.

Now if only I wasn't spending all of my money on a new house, so I could go shopping!

Streaky Glass and All

So who wants to see the actual finished photos of our ensuite in all its glory, instead of just getting close-up snippets while we install towel rails etc?

Well let's not keep you in suspense?

Ladies and gentlemen, my pride and joy...


And here's a more moody version of that above shot where that streaky shower glass (totally my fault) is slightly less obvious!


We wanted this bathroom to tie into the other main bathroom nicely, hence the same use of the black ceramic pinstripe tile for a feature wall and the creamy porcelain tiles everywhere else. But the main tie-in is that mirror that mum gave me that I spray-painted silver! And the little black damask pattern in the glass of the entry doors don't hurt the theme either!
 

Let me just backtrack for a moment though, and gaze at that pedestal vanity for a moment. I had mentioned that I searched for the narrowest one that I could find, since as you can see, it only had a very little slice of space to squeeze into before it would hit the shower.


But it was not our first choice of pedestal vanity. This one was.


Yes, you can see why we didn't end up using it, huh? We got that pedestal (and the matching vanity basin that Tom is holding here guiltily in the aftermath of having broken the pedestal) when we bought all of our second-hand kitchen cabinets, claw-foot bathtub and dishwasher. The seller threw in the vanity for free, and we were thrilled!

But then somebody accidentally broke the pedestal...


At first we just planned on buying a new pedestal to sit the little vanity basin on, since it was in good condition, but in the end that would have required us to make two sacrifices:

1) The basin would have needed more space, so either we would have had to squish an already-very-narrow shower, or we would have had to move the vanity a little to the left, preventing it from being centred off the doors. Neither was really an option.

2) The basin was designed with two tap holes. These days basins usually come with either one (for an all-in-one mixer tap fitting) or three (for a spout with a tap either side). The obvious reason for that is that it's nice to have the option to have a combination of cold and warm water coming out of the one spout, not cold out of one, warm out of the other. So not only is it pretty darn hard to find attractive tap fittings to fit a two-hole basin, but it's a pretty silly arrangement, really. So aside from drilling a third hole in the centre there for a spout and hoping that we didn't crack the porcelain, we couldn't really use that basin.

So, in the end, not so much harm done! We instead bought ourselves this lovely little slim-line vanity for no more than $150 and were done with it. Oh that streaky glass!!!!!


I think it's a very good thing that we're now going to move on to a new place. I committed hard to the style that we chose in the main bathroom here (I'm going to name it Dramatic Chic), and had to continue it whether I was still committed or not. And to be honest, although I still love it and wouldn't change a bit of it, I'm really ready for something new. Perhaps less dramatic. Or chic.

Who can't wait to get started on the new place???!!!!

02 May, 2013

Ours no Longer

Guess what everyone?

We figured we'd get a bit of practice at letting go of things in preparation for our big move out of this house and into our new one.

The target in question?

Our backyard shed.

But in the interests of keeping it brief and mixing things up a little, I thought I'd document it all in a little 60-second video.

Oh and a warning, this video contains some fairly graphic shed de-construction shots, so avert your eyes if you need to. Oh and if the sight of waaaaaayyy too much junk alarms you, don't watch. Just don't do it. It's disgraceful.


Bye bye shed!

29 April, 2013

Eyesores be Gone!

In this final push to get this house renovation complete, we're finally knocking off all of those niggling little issues that have been bugging me for way too long, but haven't been important enough to actually bump up to the top of the priority list.

But no longer! Eyesores be gone!

Can you spot the eyesore in this shot?


If you ignore the crazy upside-down lampshade acting as our light over our dining table (don't worry, it's on my hit-list too), there's that still-unfinished bathroom doorway staring you in the face. With the yukky old board covering up the window space above. It's got to go!

So before we play fix-it, let's take a quick little doorway journey down memory lane! This is what that wall used to look like. What doorway?


And then Tom attacked it with the circular saw...


And we installed some door posts on the inside...


And salvaged the old horizontal piece that was originally over the long-gone kitchen doorway. And stuck up that hideous old board so that people could do their business in the bathroom without everyone in the dining room listening in.


And so we were left with this. For a long time. The icky board above the bathroom door is one thing, the slats above the laundry door to the right aren't really my thing either.


But before we could change things above the doorways, we first had to actually finish off the trim around the bathroom doorway itself. We bought a plain trim piece to run up the inside of the doorway to cover over the sides of the VJs and make everything lovely and smooth...


And we finally bit the bullet and bought ourselves a little multifunction tool so that we could cut through the chair rail and skirting board neatly, in preparation for an architrave to go around the door frame.


It's taken us two years of renovating to come to the realisation that owning one of these tools would be really handy for those jobs that require a bit of care and precision.


And then we pulled out the pieces of architrave that we originally pulled off the kitchen doorway, and nailed them in around the bathroom doorway! As you can see, I couldn't wait to attack it with the wood putty before taking a photo.


And then, finally, it was time to give that awful board its marching orders!


We could have simply replaced the board with a better-fitting piece and painted it, but because the bathroom and laundry both have lovely windows that let in quite a bit of good light, we decided that fixed glass panels would still provide a sound barrier, but let the light flow through into the dining room. So, we took the measurements of the window sections above both the bathroom and laundry doors, and then Tom toddled off to a glass shop to get two pieces of clear glass cut to size.


It was looking great as Tom popped the first panel into place.


But unfortunately nothing in this house is straight or square, so the panel hit a bit of a bumpy bit in the middle that needed some sanding before it would slot in properly.


So while Tom sanded, I took photos, and Allie played with her favourite toy. Everyone's happy!


This is a pretty typical face while we're working on the house.


And then the glass popped in nicely.


Isn't it pretty? Like a real doorway!


The laundry doorway got the same treatment...


And it was like they'd been like that all along!


What do you think? Does glass above a timber doorway work?

The Claw

Surprisingly enough, I'm not referring to this claw.


Or even these.


No, this is the story of another kind of claw. A much more attractive-looking one, I might add!


Almost immediately after we got out claw-foot bathtub secondhand along with our kitchen cabinets, one of its claws broke off, leaving the poor bath a little unstable. And of course, it was the most conspicuous claw, the one nearest to the bathroom doorway.


Our temporary fix-it solution was to wrap a brick in an old towel and jam it under there to support that corner of the bath. And then we proceeded to shower in the bath for more than two years, living with the fact that when you placed your feet in certain spots, the tub would rock a little bit.


Well enough is enough!

Since there was no repairing the actual plate bit on the bottom of the tub that is supposed to grab onto the top of the claw, we had to come up with another solution.

And that solution is  to add a fifth leg! We found this adjustable rubber support thing at Bunnings, and mucked around a bit with positioning it so that the bath would no longer rock.


And as you can see, we could then just slot the fourth bath claw back into position, and like magic, our bath had four claws again!


You can hardly see our fifth leg in the shadows under the tub, and it's completely obscured from view from the doorway by the claw itself!


I think this is yet another job that deserves a place on the "I can't believe it took me two years to get that done!" list!
Related Posts Plugin for WordPress, Blogger...