DIY Explanation

pour améliorer, meaning 'to improve', is a humble record of our renovation, home improvement and landscaping projects, with our travel adventures thrown in.

11 March, 2013

Preventing the Wobbles

How fast we fall. One minute I'm discussing how amiable diamonds are (see here), now we're preventing wobbles.

Those wobbles relate to our front staircase.

Allow me to explain. A long long time ago, we can still remember...

When we first concreted in the steel brackets to support the posts that would then support our staircase, we concreted them in based on the height we expected our front yard to be eventually. That height was higher than the original ground height, so we devised an extremely sophisticated system to hold the concrete up higher than ground level.

Empty paint tins.


Then all of our height dramas happened (see here), and now our front yard has to be back down at the level that it was originally.

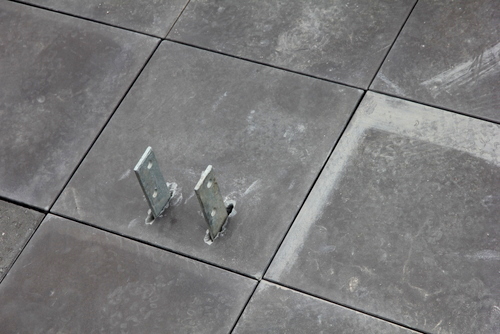
And as you can just glimpse from this in-progress paver shot from last week, the lower ground height means that the little blocks of concrete holding up our staircase are now exposed.


Which justifies our fear that our staircase will get the wobbles!


So something had to be done to ensure that our staircase posts weren't going anywhere.

We decided to temporarily make the staircase even more unstable by digging a big trench underneath it, so that we could then concrete in big channels to link up all of the exposed post footings. Actually Tom did all of the hard yakka digging. I just happened to find a photo of me with a shovel in my hand, so I can now take all of the credit.


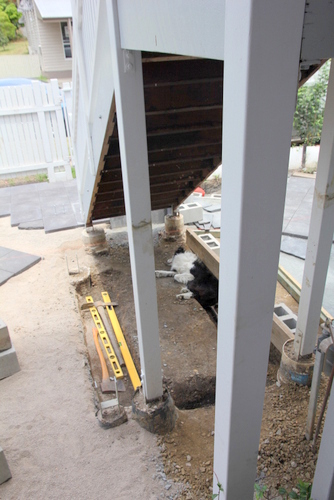
In fact, just for fun, let's back up a step and have a look at the first photo from this post above. You can just spot the little trench dug up under the stairs. On one side it has an axe and two yellow levels sitting in it. On the other, there's a sleeping dog!


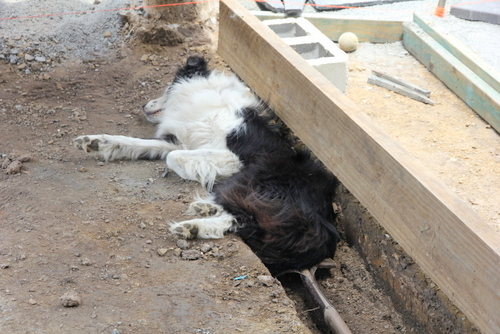
Yes, Allie promptly took ownership of the trench and claimed it as her sleeping spot. Note that she is actually sleeping with her bum resting on an upturned shovel head. Love that girl.

We did eventually have to displace Allie, and continue working on our to-be-concreted trench. Somewhere along the line some of the tradies we had hired had left a whole bunch of steel reinforcement rods lying by the side of our driveway, so we nabbed those and cut them to size (my first time using the grinder - thankfully uneventful), and stuck them in our trench.


Unfortunately those same tradies didn't leave any convenient little plastic reo-bar-holding-thingies behind as well, so we improvised and cut a leftover plastic plumbing pipe into little pieces to hold our steel bars up off the ground. The reason for this is, for them to do their job correctly and provide the concrete with support, they're best being located fairly centrally in the concrete rather than on one edge. Makes sense when you think about it, huh?


Up in the area beneath the stair landing we decided to run a similar trench around the edges to link all of the exposed concrete stumps together, but we arranged some spare blocks in the centre that we could later remove to prevent the entire area being covered in concrete. The reason for that is because that area is plumbing central, and it would be great to have access to the buried pipes there in the case of future issues.
 

And then came the fun part. The concrete-making (thanks to our lovely ex-neighbours Shaun and Tanya for the loan of your mixer... again!)...


Which Allie supervised very carefully of course...


And wheelbarrow by wheelbarrow, we began filling up the area under the stairs.


Mmm. Doesn't that look attractive?


Many many wheelbarrows later...


We were nearing the finish line...


And those stair posts ain't goin' nowhere!


Before we signed off for the day, Tom carefully aerated the concrete with the shovel before smoothing it over...


Oh but we haven't talked about the front of the stairs! Here's the giant gap between ground level and the staircase that I've been harping on about. We decided to bridge it with a little paver step. So we positioned some pavers to form the riser of our new step and made sure that they were nice and level...


And then the creepy hand shoved some concrete blocks in from behind so that their tops lined up with the tops of the riser pavers so we could then put our wet concrete in all of the gaps to link it all together and make it nice and strong.


And the source of the creepy hand? Tom exercising his stomach muscles by perching his bottom on a paver we'd squelched into the under-stair concrete without touching his feet on any of the surrounding wet concrete. Yep, my husband is crazy. But committed. Wet concrete needs to be dealt with!


So I'm relieved to report that after all of this work, we can now be sure that our front staircase is once again strong, un-wobbly and stable and definitely not going anywhere! Whew!

08 March, 2013

Diamonds are a Girls Best Friend

As this mid-painting shot of our house testifies, our front garden has been letting down our street appeal quite a bit. Unless of course front yards full of old furniture and junk are considered attractive nowadays!


The front staircase essentially divides our front yard in half. There's this side near the driveway (this photo was taken from above on the front verandah)...


And after a bit of junk-clearing, this other side to the right of the stairs as you look at the house (this photo was taken from above standing on the landing of the stairs... front fence on the right, house on the left).


With the bulk of the inside jobs now done for our new downstairs area (that I'm calling the Granny Flat), it was high time we paid a bit of attention to the front yard. So I started playing around with the plans and figuring out what we might be able to do. I knew that I wanted to make the most of the fact that the area was divided fairly nicely in two, and make them look roughly symmetrical from above. I got a bit carried away, though.


Since making things easy is boring, I decided to make things super hard and designed the areas around pavers laid in circles as the focal points, with other pavers and garden laid around them. I figured that maybe someone somewhere would have come up with a way to make it easy to lay pavers in a circle by making kits with pavers all cut to the right sizes! Apparently I was dreaming.

That doesn't exist.

So, I had to revise my plan, and we came up with the option to replace my paver circles with diamonds! Tom loved that idea because it meant that there would be no need to cut any of the pavers, thus making the process of laying them much easier!

But before we could get to that point, first came the messy part. Preparing the front yard to be ready for pavers. We were very fortunate in our timing, because our plumber had his own earthmoving machine that he was using to dig the trenches to lay our stormwater pipes for the house.


So we asked him to spend an extra couple of hours moving dirt out of our front yard, since the council had dictated that the finished height (i.e. top of paver height) of our front yards couldn't be any higher than the natural lay of the land. Because we'd brought in dirt previously thinking the opposite, that we'd have to build the front yard up to the height of the house's slab (see here for the reason for the change), this was a bit frustrating. But what can you do? Roll with the punches!


Whenever we move dirt around Allie seems to feel the need to lie on what's left and protect it from removal! Or perhaps it's just a nice cool spot to lie?


Our carpenter let us borrow his dumpy level so that we could make sure that once we brought in road base and sand, our finished heights would be right. This was fairly complicated, since the staircase was in the way most of the time, and we also had to make sure that the yard would drain properly.

Laying out the four corners of each of our paver diamonds helped us work out which areas needed to fall in which direction around them.


And so that I would get my symmetry on each side of the yard, we also had to make sure that the two diamonds would line up with each other.


Then we hired a wacker packer for the weekend and began the process of compacting all of the road base on each side.


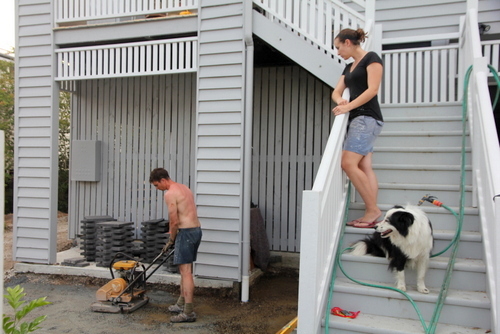
My job was to spray water on the areas that needed it before Tom ran over them with the machine, so I perched myself on the stairs with Allie. And I must say, spraying water at one's defenceless husband is a little too much fun!


And then, after our layer of road base was nice and compact, we brought in some more sand as a softer layer for our pavers to sit on.


Then it was screeding time...

Tom uses a big metal level to scrape the sand in arcs so that is flat and not-bumpy and also falling in the right direction.


And then finally it was paver time! That's the fast part!

We bought some charcoal-coloured concrete paver seconds at a discounted price from a local landscaping yard, and carefully selected the ones that were roughly the same colour as each other.


And then we dashed upstairs to admire from above. Unfortunately something went wrong somewhere along the way, because the diamond on this side of the yard actually ended up a little bit crooked, so its two centre points didn't line up with the house perfectly. We considered just leaving it like that, but we knew that every time we walked up the stairs that would be all we'd notice.

So, poor Tom picked up every paver and started again, trouper that he is.


And then we repeated the process on the other side (thankfully having already learned from our original mistakes).


The next area of interest was the little space between the two sides of the yard at the bottom of the stairs where the entrance from the front gate is.

We realised at this point that we needed some pavers with a bullnose edge to meet the front footpath, and also create an extra step up to the timber stairs, since they were a bit too high off our new lower ground level. Unfortunately I didn't take a picture that demonstrates that properly, but I'm sure you can imagine a giant step down from the last timber step.


And that was when we discovered that the pavers we had bought for our diamonds didn't have a bullnose option! So, Tom did a big ring-around and found some similar-looking pavers that did come with a bullnose option. They're actually a much nicer (and much more expensive) paver, so we figure that it's quite nice that we have the fancy pavers at the entrance.

To fit them around the front fence posts, we had to carefully measure and mark them, and Tom cut them with the grinder.


And they fitted beautifully. Thank goodness!


And it didn't take long to get the rest of them (that didn't need cutting) laid.


Although there was one that Tom had to give a bit of TLC to, so that it fitted around the steel fence post bracket that we'd previously concreted into the ground. You can just see it next to the timber level lying on the ground next to Tom in the above photo. More on that later.


In the meantime, it feels great to have a good start on making our front yard less of an eyesore!


We've still got a way to go, though!

01 March, 2013

The Cherry on Top

Yesterday I talked about the icing on the cake (i.e. finishing our downstairs bathroom off).

Well today we've moved on to the cherry on top. Except it's not in the bathroom.

As we steamroll our way towards the finish line for this downstairs renovation, we're back to the downstairs kitchen! Last we left it, I'm pretty sure it was looking like this.


Does an appliance-less kitchen qualify as a kitchen?

We didn't think so. So... I set about filling it with appliances. We dithered for quite a while over whether or not we should bite the bullet and buy new appliances, or whether we could get some decent options second hand at a fraction of the price. After all, so far we haven't had any issues with any of the appliances we've bought secondhand.

After realising that we'd be looking at well over $2,000 for brand new ones (and that's for the cheap brands), we went secondhand hunting. I found this gas cooktop and electric oven combination for a grand total of $400...


And we shelled out about $100 for a rangehood to go above. We had a bit of trouble finding an appropriate rangehood, because we needed one that didn't need to be ducted outside in order to work effectively.


And I had already bought a $100 IKEA sink that you got a glimpse of when we put the tin on the back of the kitchen peninsula. See it there perched o top of the bench?

And I paired it with a $100 goose-neck IKEA tap as well that I forgot to take a close-up shot of when it was installed. But you can see it here in this wider shot.

Where you can also see our new integrated dishwasher! It's a Smeg, and we got it for $250! It's nowhere near brand new, but it's a good brand, and it works nicely. So, at a mere fraction of what a brand new dishwasher costs, we figure we can fairly easily replace it with another secondhand one if need be down the track.

The fact that it's integrated (meaning you're only supposed to see the top panel, and you can put a piece that matches your cabinets over the rest of it) caused us a few problems, since obviously we were working with our secondhand kitchen cabinets, and didn't have many spare cabinet doors leftover.


We did find that the front of what was supposed to be a drawer under a wall oven was the perfect width, but unfortunately it wasn't tall enough, so we had to add a plain panel beneath it. I think it does look a bit strange, but hopefully only if you're focusing on it.

So that's our new fully functional kitchen! Hooray!


But we're still not quite done!

What's next? Window coverings!

As you can see from this wider kitchen shot from above (where you can also decide whether or not you think the panels on the dishwasher look strange), the windows in the lounge bring in a lot of natural light, and are looking pretty bare.


So, we went curtain shopping. I think we must have chosen the messiest Spotlight store in Australia to visit, so it took us MUCH longer than it should have to find enough matching pairs of curtains for all of our windows. We eventually settled on these black faux silk pinch pleat panels, with a sheer panel between them.


We actually installed them before we installed the newly black-sprayed tin panel on the back of the kitchen bench (see here), so we had a chance to lay out the smaller piece of tin to demonstrate how nicely they match.


And you can just see a black curtain peeking out in the corner of this shot when Tom was installing the tin.


We also bought matching panels for the bedrooms too, but stupidly, I forgot to take photos of them. Sorry!

I didn't forget to take photos of the blind we bought for the kitchen window, though! Yay!

We found it at Bunnings, and it was lovely and cheap! I'm afraid I can't recall the exact price, but it was less than $50, I'm sure.


It has a nice woven straw kind of feel, and it fits the slightly odd-sized kitchen window beautifully!


It actually lines perfectly with the little IKEA sink! Yay for happy accidents, yet again!


And of course, the fact that the blind is black means that it ties in with the black tile splashback above the stove, and also the dark pendants above the bench!


And... creates a nice connection with the black curtains in the lounge, so everything matches!


What do you think? Can you believe that is almost exactly the same view as this, just a few months ago?


I can't!
Related Posts Plugin for WordPress, Blogger...