DIY Explanation

pour améliorer, meaning 'to improve', is a humble record of our renovation, home improvement and landscaping projects, with our travel adventures thrown in.

23 April, 2012

Mud Rocks...Not

Back at our last house, we spent a ridiculous amount of time covered in mud and sweat, moving dirt around as part of our grand landscaping plan.


So far we haven't really done much in the way of landscaping since moving into this house (aside from cutting down all of the trees). But we've now been forced to fast-track the improvement of one little area alongside our new slab, under our first fence.

This is how that area looked when they had leveled the slab area ready for the footings to be poured.


Because they had an earthmover in again before the full slab was poured, we asked if they wouldn't mind scraping away the extra earth along that side under the fence, to save us from having to do it by hand.


What we were left with was not attractive, with a main feature being the remnants of an old tree stump (and its roots) that you can see in the bottom right of the photo above. When it rained shortly afterward, the entire area became a muddy, sticky, stinky mess. I really don't know why clay earth stinks so much when it's exposed, but it does. We could smell it from upstairs!
So, we decided that we were simply going to have to get our hands dirty and do something about it. I took a few trips to our local landscaping store to retrieve loads of rocks...


Which we shovelled into wheelbarrows and then tipped into the area (after we'd cleared away the excess mud and muck).


Until it started looking like this. Much much better (although you'll have to imagine the muddy mess it replaced, because I didn't manage to get a photo of it at its worse). We also took the opportunity to add an extra timber sleeper underneath the sleepers that we'd built in under our fence, since the earth on this side was now considerably lower than it was when we first built the fence. We'll have to do something about those exposed blocks of concrete around our fence posts some day.


Oh! And something else I also didn't get photos of was that we had bought some ag pipe to lay underneath all of our rocks down that side, so that when it rains that area doesn't just fill up like a giant bucket, but drains down into the front yard (and hopefully then into the stormwater drain once we sort out the front yard drainage).


It was exhausting work (and made even less pleasant by the fact that it kept raining on us), but we progressed very nicely. Until we hit the tree stump, that is.


That thing was a monster. And a monster that played hard to get, too! We tried chainsawing it...


I tried to dig away all of the dirt surrounding the stump so that we could at least get access to it.


I tried chopping it up with an axe, which strangely looks like it's upside down in this photo. Maybe it's the mattock. We tried that too.


We eventually discovered that the best way to cut away the bulk of it was for Tom to go next door and slide the chainsaw blade down through the little gap between the concrete of their driveway and our fence, and cut away the bulk of the tree stump from there. This is probably not a safe thing to do. Don't try it at home, kids.


We eventually got it looking like this. Not very attractive, but at least it's comparatively clear.


And with the magic of rocks, it looked like this!


With the minutes ticking closer to the landscaping place's 4pm closing time, we decided that we could just manage to get another load of rocks to dump in the front yard as well. Daniel whipped out the mower and cut all of the grass back as low as possible. And as you can see, the boys dismantled part of the front fence so that we could back the ute in through that gap. We just couldn't face having to wheelbarrow another entire load of rocks over, so the fence removal seemed like the easier option. It was, too!


And now this is what the front yard looks like, with that extra load of rocks dumped in there, and the front fence replaced. It's definitely not the most attractive front yard I've ever seen, but it's better than mud! Speaking of mud, I wish I'd got a photo of what we looked like by the end of the day. Drenched and covered in dirt and sweat, we were quite the sorry sight. It was a fight to get first dibs on the shower! But at least we've conquered one small area of our barren wasteland of a yard!


20 April, 2012

Rug-gedly Handsome

Warning... this post contains more rug-related dithering on my part. But does it have a happy ending? Wait and see!

Guess what people? I recently claimed that "Australia Has No Rugs", when I undertook a search for a rug for my office. Well, shame on me, because as it turns out, Australia does actually have a few rugs! It takes a bit of searching to find them though, and they're not necessarily affordable.

What prompted my search? This. The only other room in the house that has a rug in it, the lounge room.


We've had that red rug since we first moved in to our last house. We got it for a discounted price of $200 from the place that we bought our house's shutters from, because one was slightly damaged. It took up considerably less visual space in the last house.


I've been wanting to replace it for a while though, for three main reasons:
  1. I'm moving on from my red obsession a little, and it's kind of hard to move on from red when the floor is covered in it.
  2. Now that Allie is an inside dog, we have dog hair issues. And the red rug is not only hard to vacuum, but if I don't vacuum twice daily it always looks covered in dog hair.
  3. It's not big enough for the room. As you can see from this shot of the room in an earlier (slightly cluttered) incarnation, it extends past the couches, but leaves quite a large chunk of space on the other side, about 2.5 metres. I tried to make that look deliberate with those little black spindly chairs, but to pull the room together properly, it needed to extend further towards that far wall.

So, I began searching, and came up with the following options:


RUG OPTION #1

 
Tom and I were at a shopping centre together recently (which doesn't happen very often!) and decided to pop in to Carpet Call to see if they had any rugs that interested us. None of the patterned rugs thrilled me, so we were just about to leave when I spotted this rug at the bottom of a pile. Tom made a superhuman effort and lifted up the corner of all of the other rugs on top of it so that I could get a good look at it (and a photo). It's a pure wool knotted rug, and the ticket price of about $1,400 almost made us faint. The sales girl said they could give us 20% off, but that still meant a price tag of over $1,100, which was still nowhere near our comfort zone. So we left our phone number in case they could scrape some more dollars off it, and left without feeling too much regret.

Later that week, I received a phone call from their "Rug Manager" (got to love that title) offering us the rug for $910. Coming under the grand certainly made it a bit more attractive for us, but I was still pretty uneasy about it. Spending $1,000 on a rug wasn't really in the month's budget, particularly not with all of those concrete slabs and benchtops we've been buying!


So, in typical fashion when struck with indecision, I made a list of pros and cons:
  1. It’s pretty expensive still 
  2. It looks expensive though, which is a good thing
  3. It would disguise Allie hair extremely well, I think. Definitely better than our current rug does!
  4. I don’t know how easy it would be to vacuum Allie hair off it, since it’s not a perfectly flat surface
  5. It doesn’t have a pretty pattern, which is what I was really hoping for.
  6. But it does have a nice texture, which is almost as good as a pattern in some ways.
  7. Because it’s a nice neutral colour it’s not likely to be something we get sick of too quickly
But I was still undecided. So I hit the web to research what alternatives I could find. And I found quite a few websites that I never knew about before. The longer I searched, the more confused I got, though. I began to wonder if I would ever feel capable of making a decision. Does this feel like office rug deja vu?

This brings me to…

RUG OPTION #2


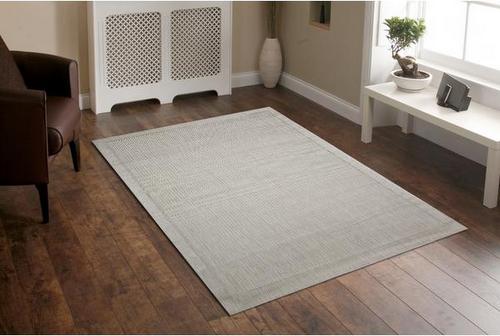
The West Elm Andalusia Rug. West Elm is the same company that I bought my office rug from, so I’m confident that they can post to Australia, which is definitely a good thing. Including the shipping (which was half price at the time), this rug would cost us $620.60.

Definitely cheaper, but still definitely not a small expense! So I got my list on again:
  1. It’s still not cheap, but cheaper than the CarpetCall one.
  2. It’s the kind of pattern that I’ve been loving for a while.
  3. It’s neutral and not particularly stand-out-ish, which will make it easier to decorate around in the future.
  4. It’s a flatweave rug, meaning it won’t have the cushy-ness that our current rug has. It will be more like the office rug
  5. It’s probably a more forgiving colour for dirt and stains than the CarpetCall one, given that it’s mostly grey, not white. But it might show up Allie’s hair more.

I kept searching.

RUG OPTION #3


It isn’t actually possible to get this one in Australia. It’s the ‘Cream Smoke Shag Rug’, available on Overstock.com. That pattern (not so much the colours) really appealed to me when I first saw them. Since I couldn't get it shipped internationally to me, I came up with two ideas for me to create a look similar to the pattern on this rug:
 
The first? Paint it! Like Holly (who writes the blog Almost 40 Year Old Intern) did.


Or... cut up and reassemble other rugs to create a pattern – like Mandi from Vintage Revivals did.


The biggest motivator for either of these DIY options is cost. I could go for a fairly daring pattern, theoretically without having to worry about it being horribly expensive. If we didn’t want to keep using that rug in the future, we wouldn’t feel so bad about having thrown money down the drain, because it would be cheaper. Theoretically.

And then this happened.

RUG OPTION #4


I stumbled across an amazing (AUSTRALIAN!!!) website where they custom-make rugs, and ship them for free, called Rug Couture! In a whole range of different and cool geometric patterns, and all colours of the rainbow! It’s exactly what I was looking for.

Except for one tiny consideration.

They’re not that cheap. I found a couple of patterns there that I like, including the one above. For the 200cm x 300cm size (which is what I’ve been looking at for all of the other rugs), it would cost $1,815.60. For the 170x240 size it’s $1,234.61. Not cheap.
 
I think if we were planning on living in this house long term and I was really confident in the design of the rug it wouldn’t be such a problem to invest in something unique and expensive, but I don’t think we’re at that stage in our lives right now.

So bring on the next!

RUG OPTION #5


I found another Australian website that I also didn’t know existed called Zanui.com.au. I didn't like  most of their rugs, as usual. But then I saw this one. Does it remind anyone else of the “Cream Smoke Shag Rug” that I liked the pattern of above? With the pattern just oriented sideways instead?

The colours are good, and the price was the best yet (aside from the potential DIY options) at $588.70, with free shipping.

When I first saw it, I thought “THIS IS THE ONE! I FINALLY FOUND IT!” But then I immediately started wondering if it’s a bit too much? Will it be really intense and overpowering in our little lounge room? Would we be more sensible to go for something with a smaller pattern (like the West Elm option) that doesn’t make quite as much of a statement? Particularly since I want to one day put a rug under the dining table as well, so we don't want too much pattern competing in the adjoining spaces.

And then, because I’m crazy and was beginning to overthink this way too much, I decided to photoshop the rug into an old photo of our lounge room to see what it would look like. By the way, I don't intend for our couches to be brown forever, so please ignore the clash-iness of the brown couche with the grey rug.


Tom loved it. I was worried about it.

And then, something else happend!

First, I stumbled across this photo on Houzz, and fell in love with the colour scheme.

 
And then, almost at exactly the same time, I stumbled across this photo (on Houzz as well), and the proverbial light bulb came on above my head.
 

I realised two things:
  1. I really liked the royal blue, black, grey, zebra colour combination. I’ve never been an animal print fan, but this photo makes it look classy.
  2. Layering rugs is totally an option! Of course I’ve seen it before, but that second photo really made me stop and think. You don’t have to have just one rug, you can have two, one on top of the other! And that seemed to me like the perfect solution, because we need quite a large area covered to make the room look good, but having a strongly patterned rug (like the Zanui one) over that big area would be quite overwhelming. So, an idea was born. We could do a very plain, hopefully cheap big rug for most of the area, with only a very small little coloured/patterned rug directly in between the two couches.
Of course, I then wasted no time going Internet trawling. And I found the following two rugs (plus a whole bunch of others, but these ones were the cheapest):
It's a Silver Sisal Rug from Deals Direct, for just $169.95 with free shipping (which I can't find a link to anymore in the correct size - maybe it's not available right now)!

And this one...

 
... is a blue shaggy rug from Solace Zone, for a total of $92 (incl. shipping).

That makes for a total of $262, which is a fraction of what the other rug options were going to cost us. The more I thought about it, the more sold I was. And the biggest advantage is that if we ever get sick of the blue rug, we only have to spend about $100 to get a complete change in colour scheme or style, rather than having to get a massive rug and spend a fortune.

So, I made an executive decision to buy the two (before even getting Tom's ok - oops), and they arrived very quickly! Now, our lounge room looks like this!


I love it!


The colours of the two rugs work well together.


And the lighter coloured rug really makes the room feel brighter. It's amazing how dark the red rug made the room. The pop of blue is small enough to not have as much impact.


Here's the view looking in the other direction (apologies about the vacuum cleaner and other junk that I neglected to move out of the shot). I placed two chairs on either end of the big rug to show what I'm thinking of for furniture placement to add a bit of extra seating and fill up the empty space at that end of the room. Better, yes?


 Hopefully all the folds marks in the rug come out eventually, or I might have to consider ironing it!

19 April, 2012

What? The Stairs Still Aren't Done?

I'm sorry to report that no, our front stairs are still not done.

A full seven months ago, in September 2011 we started building our front stairs with digging the holes for our posts (see here). Then, because it took us so long to complete each next stage, when we finally got to the handrails in November, I labeled that post Snail Railings because it had taken us such a long time to put them up. But even then, we were nowhere near finished.

Because the stairs still looked like this.


A small child could easily fall through the gap between the stairs and the top rails, even though we've managed to at least get a bottom rail on since.


Unfortunately we're not quite ready to correct that particular problem. What we are ready to do is to attach some steel reinforcement bars underneath the stairs to prevent the timber from warping over time. First... measuring where to put each bar...


And then drilling holes for them...


After we drilled the hole in the first side, we measured again on the other side, drilled another hole, and pushed our reinforcement bar through from one side to the other.


We'd fortunately also managed to buy some Loctite, which is a little red-coloured liquid that you poor onto the end of the bolt before attaching the nut to it to make sure it won't loosen over time.


So each end looked like this. Thrilling, isn't it?


Oh but not before we had to grind off any excess on the reinforcement bar, because we'd bought long ones that would make two reo bars for us when cut in half. The fireworks made it a little more thrilling...


Here's Tom working on tightening the last bar...


This process is absolutely vital (and shouldn't have taken us this long to get to) to hold the two sides of the stairs together independently of the actual stair treads themselves. So as the timber expands and adapts to the weather over time, the two sides should stay held together nice and strong.

It's unfortunately one of the more boring improvements we've made lately (perhaps even more boring than re-hanging the back door to open outwards instead of inwards), but at least there were fireworks! And it may just have given us the kick up the backside that we need to finally get those stair railings completed! Here's hoping!

17 April, 2012

We Have Walls!

Well... not quite walls, but certainly the makings of walls!

I'm actually writing this post extremely belatedly. This was the last shot I showed you of the area under our house, on the long-awaited slab-pouring day.


What I failed to mention when I rejoiced that the slab was done, was that the next day we had carpenters on site! A builder that we had talked to about helping us with the renovation called that day, and said that he had a couple of "chippies" with no work to do that week, and asked if we were interested in them coming around. We agreed, and they arrived within an hour, and said they would start the next day!


Given that it took us 18 months of living in this house to get to the point of simply having the slab poured, all of this sudden progress was making our heads spin!


Allie wasn't affected.


The first carpenter day involved a lot of welding, because our structural engineer insisted that before the frame went up, all of our posts with their 'bolt-on' extensions (from when we had to re-raise the house because it wasn't raised high enough the first time) had to be welded... taking this...


To this.


Fortunately one of the three carpenters was a qualified welder, so Tom grinded off the little plates on either side of the post (that were bolted together holding the extension to the pole) and the carpenter followed with the welder to create a nice seam.


The other carpenters got to work measuring and marking where all of the walls had to go.


And then we experienced a pretty serious panic when we realised that two of our posts were actually positioned in the middle of rooms, instead of within the walls where they were supposed to be. We were pretty furious at the structural engineer who should have known exactly where the walls were going to be based on our original plans, which he had full access to. We'd just positioned them according to his plans when we hung them all. Silly us for assuming that he could read the building plans and position the posts accordingly! You can see both problem poles in in the shot above. One in the middle of the corridor, the other in line with it on the left in one of the future bedrooms.

Thankfully we managed to solve the problem by repositioning the poles along the beam that they were supporting into positions where they would be hidden within walls, and Tom grinded off the leftover little stumps in the middle of the concrete.


When we put flooring over the top in the future, it will be like those holes never existed.


And then, in what felt like no time, our downstairs area looked like this!


That shot above is with me standing in the future living area, looking at the front door.

This shot is taken afterI backed up a bit and turned a little to the left, showing that same living area.


Here I am standing in the garage looking at the kitchen on the right-hand side, and one of the bedrooms on the left (where one of the carpenters is standing on a beam).


And here, I'm standing in the kitchen, looking down the corridor. The bedroom from the shot above is off to the right, then there's the bathroom (where you can see the plumbing sticking out of the floor), and then there's the other bedroom further over. The garages are to the left.


This is the built-in wardrobe in that far bedroom.


And this is the view from the front yard, looking at the front door (with the window gap to the right of it now installed).


And this is the front wall on the other side of the front stairs, with the door to the garage.


I find it pretty incredible that I'm now talking about rooms downstairs! Isn't it amazing how fast walls go up?! Now we've just got to scrape together a small fortune to actually finish the thing!

One step at a time, as always. Perhaps some actual walls and doors and windows would be a good start.
Related Posts Plugin for WordPress, Blogger...