DIY Explanation

pour améliorer, meaning 'to improve', is a humble record of our renovation, home improvement and landscaping projects, with our travel adventures thrown in.

10 April, 2012

Who Needs a Man?

After the thrilling encounter that was re-hanging our back door to open outwards instead of inwards, we got back to what we really wanted to be doing - hanging trim on all of the rough edges in the kitchen. As you can see, this was still when the extra kitchen window near the oven wasn't fully cut through.


Our first area to tackle was the join between the original back wall of the kitchen and the little extension we built so long ago. More specifically, the long beam running along the back wall and the boards on the little angled roof. We used this scrap piece of timber to work out how to cut the back edge off so that it would fit snugly against both the beam and the angled roof.


And then Tom replicated that cut on the long piece of timber that we had bought for that purpose. Unfortunately I didn't get a photo of that.

And then weeks went by, and we got distracted doing other things.

Then last weekend, when both Tom and Daniel were working, I decided to take matters into my own hands. This unfinished job had been having over our heads too long! I could do, it right? Yes, although it did involve finding a few creative ways of propping up the pieces of timber without a second pair of hands, so I could get them screwed in.


Voila! It worked!


Unfortunately showing a play-by-play of this process is not particularly interesting. Not surprisingly, it essentially involved measuring, cutting, drilling, and screwing. Repeat.


So here we are with all of the under-beam pieces put in.


The corner where they all meet looked like this. Quite the mess. But no problem, if in doubt, put more trim on it!


So the next step was putting on the pretty trim that would cover over all the rest of those nasty joins. First of all, I had to measure the distance to one of the inside corners of the doorway...


And then mark that same distance on the back of the piece of trim (thankfully we had managed to find pre-made trim that matches all of the existing trim in the house when we were building the new doorway in my office).


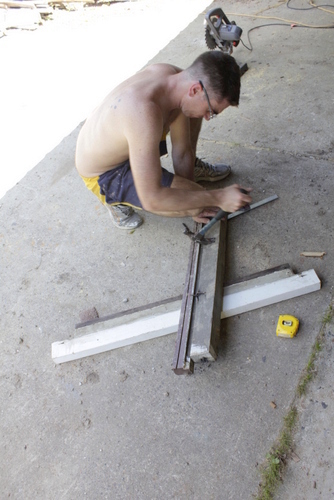
Then, to get the angle for the join at the corner, I used this contraption that we've been calling a set square, although I'm not sure that's the right name for it. It comes with a handy little 45-degree angle, so I lined the corner of that up with the mark I had made, and drew a line along the ruler at the correct angle.


Then, I cut through that line...


Leaving me with this once it was turned over. This was my first trim cut of the day, so it's probably not the most perfect one. But you get the idea.


Fortunately for me, it fit perfectly on the doorway. So I screwed it in.


And then repeated the process for the top trim as well.


Then I moved on to the other side of the doorway, and... surprise surprise, repeated the process yet again.


Until the opening between the dining room and kitchen looked like this!


How about a close-up shot?


Then I moved on to the other side, the beam running along the back of the kitchen (where tom had already put up the under-beam trim). My problem here was that wall is over 3-metres long, it was impossible for me to physically hold up both ends of a piece of trim at once, since obviously my arm-span is not quite 3-metres.

So, I got creative again, and fashioned my own leaning tower of various household items that could prop up my timber for me.


It worked! Who needs a man? Just give me an assortment of bins and storage containers and I can do it myself!


So, with my trusty tower holding up the other end, I could start screwing in the trim on the complicated corner. I had tried to be clever and cut the end of each piece of trim at an angle, so that they could slot together seamlessly in the very corner. Unfortunately I cut one slightly too short to make that effective, so I'll have to putty up that seam.


The final piece for the day was cornice for the back wall where the angled roof section met the vertical wall boards. Again, I found a scrap piece to help me figure out what I needed to do to make it fit properly, since the trim is designed to cover a 90-degree corner, whereas because of the angle of the ceiling, we were dealing with a larger angle than that.


I established that if I shaved off part of the back edge (where it meets the ceiling), it would sit closer, cutting back on the gap at the top (which you can see here because it's casting a little shadow on the ceiling board).


I wasn't confident enough to use a saw to cut off that edge, so I broke out the sander with some rough sandpaper, and sanded it. It did the job quite well, and by then it was a simple matter for me to attach the trim to the wall.


Conceptually, this process seemed very simple. And in practice it was too. But as we've discovered with most things we've attempted in this renovation, it takes a LONG time! I spent all day on this. And haven't even started on trimming the windows! Sigh.


Oh well, at least I've got a very clear before and after to reassure me that I've accomplished something!


 BEFORE                                                               AFTER

05 April, 2012

Hung Well

For quite a few weeks now, we've been wanting to get started on making this opening between the kitchen and dining room look a bit more finished. It's been looking like this for about a year and a half now, which is kind of disgraceful.


We started at the other end of the opening, near the back door, with attempting to cover up the big raw brown timber post.


As you can see here, it sits behind the level of the VJ boards. So, to cover it up, we cut a scrap VJ to the right size, and slotted it in.


And repeated the process with another smaller piece to finish it off. We weren't too worried about having a visible seam between the two, because we would eventually cover them up with timber trim.


And then we realised something. Because this was actually before we got our fancy new benchtops, and we knew that our plan was to have the benchtop overhang the back of the peninsula cabinets quite a bit, to allow for a breakfast bar, we realised that the door was going to be very much in the way.


This is because, at the time (pre-benchtop), the door hung inwards. That wasn't going to work, because it would crash straight into our benchtop overhang. In the long term, our plan is not to have a back door at all, but for the moment it's quite convenient being able to have easy access to the shed in the backyard. So, we decided to re-hang the door so that it would open outwards without interfering with our benchtop.


Tom removed the door (you can see this was while we were still halfway through opening up the second kitchen window) and turned the hinges around.


And then he cut some new notches in the doorframe, a bit further out...


so that the hinges would have enough room to allow the door to close properly in its new direction.


It was a two-person job to hold the door up in place to test whether it fitted nicely...


And then it was a relatively simple matter of screwing the hinges back into the doorframe. Although nothing's ever truly simple. There's always lots of mucking around to make sure things actually fit properly.


And now, with our new benchtop in, it looks like this!


Definitely not a dramatic change, but it allows us to keep using that door for a while rather than having to close the opening in immediately.


As happens so often in renovating, the job we started out doing ended up in an entirely different job. Hopefully next time we work on the kitchen trim we'll accomplish a bit more!

03 April, 2012

Seeking Symmetry

We're back in the kitchen again. This time looking at the wall that our oven sits against.


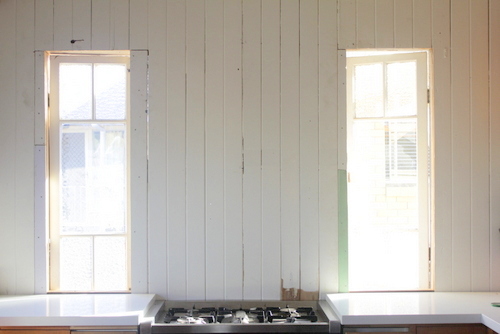
It used to look like this, before we closed in half of the existing window (and brought in cabinets and appliances that actually made it seem like a kitchen again).


From the very beginning, our kitchen plan has been to split that double window in half and separate the two panes so that they sit symmetrically on either side of the oven.


So, it was time to hack into the wall to open up the second little window half. We sawed through the wall at the same height as the top of the other window, and then started pulling out the VJ boards.


Until we were left with this.


And then we measured the exact distance between the edge of the stove and the right window, and marked the position of the left window so that it would be exactly the same distance from the stove.


And then Tom sawed through the line we'd marked on the external weatherboards, while I was on vacuum duty.


And then Tom climbed up a ladder to start pulling away the weatherboards from the outside.


Leaving us with this.


Tom then cut through the vertical beam that was now in the middle of our new window.


May I suggest that you don't try this particular method at home? Not the safest.


So that was the easy part, leaving us with two roughly matching openings in our wall.


Then came the hard part. Finishing it all off! First step was window sills. We had somehow managed to salvage two other chunky window sills from somewhere else in the house, so we carefully cut them down to size...


It took quite a bit of trial and error until we settled on the right angle to cut so that it would slot into the existing window space properly.


And then we just replicated it on the other side so that it slotted in nicely.


Please ignore the embarassing cluster of bolt holes in the window sill in this picture. We changed our minds about where to bolt it in, and you won't even know they're there once I get the putty happening. The real problem was the height difference between the top of the window sill and the top of our benchtop. There was no question that we'd need to put something in that gap to cover over the ugly tops of the VJs (sitting between the benchtop and the window sill), but it would need to be especially deep, so that it also covered the height difference.


After a bit of measuring, I drew this not-very-legible diagram.


We located a suitably large old piece of fence post in our timber pile, and Tom got to work with the circular saw, turning my concept into reality.


Thankfully it worked, and we then had a nice smooth piece of timber sitting just a little bit above the height of the bench, so it no longer looks so strange having the window sill significantly lower than the benchtop height.


Then it was time to finally make the windows look exactly the same, by framing up our new hole in the wall.


It too involved another complicated diagram from me. The issue was trying to make sure that there would not only be exactly enough room for each of the windows themselves, but that the inside edge of each would be the same distance from the edge of the stove. It sounds simple, but it was hard!


Tom got to work attaching some ply to the edges of our new window frame, to build it out just enough...


And we cut up some extra bits of VJ boards to cover over the exposed bits of frame. They will eventually be covered by trim. Oh, and we hung the windows!


It's so lovely finally having that window plan turn into a reality! It was a hard slog, but we got there! Now I can't wait to get some trim around those windows to really finish them off.

02 April, 2012

A Bit of Elbow Room

After the excitement of our 'Trash the Dress' photoshoot (for which I should hopefully have the rest of the photos soon), we're back to house jobs again!

This time, we're back to the house that we built for our fridge.


The poor fridge has never been able to slot all the way back into its house, because of these brackets that we put in to support the shelf above it. The one that currently holds all of my recipe books. And we couldn't just relocate that shelf upwards, because we wanted the shelf to line up with the bottom of the wall cabinets on either side of the fridge house.


The source of the problem was these elbows sitting on top, connecting the doors to the fridge itself. Because they sit just a little bit higher than the top of the fridge, they were colliding with our shelf brackets, meaning we could only push the fridge in as far as the back of the elbow.


So we pulled the fridge out. On a mat, of course. We didn't want to scratch our floor.


And we marked the size of the elbows on each of the shelf brackets.


And brought out the reticulating saw to chop out the corner that we'd marked.


Finishing it off with some chiseling.


The little piece that we chopped out looked pretty sad and sorry by the end. The reticulating saw burned its way through, leaving it a bit charred.


So about 20 minutes after we first started, we were finished (except that I still have to paint the bits we've exposed now)! We slid the fridge back into place, and it finally sits where it's supposed to, sitting out from the walls of its house only just enough for the doors to open freely.


It's definitely a snug fit! Hopefully future owners of this house have a smaller fridge!


It's not much of a before and after, but it has actually made quite a dramatic difference to how that side of the kitchen feels. That extra 10cm of space created by pushing the fridge all the way back has made the path into the kitchen just a bit roomier, which is great.

Related Posts Plugin for WordPress, Blogger...